ThreadX内核移植01
1. 移植方式
- 使用cubemx直接创建包含threadx的工程
- 移植非常非常简单
- 版本相对不是最新的
- 常用的芯片基本都支持
- 使用cubemx创建keil工程,然后手动移植
- 自己移植一遍会理解更多一点
- 版本选择更自由一点
- 使用cubemx创建gcc工程,然后手动移植
- 前面写FreeRTOS的时候用过这种方式,可以使用vscode编写确实舒服
鉴于这里第一次用这个,并且这个相对于其他系统来说,存在大量的汇编文件移植,而不是c源文件的方式,所以从最简单的入手:
先使用cubemx直接创建包含threadx的工程;
简单看明白工程怎么回事之后,使用cubemx创建基础工程,然后手动添加源码移植的方式;
然后再用gcc应该基本上就没啥差别了。
2. 资料准备
2.1 源码地址
如果想要自己手动移植,需要有源码包。
源码地址:https://github.com/eclipse-threadx/threadx/
不要直接在main分支下载,去release页面下载最新的源码,这里当前最新的是Eclipse ThreadX v6.5.1.202602a
刚开始这个项目属于Azure,发布的最后一个版本是6.4.0
后来项目捐给了eclipse基金会,开源了就,开源后的第一个版本为6.4.0
所以在release页面的list中还可以看到版本前面有
Eclipse或Azure前缀。
2.2 SDK包
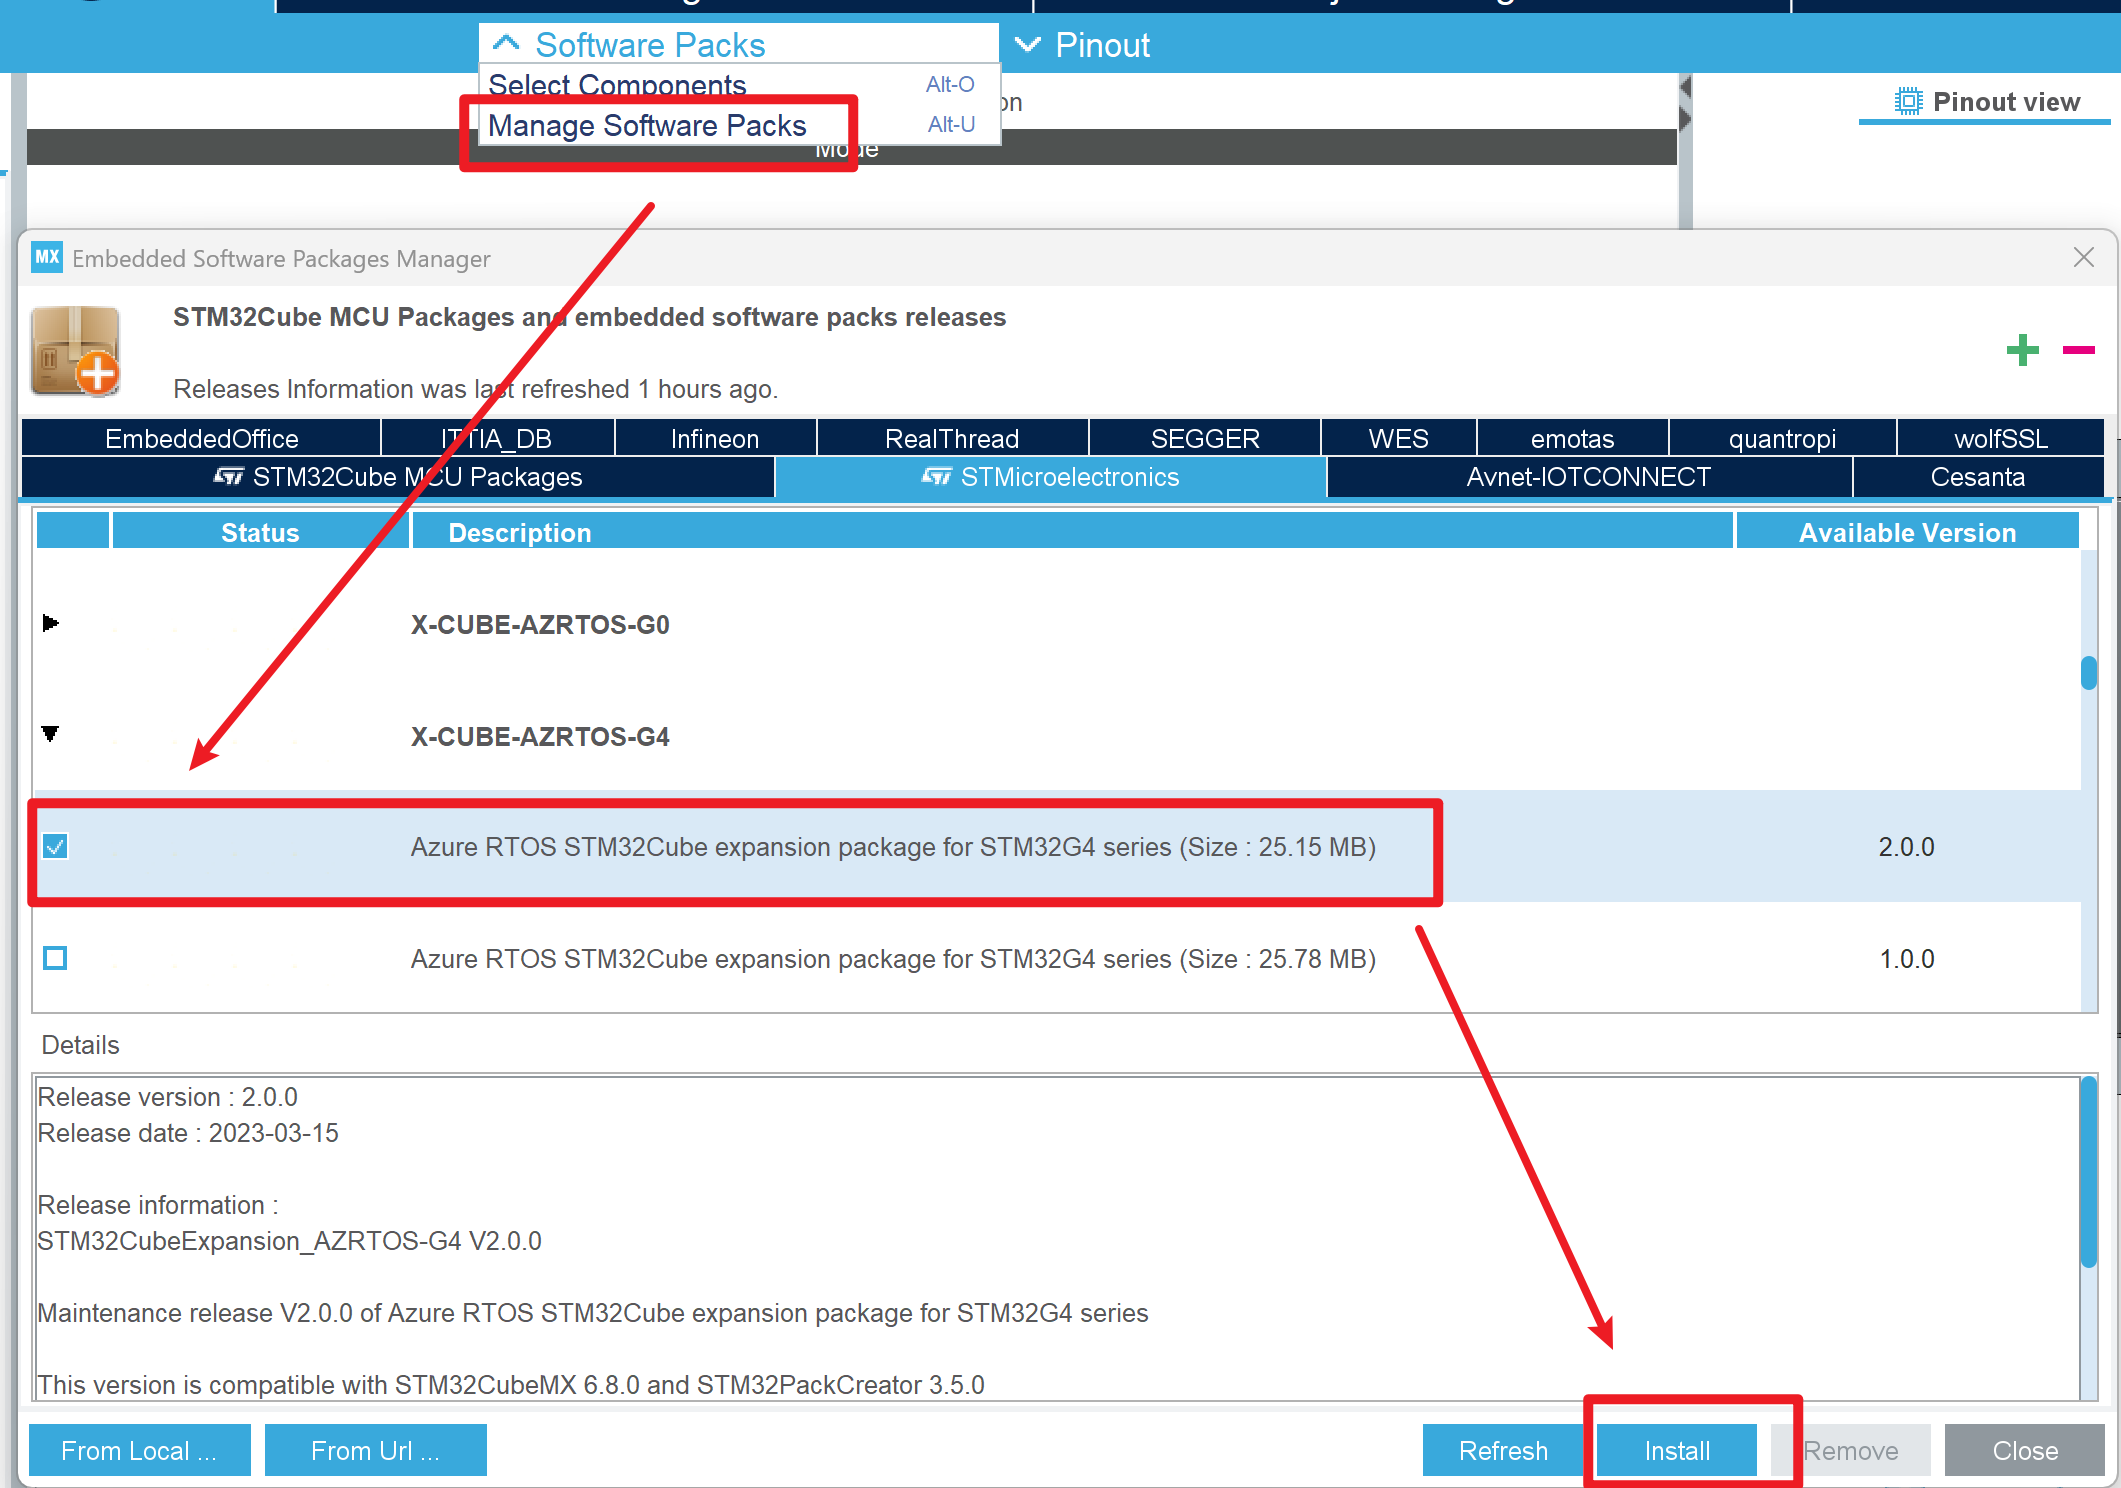
如果使用cubemx直接创建包含threadx的工程,则需要安装对应的包
使用目标芯片创建工程,然后在包管理界面直接找到使用的芯片对应的安装包,直接安装即可。
2.3 其他资料
这个系统相对FreeRTOS或者RT-Thread来说教程较少,目前只有安富莱对这个系统有部分教程和资料。
- https://forum.anfulai.cn/forum.php?spm=5176.28103460.0.0.72ab2988tgGOVA&mod=viewthread&tid=97925
- https://forum.anfulai.cn/forum.php?mod=viewthread&tid=99514
3. 使用CubeMX移植
3.1 移植过程
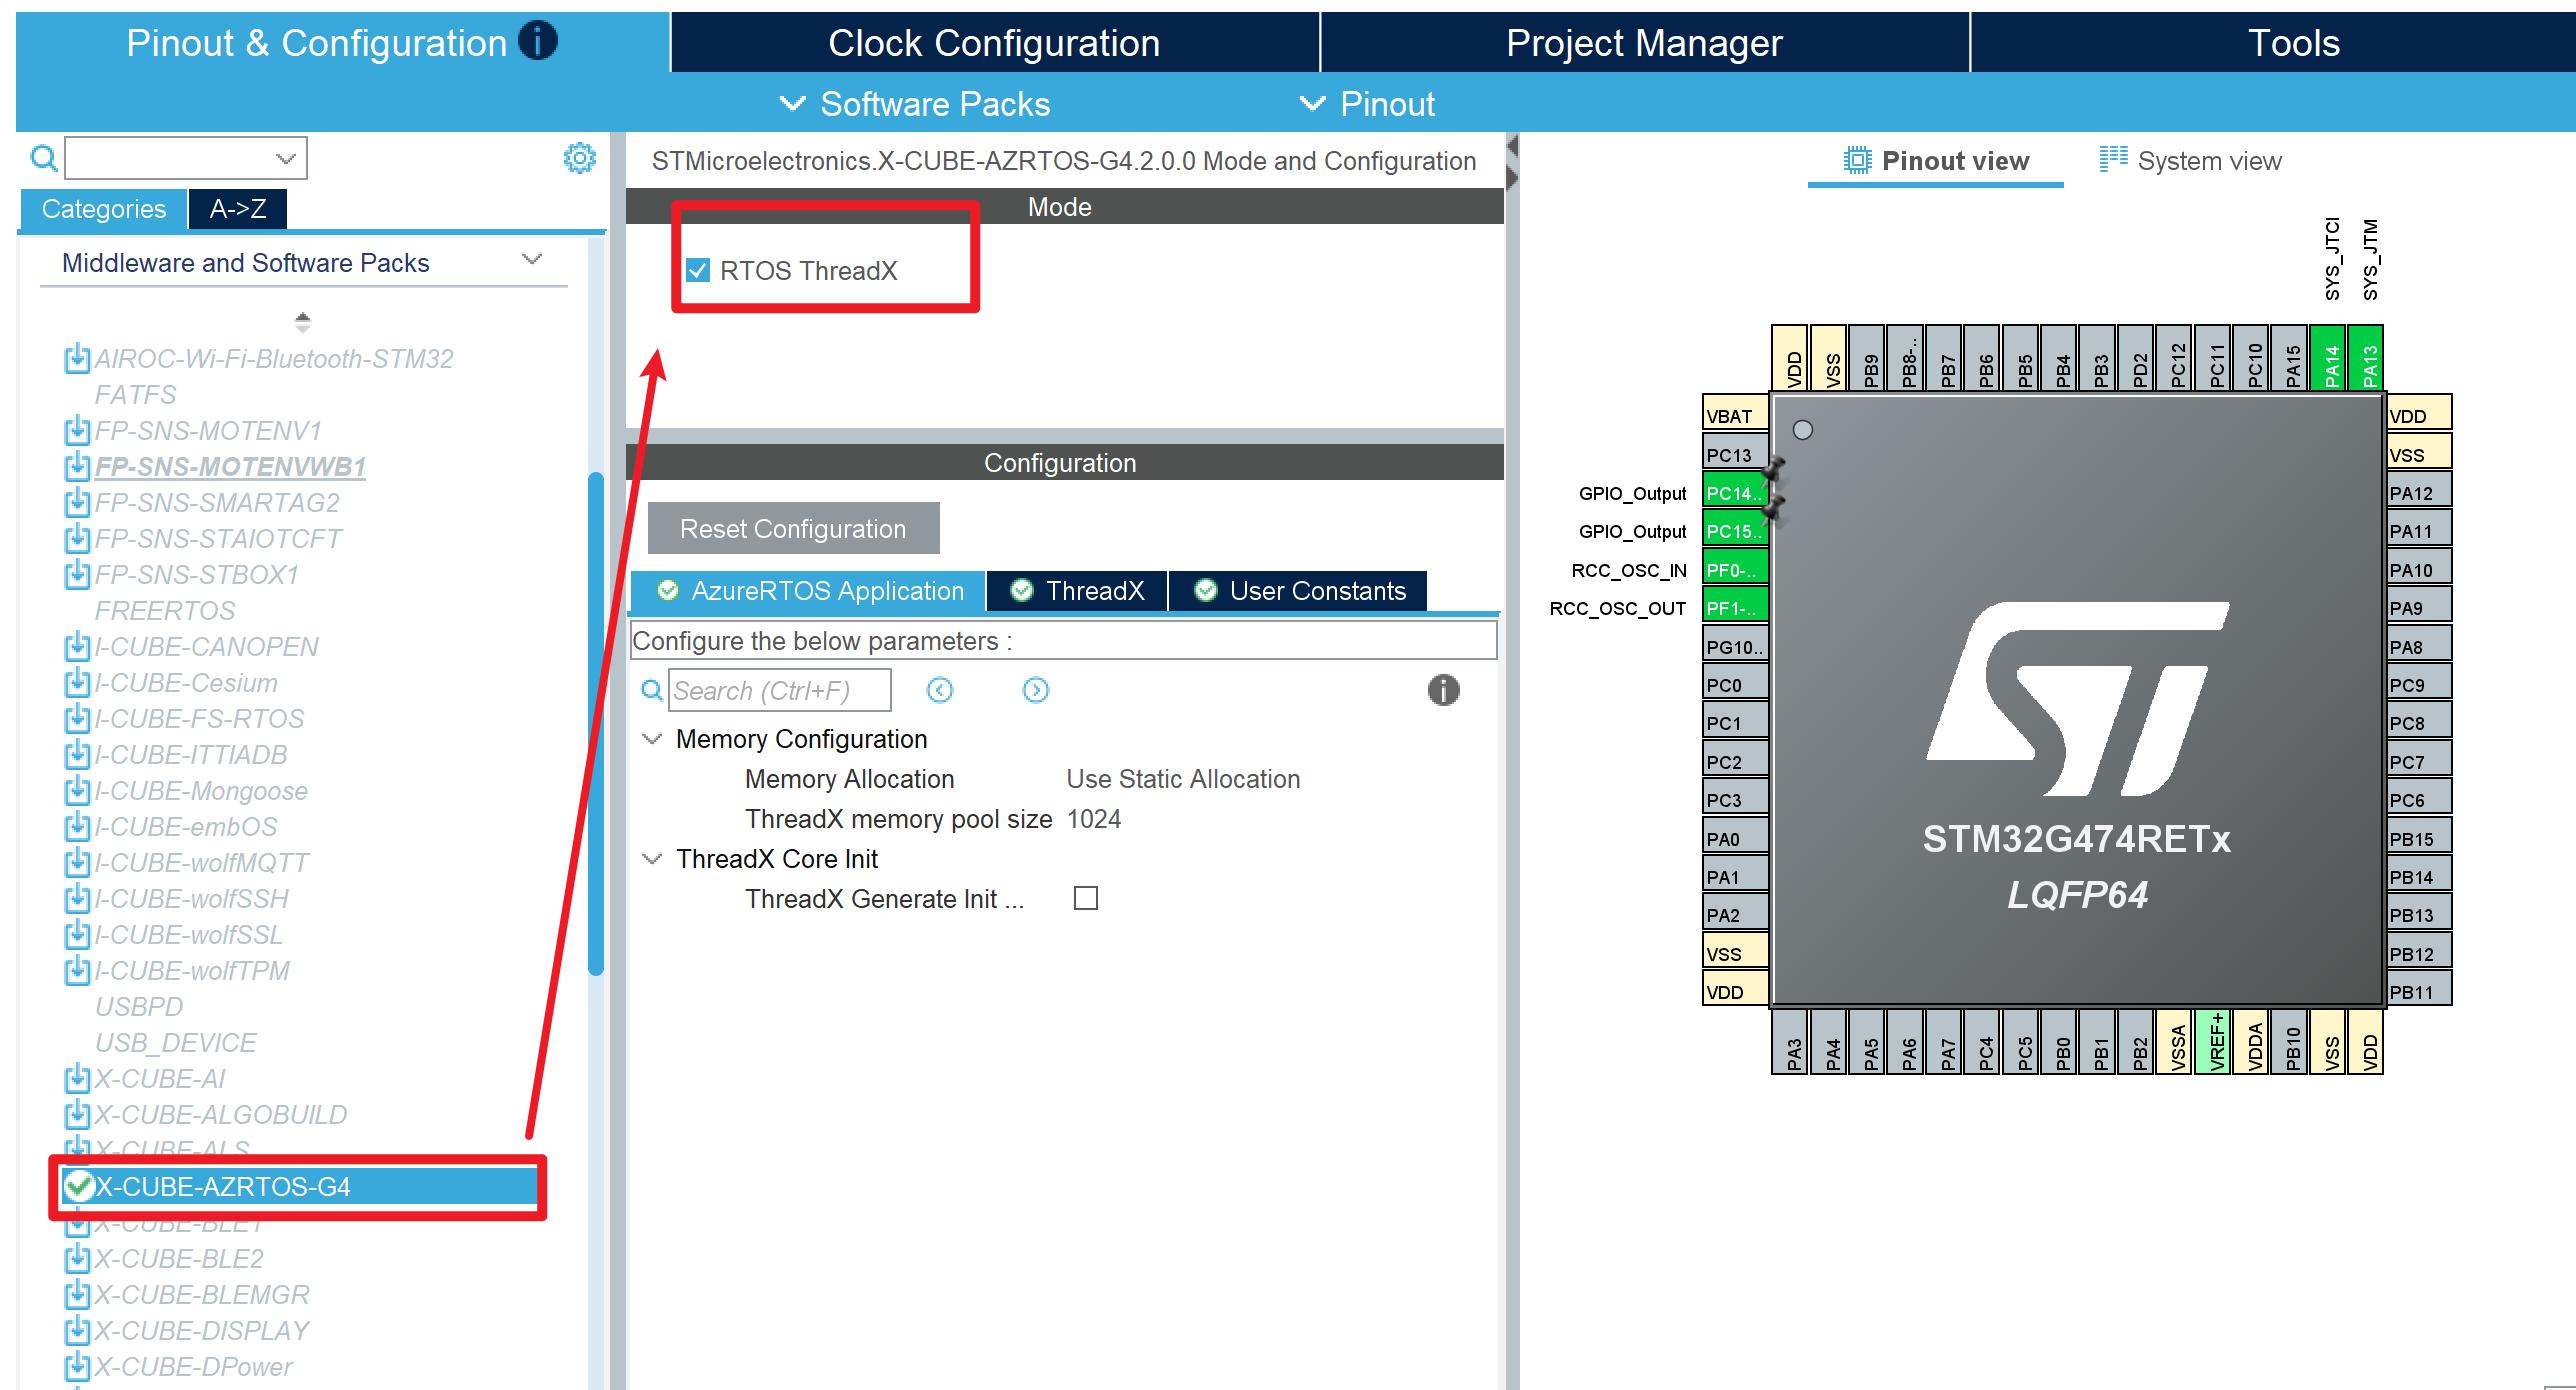
用这种方式移植简单的不像话。
正常配置工程后,直接勾选,参数全部默认即可。
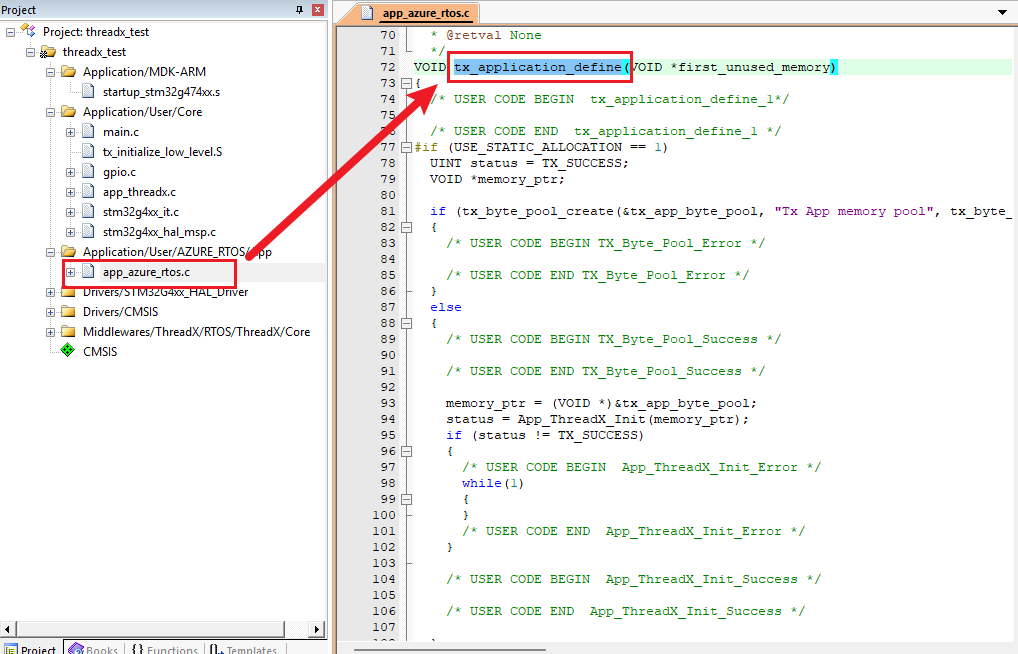
生成代码后,程序从main函数进入,最终会运行到下面这个函数开始应用程序。
我们需要把我们的逻辑放到这个函数里启动即可。
3.2 点灯任务
执行流程是这样的:
- main函数初始化外设之后,运行
MX_ThreadX_Init - 里面调用了
tx_kernel_enter,这个接口就是rtos提供的,是个宏定义,指向了_tx_initialize_kernel_enter - 全局搜索可以看到函数的定义的位置,需要注意的就下面两个接口,
tx_application_define就是系统留给用户的入口函数,所有的逻辑都可以从这里启动,这也就是上面的那个启动函数;然后_tx_thread_schedule就可以开始调度了。
VOID  _tx_initialize_kernel_enter(VOID)
{
	// ...

    /* Call the application provided initialization function.  Pass the
       first available memory address to it.  */
    tx_application_define(_tx_initialize_unused_memory);

	// ...

    /* Enter the scheduling loop to start executing threads!  */
    _tx_thread_schedule();

}
也就是说这个系统已经把用户入口写好了,而不是让用户自己在调度之前在任意地方创建任务。
添加一个点灯任务,直接写在app_azure_rtos.c这个文件中。编译运行后即可看到LED闪烁。
#include "gpio.h"

TX_THREAD		thread_0;
UCHAR 			thread_0_area[1024] = {0};
void thread_0_entry(ULONG thread_input)
{
    while(1)
    {
        HAL_GPIO_WritePin(GPIOC, GPIO_PIN_14|GPIO_PIN_15, GPIO_PIN_RESET);
        tx_thread_sleep(1000);

        HAL_GPIO_WritePin(GPIOC, GPIO_PIN_14|GPIO_PIN_15, GPIO_PIN_SET);
        tx_thread_sleep(1000);
    }
}

// 直接把这个函数内的内容全部注释掉  只写个启动函数即可
VOID tx_application_define(VOID *first_unused_memory)
{
	tx_thread_create(&thread_0, "thread 0",		// 任务控制块和任务名
                     thread_0_entry, 0,			// 任务入口和任务参数
                     thread_0_area, 1024,		// 任务堆栈和大小
                     1, 1,						// 优先级和任务抢占阈值
                     TX_NO_TIME_SLICE,			// 不开启时间片
                     TX_AUTO_START);			// 立即启动
}
3.3 底层驱动
一般移植RTOS主要需要移植的几个接口
- 定时器中断,提供时钟的
- SVC中断,特权级别切换
- PendSV中断,上下文切换
使用cubemx配置threadx时,这三个接口就默认不会生成了,而是直接使用的系统自带的了。
系统自带的这些接口,使用汇编写法写在文件tx_initialize_low_level.S中,这也是后面手动移植的话需要自己处理的一个文件。
文件开头有这么一段,定义了这几个接口
    .global     _tx_thread_system_stack_ptr
    .global     _tx_initialize_unused_memory
    .global     _tx_timer_interrupt
    .global     __main
    .global     __tx_SVCallHandler
    .global     __tx_PendSVHandler
    .global     __tx_NMIHandler                     @ NMI
    .global     __tx_BadHandler                     @ HardFault
    .global     __tx_SVCallHandler                  @ SVCall
    .global     __tx_DBGHandler                     @ Monitor
    .global     __tx_PendSVHandler                  @ PendSV
    .global     __tx_SysTickHandler                 @ SysTick
    .global     __tx_IntHandler                     @ Int 0
.global __Vectors比如滴答定时器中断,这里又调用了_tx_timer_interrupt,然后这个接口又定义在其他文件中,也是使用汇编实现了滴答定时器的功能。
@ /* System Tick timer interrupt handler */
    .global  __tx_SysTickHandler
    .global  SysTick_Handler
    .thumb_func
__tx_SysTickHandler:
    .thumb_func
SysTick_Handler:
@ VOID TimerInterruptHandler (VOID)
@ {
@
    PUSH    {r0, lr}
#ifdef TX_EXECUTION_PROFILE_ENABLE
    BL      _tx_execution_isr_enter             @ Call the ISR enter function
#endif
    BL      _tx_timer_interrupt
#ifdef TX_EXECUTION_PROFILE_ENABLE
    BL      _tx_execution_isr_exit              @ Call the ISR exit function
#endif
    POP     {r0, lr}
    BX      LR
@ }注意:在其他RTOS系统中,很多时候是可以裸机系统和RTOS共用一个滴答定时器来提供时钟的,但是在这里threadx直接使用汇编重新写了这个接口,因此延时只能使用它提供的延时函数tx_thread_sleep,如果用户还是直接调用HAL_Delay接口或者依赖此接口的函数,其实会直接原地卡死的。
    while(1)
    {
        HAL_GPIO_WritePin(GPIOC, GPIO_PIN_14|GPIO_PIN_15, GPIO_PIN_RESET);
        tx_thread_sleep(1000);
        // HAL_Delay(500);

        HAL_GPIO_WritePin(GPIOC, GPIO_PIN_14|GPIO_PIN_15, GPIO_PIN_SET);
        tx_thread_sleep(1000);
        // HAL_Delay(500);
    }
解决办法:
- 配置裸机系统其他的定时器作为时钟源(推荐)
- 自己重写
HAL_Delay接口(安富莱教程里有这个案例)
4. cubemx手动移植
手动移植其实也不难,和FreeRTOS相比甚至文件更简单,只是有几个汇编文件需要改一下,而不是改c源文件,有点烦,可读性就差点意思。
4.1 创建工程
使用cubemx创建一个工程
时钟源选择一个基础定时器,这里选择
TIM6(因为这个定时器看起来最没其他用)生成的工程类型选择
makefile,如果使用keil选择MDK_ARM这里配置一个LED和USART1用于创建一个任务测试
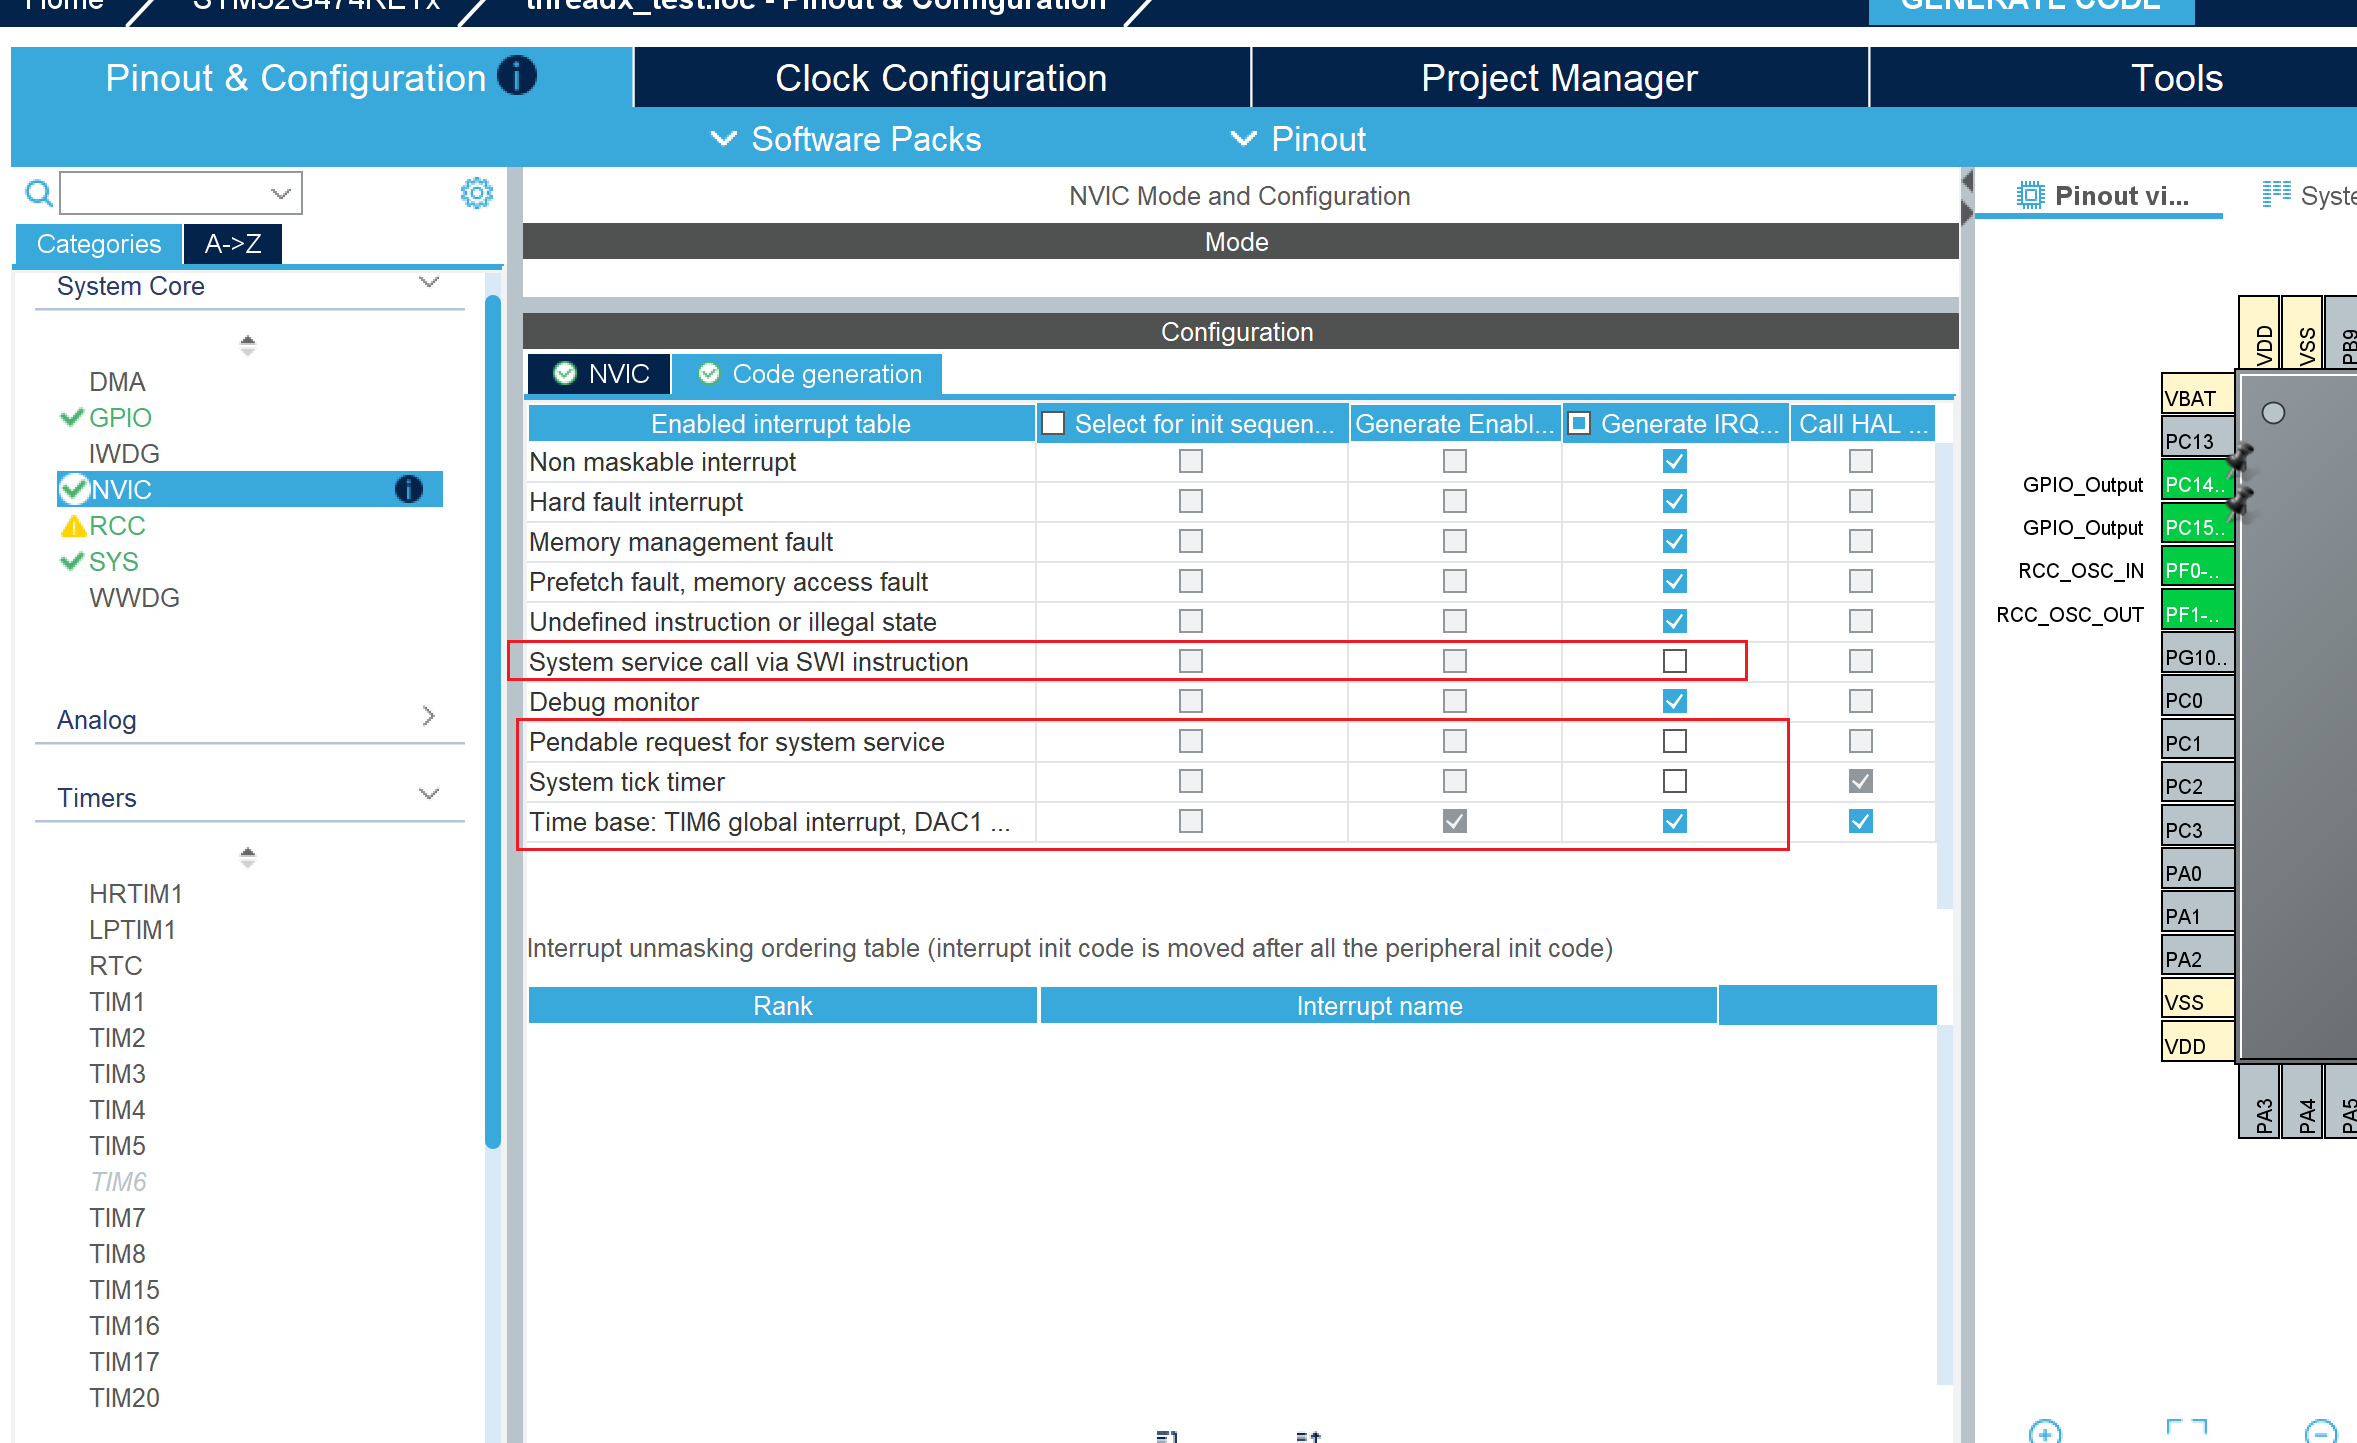
取消三个中断函数生成的代码
PendSV_HandlerSVC_HandlerSysTick_Handler
HAL库本身的时钟源,非必须配置,但是推荐,如果不设置
HAL_Delay相关的接口都无法使用,很多外设操作接口内部其实都可能用到。
4.2 添加源码
将下载的源码中的这个文件夹直接copy到我们的工程下,这里在工程文件夹创建一个ThreadX文件夹,然后把内核源码文件夹直接放进去
经过处理后的最终目录如下
C:\Users\XX\Desktop\threadx_test\ThreadX\threadx-6.5.1>tree /F
卷 Windows 的文件夹 PATH 列表
卷序列号为 00000091 9457:6479
C:.
├─common
│  │  CMakeLists.txt
│  │
│  ├─inc
│  │      tx_api.h
│  │      tx_block_pool.h
│  │      tx_byte_pool.h
│  │      tx_event_flags.h
│  │      tx_initialize.h
│  │      tx_mutex.h
│  │      tx_queue.h
│  │      tx_semaphore.h
│  │      tx_thread.h
│  │      tx_timer.h
│  │      tx_trace.h
│  │      tx_user_sample.h
│  │
│  └─src
│          txe_block_allocate.c
│          xxx太多了省略
│          tx_trace_user_event_insert.c
│
└─ports
    └─cortex_m4
        └─ac6
            ├─inc
            │      tx_port.h
            │
            └─src
                    tx_initialize_low_level.S
                    tx_misra.S
                    tx_thread_context_restore.S
                    tx_thread_context_save.S
                    tx_thread_interrupt_control.S
                    tx_thread_interrupt_disable.S
                    tx_thread_interrupt_restore.S
                    tx_thread_schedule.S
                    tx_thread_stack_build.S
                    tx_thread_system_return.S
                    tx_timer_interrupt.S
说明:
common文件夹下的文件全部保留ports文件夹下只保留目标内核的文件夹,这里为cortex_m4cortex_m4文件夹下只保留我们使用的编译器的文件夹(最新版的keil一般是ac6,如果使用vscode开发使用交叉编译器则为gcc)ac6文件夹下保留src和inc全部ac6文件夹下将里面的example_build\sample_threadx文件夹下的tx_initialize_low_level.S也复制到src文件夹下ac6文件夹下将里面的example_build\sample_threadx文件夹下的sample_threadx.c可以留着备用(里面有个创建任务的demo)
其余的就可以删了。
有个
tx_misra.S文件好像没啥用,添加进去编译会有个提示,不添加也没啥影响。这里没删除,但是也没添加到工程编译。
4.3 适配工作
添加代码
- 将
threadx_test\ThreadX\threadx-6.5.1\common\src和threadx_test\ThreadX\threadx-6.5.1\ports\cortex_m4\ac6\src文件夹下的内容全部添加到工程; - 将
threadx_test\ThreadX\threadx-6.5.1\common\inc和threadx_test\ThreadX\threadx-6.5.1\ports\cortex_m4\ac6\inc文件夹添加到头文件目录
添加完成后如下图所示,
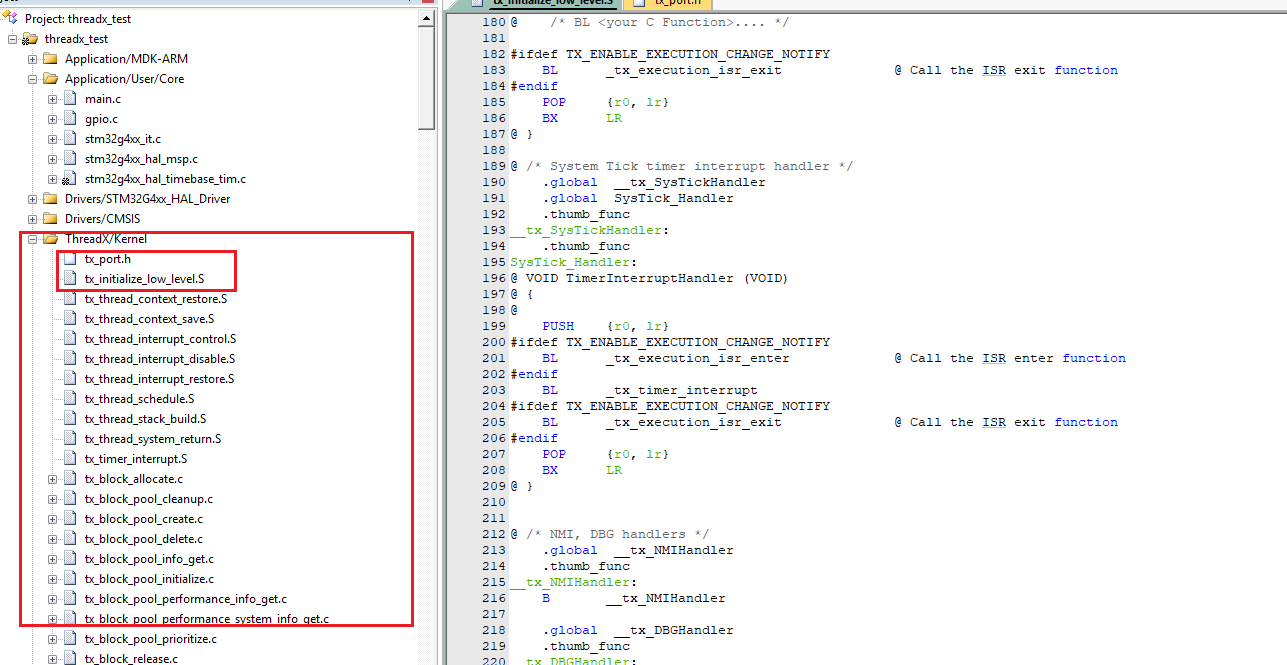
这里tx_initialize_low_level.S是我们需要适配的文件,tx_port.h是在目录threadx_test\ThreadX\threadx-6.5.1\ports\cortex_m4\ac6\inc下,后面也可能需要配置,这里添加进来好找。
版本bug
这里release的版本代码里有个bug,这段写了两次,编译会报错,把重复的部分删掉就可以了
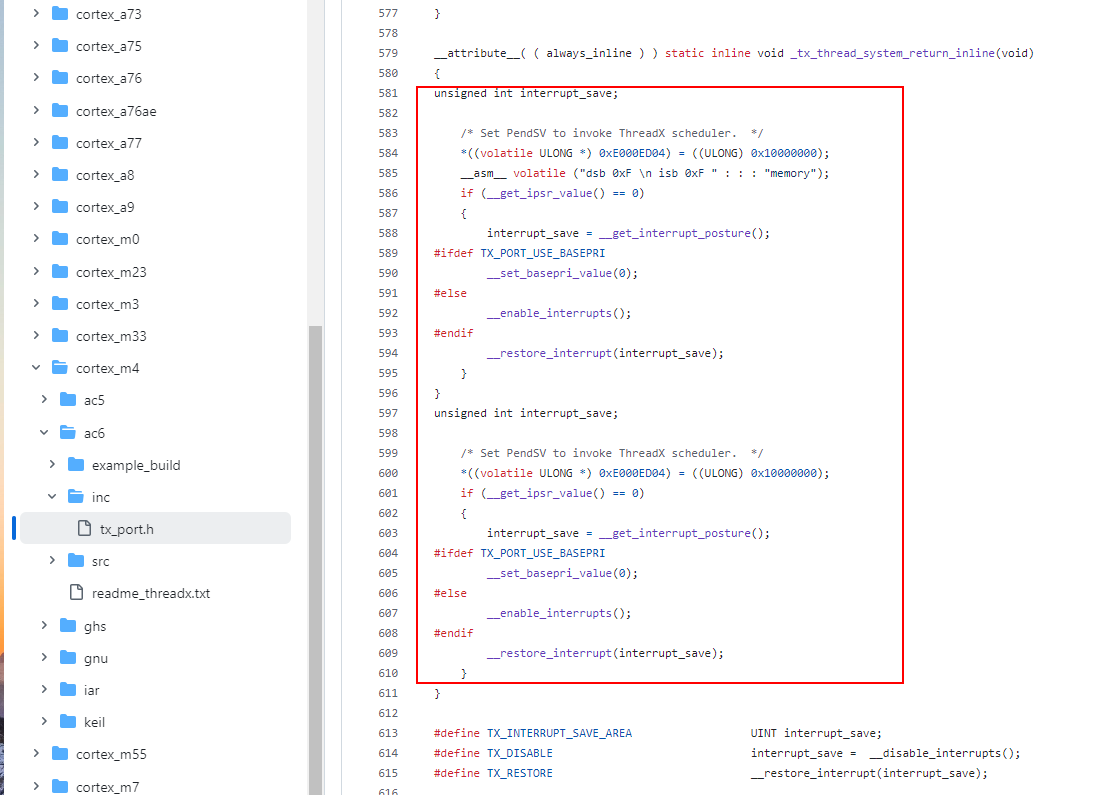
完整的这段是这样的,注释掉下面部分就可以了。
__attribute__( ( always_inline ) ) static inline void _tx_thread_system_return_inline(void)
{
unsigned int interrupt_save;

    /* Set PendSV to invoke ThreadX scheduler.  */
    *((volatile ULONG *) 0xE000ED04) = ((ULONG) 0x10000000);
    __asm__ volatile ("dsb 0xF \n isb 0xF " : : : "memory");
    if (__get_ipsr_value() == 0)
    {
        interrupt_save = __get_interrupt_posture();
#ifdef TX_PORT_USE_BASEPRI
        __set_basepri_value(0);
#else
        __enable_interrupts();
#endif
        __restore_interrupt(interrupt_save);
    }
}
//unsigned int interrupt_save;

//    /* Set PendSV to invoke ThreadX scheduler.  */
//    *((volatile ULONG *) 0xE000ED04) = ((ULONG) 0x10000000);
//    if (__get_ipsr_value() == 0)
//    {
//        interrupt_save = __get_interrupt_posture();
//#ifdef TX_PORT_USE_BASEPRI
//        __set_basepri_value(0);
//#else
//        __enable_interrupts();
//#endif
//        __restore_interrupt(interrupt_save);
//    }
//}
适配
主要是tx_initialize_low_level.S这个文件
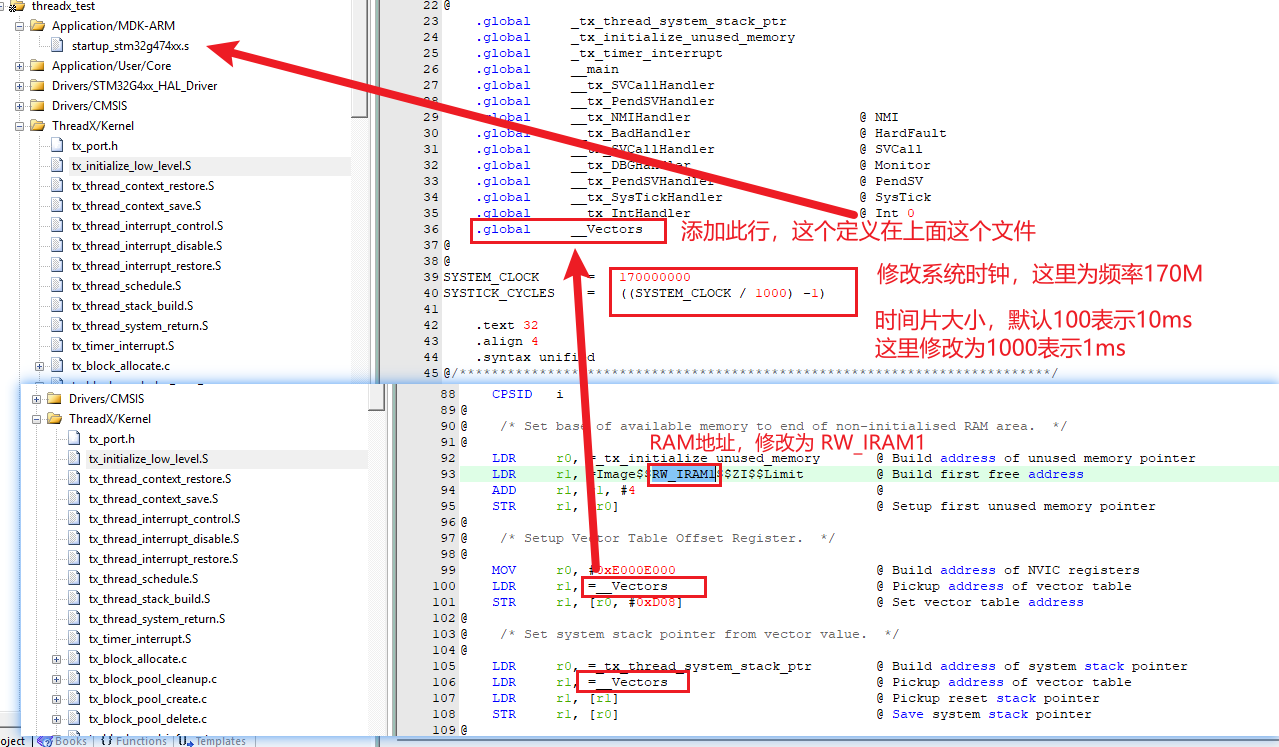
修改到的片段如下
片段1
    .global     _tx_thread_system_stack_ptr
    .global     _tx_initialize_unused_memory
    .global     _tx_timer_interrupt
    .global     __main
    .global     __tx_SVCallHandler
    .global     __tx_PendSVHandler
    .global     __tx_NMIHandler                     @ NMI
    .global     __tx_BadHandler                     @ HardFault
    .global     __tx_SVCallHandler                  @ SVCall
    .global     __tx_DBGHandler                     @ Monitor
    .global     __tx_PendSVHandler                  @ PendSV
    .global     __tx_SysTickHandler                 @ SysTick
    .global     __tx_IntHandler                     @ Int 0
	.global     __Vectors
@
@
SYSTEM_CLOCK      =   170000000
SYSTICK_CYCLES    =   ((SYSTEM_CLOCK / 1000) -1)

    .text 32
    .align 4
    .syntax unified
片段2
    LDR     r0, =_tx_initialize_unused_memory       @ Build address of unused memory pointer
    LDR     r1, =Image$$RW_IRAM1$$ZI$$Limit 		@ Build first free address
    ADD     r1, r1, #4                              @
    STR     r1, [r0]                                @ Setup first unused memory pointer
4.4 配置文件
配置项主要在tx_port.h文件下,另外还有一个,在这个文件和其他文件中都有一段
#ifdef TX_INCLUDE_USER_DEFINE_FILE

/* Yes, include the user defines in tx_user.h. The defines in this file may
   alternately be defined on the command line.  */

#include "tx_user.h"
#endif也就是说可以通过这个宏定义再使能是个头文件,这个头文件也有个demo,文件在threadx_test\ThreadX\threadx-6.5.1\common\inc\tx_user_sample.h。这个文件内提供了模板,但是所有内容都是被注释的,因此直接添加进去也不会有影响。
如果需要使能这个配置文件的话,可以在keil软件的Define配置中添加一个TX_INCLUDE_USER_DEFINE_FILE宏定义,然后把这个文件tx_user_sample.h的后缀去掉就可以了。
也可以把这个文件也添加到工程目录,方便修改。
完成后效果如下图所示(注意宏定义之间要添加逗号)
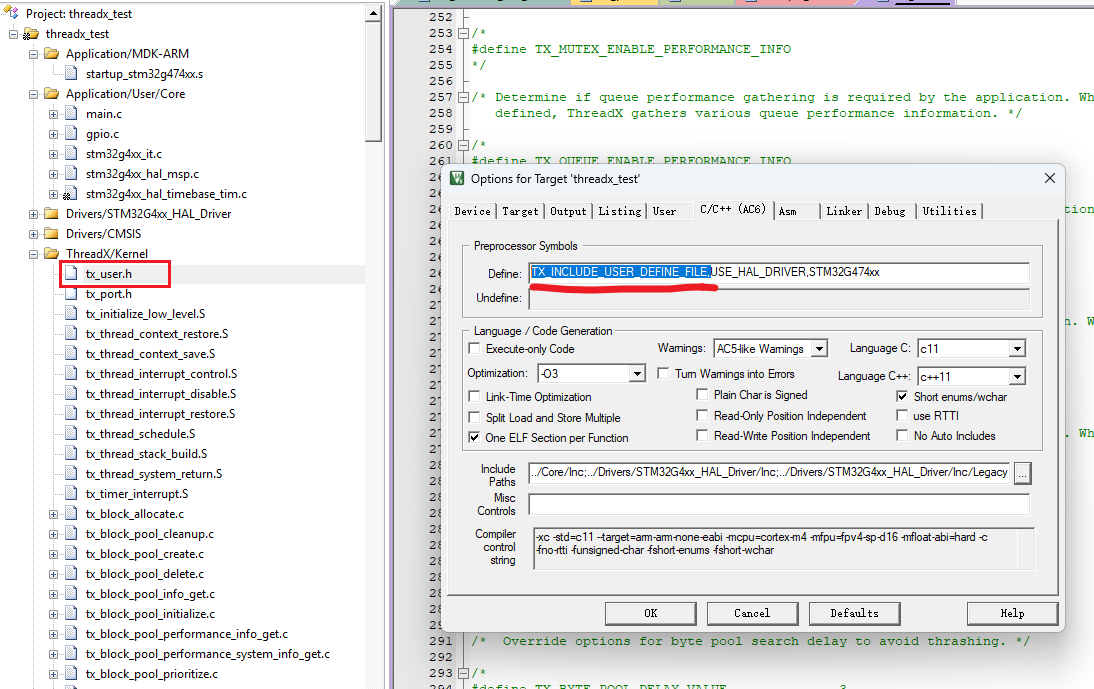
4.5 配置内容
具体的配置内容暂时我也不知道有啥,等学完了内核使用应该就知道怎么配置了。
4.6 点灯任务
在main函数中,添加启动内核接口tx_kernel_enter
#include "tx_api.h"

int main(void)
{
  HAL_Init();
  SystemClock_Config();

  MX_GPIO_Init();
  /* USER CODE BEGIN 2 */

	/* Enter the ThreadX kernel.  */
    tx_kernel_enter();

  /* USER CODE END 2 */

  /* Infinite loop */
  /* USER CODE BEGIN WHILE */
  while (1)
  {
    /* USER CODE END WHILE */

    /* USER CODE BEGIN 3 */
  }
  /* USER CODE END 3 */
}前面说threadx_test\ThreadX\threadx-6.5.1\ports\ac6\example_build\sample_threadx文件夹下的sample_threadx.c可以留着备用。
把这个文件放到应用程序适合的位置,并添加到工程,删掉文件中的main函数,里面定义了tx_application_define接口,并且启动了多个demo任务。
这里将他的任务注释掉,然后改成自己的点灯任务即可。
// 参考3.2小节的点灯任务,或者把他的demo任务中的while修改为点灯即可。
至此,编译烧录点灯应该就可以完成了(如果编译还报错,在keil配置中把编译器修改为AC6,可能默认生成的是AC5编译的)。
第一天写到这里了,感觉这系统因为汇编的原因,相对于FreeRTOS,多少还是有点不好用。