fatfs文件系统移植
使用的开发板:RTT&正点原子的潘多拉loT Board开发板、普中Z-100开发板。主控:STM32L475VET6、STM32F103ZET6
软件:CubeMX 6.7.0、Keil 5.38、FatFs R0.15
学习路线:
- 学会FATFS文件系统的移植;
- 学会API的使用;
第一部分:移植
FatFs 是一个通用的文件系统(FAT/exFAT)模块,用于在小型嵌入式系统中实现FAT文件系统。
FatFs 组件的编写遵循ANSI C(C89),完全分离于磁盘 I/O 层l,因此不依赖于硬件平台。它可以嵌入到资源有限的微控制器中,如 8051, PIC, AVR, ARM, Z80, RX等等,不需要做任何修改。
1. 准备源码
FATFS网站:http://elm-chan.org/fsw/ff/00index_e.html
从官网中即可下载源码。这里选择最新版本R0.15。
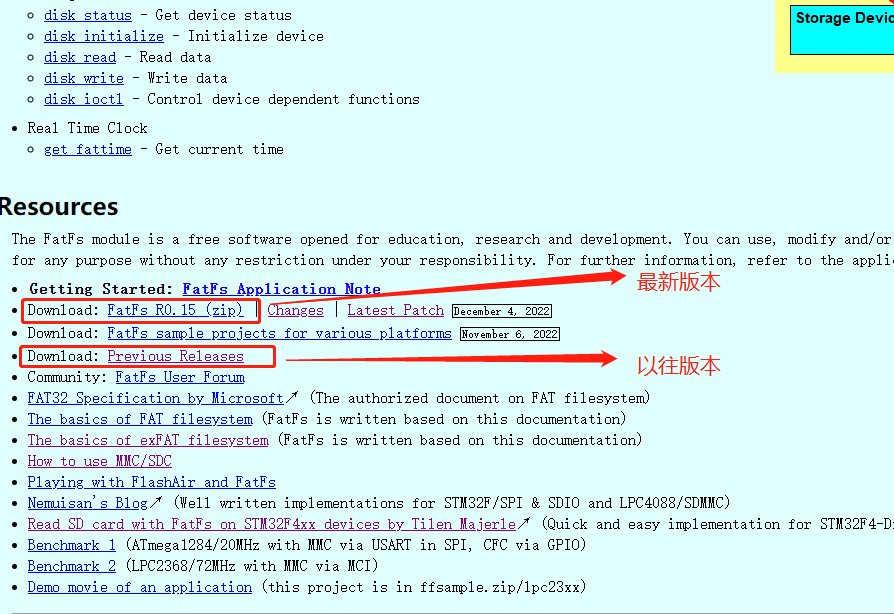
下载压缩包解压后目录如下:
- ff15
- documents(官网网页,没啥用可删除)
- source(源码)
diskio.c \ diskio.h- ``ff.c \ ff.h`
ffconf.h- ``ffsystem.h`
ffunicode.c- 00history.txt
- 00readme.txt
- LICENSE.txt(开源协议)
其中:
- ff.c / ff.h:文件系统协议层,几乎不用修改;
- ffconf.h:FatFs模块的配置文件;
- diskio.c \ diskio.h:将现有磁盘I/O模块连接到FatFs的粘合功能,即适配低层硬件接口读写操作,是主要移植修改的重点;
- ffunicode.c:字符编码层,可以选择utf8、ascii、GBK。根据需要选择。
- ffsystem.c:可选O/S相关功能的示例。
这是 FatFs 官方所提供的程序之间的依赖网络。其中虚线框不是必须的,为用户自行编写定义。
在官方提供的文件中,ff.c、ff.h、diskio.h 是不需要操作的。
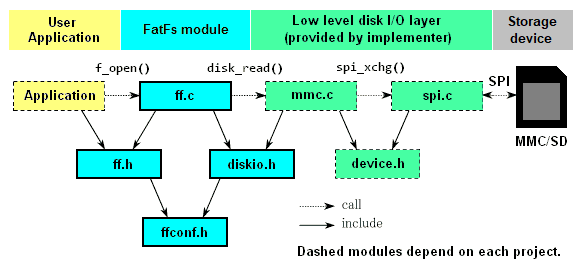
需要修改的有:
- ffconf.h:通过修改其中的宏定义可裁剪 FatFs 的部分功能。
- diskio.c:底层驱动函数。
具体文件如何配置或修改看移植部分。
2. TF卡 SDIO 模式移植(尚有问题未解决)
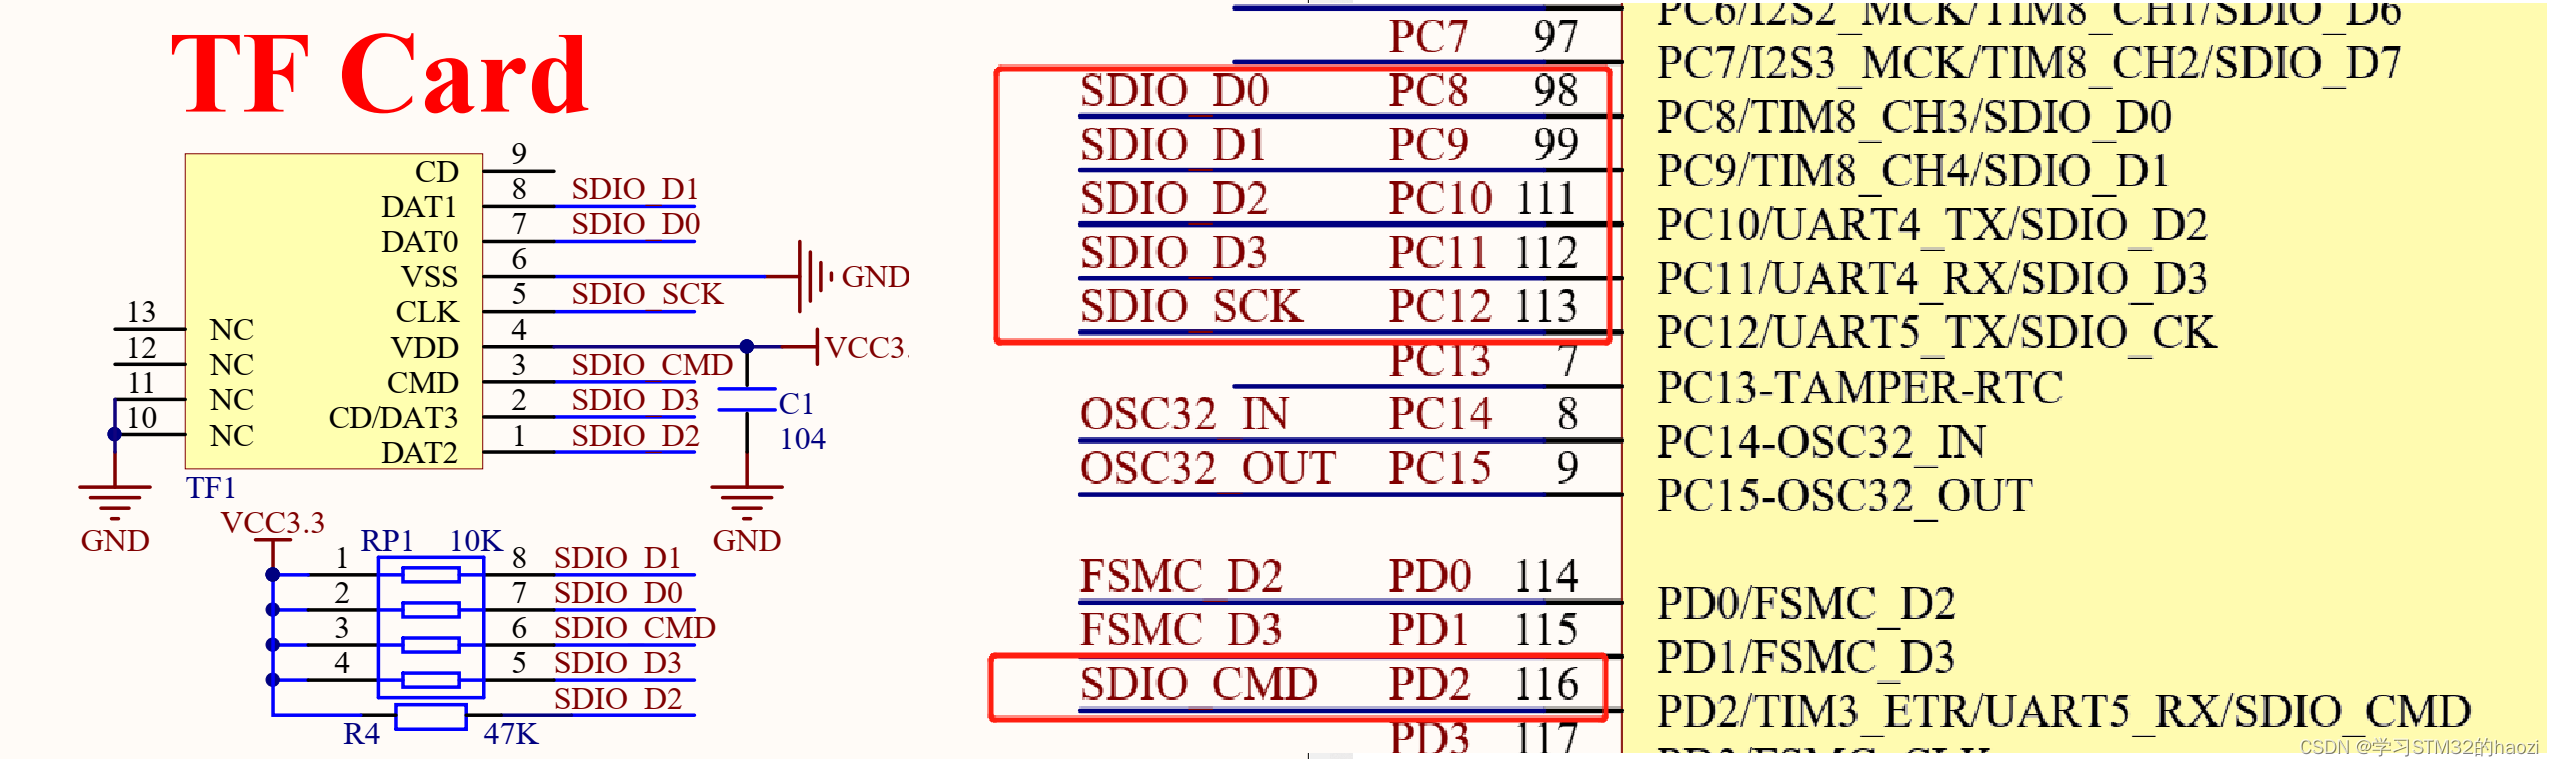
这里使用普中Z-100开发板,主控芯片为STM32F103ZET6。开发板上TF卡与主控的通信采用SDIO通信。
原理图如下:
2.1 创建工程
使用CubeMX创建一个工程。需要配置的项目有:
- 时钟
- 程序调试接口
- 串口(用于观察调试信息)
- SDIO接口(带DMA)
其中 SDIO 接口的配置如下:
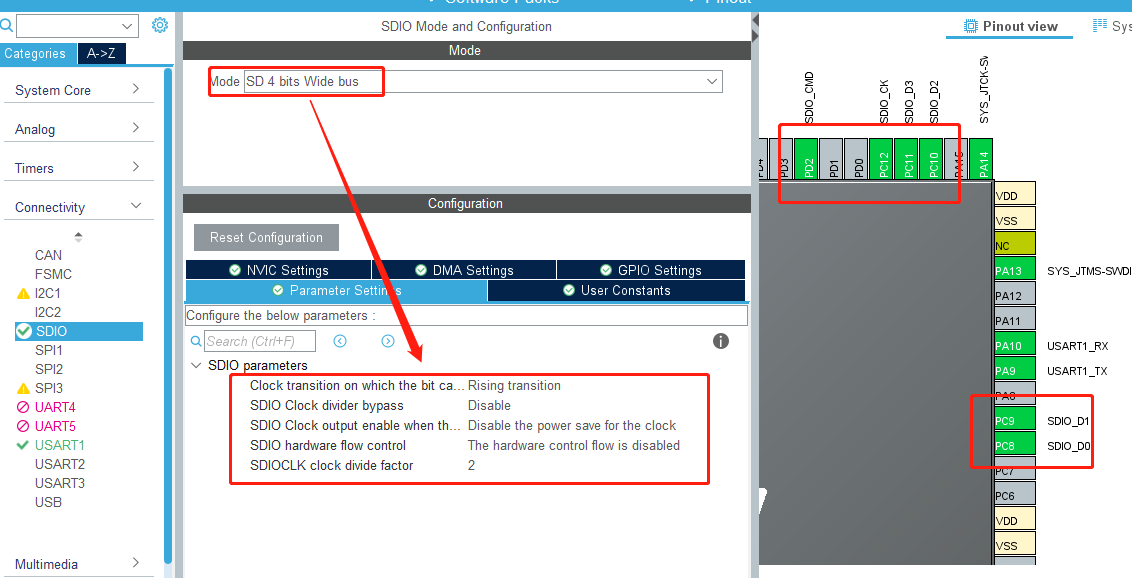
Clock transition on which the bit capture is made:
Rising transition。主时钟 SDIOCLK 产生 CLK 引脚时钟有效沿选择,可选上升沿或下降沿,它设定 SDIO 时钟控制寄存器(SDIO_CLKCR)的 NEGEDGE 位的值,一般选择设置为上升沿。SDIO Clock divider bypass:
Disable。时钟分频旁路使用,可选使能或禁用,它设定 SDIO_CLKCR 寄存器的 BYPASS 位。如果使能旁路,SDIOCLK 直接驱动 CLK 线输出时钟;如果禁用,使用 SDIO_CLKCR 寄存器的 CLKDIV 位值分频 SDIOCLK,然后输出到 CLK 线。一般选择禁用时钟分频旁路。SDIO Clock output enable when the bus is idle:
Disable the power save for the clock。节能模式选择,可选使能或禁用,它设定 SDIO_CLKCR 寄存器的 PWRSAV 位的值。如果使能节能模式,CLK 线只有在总线激活时才有时钟输出;如果禁用节能模式,始终使能 CLK 线输出时钟。SDIO hardware flow control:
The hardware control flow is disabled。硬件流控制选择,可选使能或禁用,它设定 SDIO_CLKCR 寄存器的 HWFC_EN 位的值。硬件流控制功能可以避免 FIFO 发送上溢和下溢错误。SDIOCLK clock divide factor:
2。时钟分频系数,它设定 SDIO_CLKCR 寄存器的 CLKDIV 位的值,设置 SDIOCLK 与 CLK 线输出时钟分频系数:CLK 线时钟频率=SDIOCLK/([CLKDIV+2])。
SDIO相关的时钟分为两部分:
SDIO适配器时钟(SDIOCLK),用于驱动SDIO适配器,可用于产生SDIO_CK时钟。在STM32F1中,SDIOCLK来自HCLK(72MHz)。改时钟经过上述的分频后产生SDIO_CK时钟。
AHB总线接口时钟(HCLK/2),该时钟用于驱动SDIO的AHB总线接口,其频率为HCLK/2(36MHz)()在cubemx时钟配置页面可以看得到。
需要注意的是,不同的SD卡对时钟的最高频率范围不同。因此建议将**SDIOCLK clock divide factor:**从0开始慢慢增大试试,可以读写数据成功即可。
我这里用的卡,经过测试设置为0时,卡信息读写成功,数据读写失败。设置为2时,均可成功。
DMA配置如下:(一般应用中都是用DMA传输)
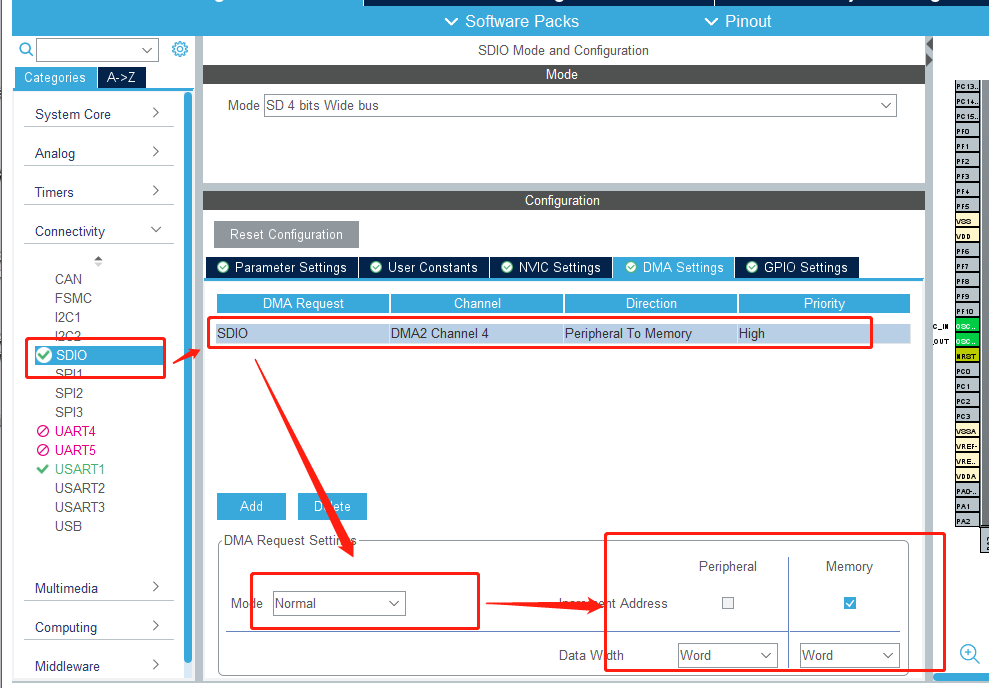
此处,可以发现,DMA只能配置一个方向的,即两个方向共用了一个传输通道。在使用时,实际上可以通过重新初始化DMA来更改传输方向。这里先随便设置一个方向即可。
最后勾选上中断:
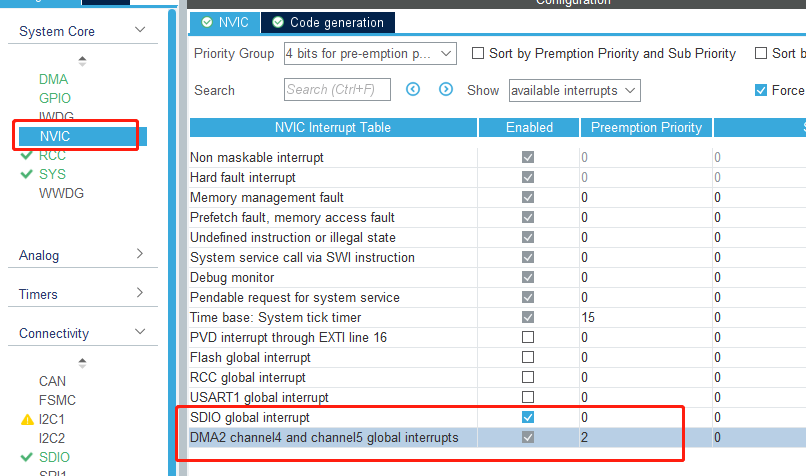
生成工程后:
修改sdio.c文件中的void MX_SDIO_SD_Init(void)函数。正确的如下:
void MX_SDIO_SD_Init(void)
{
  hsd.Instance = SDIO;
  hsd.Init.ClockEdge = SDIO_CLOCK_EDGE_RISING;
  hsd.Init.ClockBypass = SDIO_CLOCK_BYPASS_DISABLE;
  hsd.Init.ClockPowerSave = SDIO_CLOCK_POWER_SAVE_DISABLE;
  hsd.Init.BusWide = SDIO_BUS_WIDE_1B;	// 注意要修改这里为 SDIO_BUS_WIDE_1B
  hsd.Init.HardwareFlowControl = SDIO_HARDWARE_FLOW_CONTROL_DISABLE;
  hsd.Init.ClockDiv = 2;
  if (HAL_SD_Init(&hsd) != HAL_OK)
  {
    Error_Handler();
  }
  if (HAL_SD_ConfigWideBusOperation(&hsd, SDIO_BUS_WIDE_4B) != HAL_OK)
  {
    Error_Handler();
  }
}
如果生成的代码中 本来就是 hsd.Init.BusWide = SDIO_BUS_WIDE_1B; 那就不用管。
如果生成的默认是 4B,则要修改为 1B,否则此函数执行的时候不会通过。
(不同固件包生成的不一样,因此要确认一下)
2.2 SD卡读写验证
2.2.1 sdio_sdcard.h
两个 test 函数,测试完成之后不需要的话可以删除。跟后续移植关系不是很大。
#ifndef __SDIO_SDCARD_H
#define __SDIO_SDCARD_H


#include "sdio.h"
#include "stdint.h"


void SD_info_print(void);
void SD_read_writer_test(void);
HAL_StatusTypeDef SDIO_ReadBlocks_DMA(SD_HandleTypeDef *hsd, uint8_t *pData, uint32_t BlockAdd, uint32_t NumberOfBlocks);
HAL_StatusTypeDef SDIO_WriteBlocks_DMA(SD_HandleTypeDef *hsd, uint8_t *pData, uint32_t BlockAdd, uint32_t NumberOfBlocks);
void SD_read_writer_dma_test(void);


#endif	/* __SDIO_SDCARD_H */
2.2.2 sdio_sdcard.c
#include "sdio_sdcard.h"

#include "stdio.h"  // 调试信息输出
#include "sdio.h"   // cubemx生成的


extern SD_HandleTypeDef hsd;
extern DMA_HandleTypeDef hdma_sdio;


/**
 * @brief   打印SD卡信息
 *
 * @param   none
 *
 * @return  none
 */
void SD_info_print(void)
{
    HAL_SD_CardInfoTypeDef  SDCardInfo;		// SD卡信息结构体
	HAL_SD_CardCIDTypeDef sdcard_cid;		//


    HAL_SD_GetCardInfo(&hsd, &SDCardInfo);	// 得到卡的信息
	// 打印SD卡基本信息
	printf("SD card information! \r\n");
    printf("Card Type:%d \r\n",			SDCardInfo.CardType);			// 卡类型
    printf("Card CardVersion:%d \r\n",	SDCardInfo.CardVersion);		// CardVersion

	printf("Card Class:%d \r\n",		SDCardInfo.Class);				// 卡Class
	printf("Card RCA:%d \r\n",			SDCardInfo.RelCardAdd);			// 卡相对地址

	printf("Card BlockNumber: %d \r\n", 	SDCardInfo.BlockNbr);		// 有多少个块
	printf("Card BlockSize(Byte): %d \r\n",	SDCardInfo.BlockSize);		// 块大小 默认512个字节
	printf("Card Capacity(Byte): %llu \r\n", ((unsigned long long)SDCardInfo.BlockSize * SDCardInfo.BlockNbr));	// 容量

    printf("Card Capacity:%d MB \r\n", (uint32_t)(SDCardInfo.LogBlockNbr) >> 11); // 显示容量
    printf("Card BlockSize:%d \r\n", 	SDCardInfo.LogBlockSize);       // 显示块大小


	// 读取并打印SD卡的CID信息
	HAL_SD_GetCardCID(&hsd, &sdcard_cid);
	printf("ManufacturerID: %d \r\n", sdcard_cid.ManufacturerID);	// 制造商
}

/**
 * @brief   SD卡读写测试
 *
 * @param   none
 *
 * @return  none
 */
void SD_read_writer_test(void)
{
    /* SD卡状态 */
    int sdcard_status = 0;

    uint8_t read_buf[512];      // 读数据缓存
    uint8_t write_buf[512];     // 写数据缓存

    /* 读取未操作之前的数据 */
    printf("------------------- Read SD card block data Test ------------------\r\n");
    /*
        读一个扇区的数据:
        0: 从第0个扇区开始。
        1:读一个扇区的数据。
        0xffff:等待时间。
        note:也就是只读了第0个扇区。
    */
    sdcard_status = HAL_SD_ReadBlocks(&hsd, (uint8_t *)read_buf, 0, 1, 0xffff);
    if(sdcard_status == HAL_OK)
    {
        printf("Read block data ok! \r\n");
        for(int i = 0; i < 512; i++)
        {
            printf("0x%02x ", read_buf[i]);
            if((i + 1) % 16 == 0)
            {
                printf("\r\n");
            }
        }
    }
    else
    {
        printf("Read block data fail! status = %d \r\n", sdcard_status);
    }

    /* 向SD卡块写入数据 */
    printf("------------------- Write SD card block data Test ------------------\r\n");
    /* 填充缓冲区数据 */
    for(int i = 0; i < 512; i++)
    {
        write_buf[i] = i % 256;
    }
    // 开始写入数据
    /*
        写一个扇区的数据:
        0: 从第0个扇区开始。
        1:写一个扇区的数据。
        0xffff:等待时间。
        note:也就是只写了第0个扇区。
    */
    sdcard_status = HAL_SD_WriteBlocks(&hsd, (uint8_t *)write_buf, 0, 1, 0xffff);
    if(sdcard_status == HAL_OK)
    {
        /* 传输完成不代表写入完成,因此要等待SD卡状态变为可传输状态。擦除操作也是一样。 */
        printf("Writing block data. state = %d \r\n", HAL_SD_GetCardState(&hsd));
        while(HAL_SD_GetCardState(&hsd) == HAL_SD_CARD_PROGRAMMING);
        printf("Write block data ok,state = %d \r\n", HAL_SD_GetCardState(&hsd));
    }
    else
    {
        printf("Write block data fail! status = %d \r\n", sdcard_status);
    }

    /* 读取写入之后的数据 */
    printf("------------------- Read SD card block data after Write ------------------\r\n");
    sdcard_status = HAL_SD_ReadBlocks(&hsd, (uint8_t *)read_buf, 0, 1, 0xffff);
    if(sdcard_status == HAL_OK)
    {
        printf("Read block data ok! \r\n");
        for(int i = 0; i < 512; i++)
        {
            printf("0x%02x ", read_buf[i]);
            if((i + 1) % 16 == 0)
            {
                printf("\r\n");
            }
        }
    }
    else
    {
        printf("Read block data fail! status = %d \r\n", sdcard_status);
    }

    /* 擦除SD卡块 */
    printf("------------------- Block Erase -------------------------------\r\n");
    /*
        擦除512个扇区的数据:
        0: 从第0个扇区开始。
        1:一直擦除到512扇区。
        note:擦除第0到第512个扇区数据,也包括0和512,也就是一共512个。
    */
    sdcard_status = HAL_SD_Erase(&hsd, 0, 512);
    // 等待擦除完毕
    if(sdcard_status == HAL_OK)
    {
        printf("Erasing block. state = %d \r\n", HAL_SD_GetCardState(&hsd));
        while(HAL_SD_GetCardState(&hsd) == HAL_SD_CARD_PROGRAMMING);
        printf("Erase block ok state = %d \r\n", HAL_SD_GetCardState(&hsd));
    }
    else
    {
        printf("Erase block fail! status = %d \r\n", sdcard_status);
    }

    /* 读取擦除之后的数据 */
    printf("------------------- Read SD card block data after Erase ------------------\r\n");
    sdcard_status = HAL_SD_ReadBlocks(&hsd, (uint8_t *)read_buf, 0, 1, 0xffff);
    if(sdcard_status == HAL_OK)
    {
        printf("Read block data ok \r\n");
        for(int i = 0; i < 512; i++)
        {
            printf("0x%02x ", read_buf[i]);
            if((i + 1) % 16 == 0)
            {
                printf("\r\n");
            }
        }
    }
    else
    {
        printf("Read block data fail! status = %d \r\n", sdcard_status);
    }
}

/**
 * @brief   SD卡DMA读数据(开始前重新初始化DMA,更改传输方向)
 *
 * @param   hsd
 * @param   pData
 * @param   BlockAdd
 * @param   NumberOfBlocks
 *
 * @return  none
 */
HAL_StatusTypeDef SDIO_ReadBlocks_DMA(SD_HandleTypeDef *hsd, uint8_t *pData, uint32_t BlockAdd, uint32_t NumberOfBlocks)
{
    HAL_StatusTypeDef Return_Status;
    HAL_SD_CardStateTypeDef SD_Card_Status;

	// 读之前,确保SD卡处于可传输状态
    do
    {
        SD_Card_Status = HAL_SD_GetCardState(hsd);
    } while(SD_Card_Status != HAL_SD_CARD_TRANSFER);

	// 重新初始化MDA传输方向
    HAL_DMA_DeInit(&hdma_sdio);
    hdma_sdio.Instance = DMA2_Channel4;
    hdma_sdio.Init.Direction = DMA_PERIPH_TO_MEMORY;
    hdma_sdio.Init.PeriphInc = DMA_PINC_DISABLE;
    hdma_sdio.Init.MemInc = DMA_MINC_ENABLE;
    hdma_sdio.Init.PeriphDataAlignment = DMA_PDATAALIGN_WORD;
    hdma_sdio.Init.MemDataAlignment = DMA_MDATAALIGN_WORD;
    hdma_sdio.Init.Mode = DMA_NORMAL;
    hdma_sdio.Init.Priority = DMA_PRIORITY_LOW;
    if(HAL_DMA_Init(&hdma_sdio) != HAL_OK)
    {
        Error_Handler();
    }
    __HAL_LINKDMA(hsd, hdmarx, hdma_sdio);

	// 开始一次DMA传输
    Return_Status = HAL_SD_ReadBlocks_DMA(hsd, pData, BlockAdd, NumberOfBlocks);

    return Return_Status;
}

/**
 * @brief   SD卡DMA写数据(开始前重新初始化DMA,更改传输方向)
 *
 * @param   hsd
 * @param   pData
 * @param   BlockAdd
 * @param   NumberOfBlocks
 *
 * @return  none
 */
HAL_StatusTypeDef SDIO_WriteBlocks_DMA(SD_HandleTypeDef *hsd, uint8_t *pData, uint32_t BlockAdd, uint32_t NumberOfBlocks)
{
    HAL_StatusTypeDef Return_Status;
    HAL_SD_CardStateTypeDef SD_Card_Status;

    do
    {
        SD_Card_Status = HAL_SD_GetCardState(hsd);
    } while(SD_Card_Status != HAL_SD_CARD_TRANSFER);

    // 重新初始化MDA传输方向
    HAL_DMA_DeInit(&hdma_sdio);
    hdma_sdio.Instance = DMA2_Channel4;
    hdma_sdio.Init.Direction = DMA_MEMORY_TO_PERIPH;
    hdma_sdio.Init.PeriphInc = DMA_PINC_DISABLE;
    hdma_sdio.Init.MemInc = DMA_MINC_ENABLE;
    hdma_sdio.Init.PeriphDataAlignment = DMA_PDATAALIGN_WORD;
    hdma_sdio.Init.MemDataAlignment = DMA_MDATAALIGN_WORD;
    hdma_sdio.Init.Mode = DMA_NORMAL;
    hdma_sdio.Init.Priority = DMA_PRIORITY_LOW;
    if(HAL_DMA_Init(&hdma_sdio) != HAL_OK)
    {
        Error_Handler();
    }
    __HAL_LINKDMA(hsd, hdmatx, hdma_sdio);

	// 开始一次DMA传输
    Return_Status = HAL_SD_WriteBlocks_DMA(hsd, pData, BlockAdd, NumberOfBlocks);

    return Return_Status;
}

/**
 * @brief   SD卡DMA读写测试
 *
 * @param   none
 *
 * @return  none
 */
void SD_read_writer_dma_test(void)
{
    /* SD卡状态 */
    int sdcard_status = 0;

    uint8_t read_buf[512];      // 读数据缓存
    uint8_t write_buf[512];     // 写数据缓存

    /* 读取未操作之前的数据 */
    printf("------------------- Read SD card block data Test ------------------\r\n");
    /*
        读一个扇区的数据:
        0: 从第0个扇区开始。
        1:读一个扇区的数据。
        note:也就是只读了第0个扇区。
    */
    sdcard_status = SDIO_ReadBlocks_DMA(&hsd, (uint8_t *)read_buf, 0, 1);

    if(sdcard_status == HAL_OK)
    {
        printf("Read block data ok! \r\n");
        for(int i = 0; i < 512; i++)
        {
            printf("0x%02x ", read_buf[i]);
            if((i + 1) % 16 == 0)
            {
                printf("\r\n");
            }
        }
    }
    else
    {
        printf("Read block data fail! status = %d \r\n", sdcard_status);
    }

    /* 向SD卡块写入数据 */
    printf("------------------- Write SD card block data Test ------------------\r\n");
    /* 填充缓冲区数据 */
    for(int i = 0; i < 512; i++)
    {
        write_buf[i] = i % 256;
    }
    // 开始写入数据
    /*
        写一个扇区的数据:
        0: 从第0个扇区开始。
        1:写一个扇区的数据。
        note:也就是只写了第0个扇区。
    */
    sdcard_status = SDIO_WriteBlocks_DMA(&hsd, (uint8_t *)write_buf, 0, 1);

    if(sdcard_status == HAL_OK)
    {
        /* 传输完成不代表写入完成,因此要等待SD卡状态变为可传输状态。擦除操作也是一样。 */
        printf("Writing block data. state = %d \r\n", HAL_SD_GetCardState(&hsd));
        while(HAL_SD_GetCardState(&hsd) == HAL_SD_CARD_PROGRAMMING);
        printf("Write block data ok,state = %d \r\n", HAL_SD_GetCardState(&hsd));
    }
    else
    {
        printf("Write block data fail! status = %d \r\n", sdcard_status);
    }

    /* 读取写入之后的数据 */
    printf("------------------- Read SD card block data after Write ------------------\r\n");

    sdcard_status = SDIO_ReadBlocks_DMA(&hsd, (uint8_t *)read_buf, 0, 1);

    if(sdcard_status == HAL_OK)
    {
        printf("Read block data ok! \r\n");
        for(int i = 0; i < 512; i++)
        {
            printf("0x%02x ", read_buf[i]);
            if((i + 1) % 16 == 0)
            {
                printf("\r\n");
            }
        }
    }
    else
    {
        printf("Read block data fail! status = %d \r\n", sdcard_status);
    }
}
2.2.3 main.c
添加printf支持,在usart.c中添加如下代码
// 需要调用stdio.h文件
#include <stdio.h>
// 取消ARM的半主机工作模式
#pragma import(__use_no_semihosting)// 标准库需要的支持函数
struct __FILE
{
	int handle;
};
FILE __stdout;
void _sys_exit(int x) // 定义_sys_exit()以避免使用半主机模式
{
	x = x;
}
void _ttywrch(int ch)	// 这个函数一般情况下应该是不需要的,但是在这里需要
{
	ch = ch;
}
int fputc(int ch, FILE *f)
{
	HAL_UART_Transmit(&huart1, (uint8_t *)&ch, 1, 0xffff);
	return ch;
}在main.c中while之前运行:
SD_info_print();
SD_read_writer_test();    // 阻塞式读写测试
SD_read_writer_dma_test();	// DMA读写测试
如果均能正常执行,即表示配置无误。
如果第二个函数读写失败:参照修改2.1小节SDIOCLK clock divide factor参数。
如果生成的初始化函数运行卡死:参照修改2.1小节中的void MX_SDIO_SD_Init(void)函数。
注意:如果按照上述流程配置下来,
SD_read_writer_test();写出错,而SD_read_writer_dma_test();正常运行是没什么问题的。因为上面的时钟频率设置的挺高的(SDIOCLK clock divide factor:
2),在此情况下,只能使用DMA模式。如果不放心,可以把这个参数调大一点之后,然后验证阻塞式读写。验证可以之后再调回来(实际应用中肯定希望速度快一点)。
2.3 移植 FATFS 系统
2.3.1 添加源码
在确保SD卡读写无误之后,开始移植。
在工程目录创建文件夹并放入FATFS系统源码
- Middlewares\FATFS_R0.15
- ffunicode.c
- ffsystem.c
- ffconf.h
- ff.h
- ff.c
- diskio.h
- diskio.c
- 00readme.txt
- 00history.txt
并在 Keil 中添加文件和头文件路径。
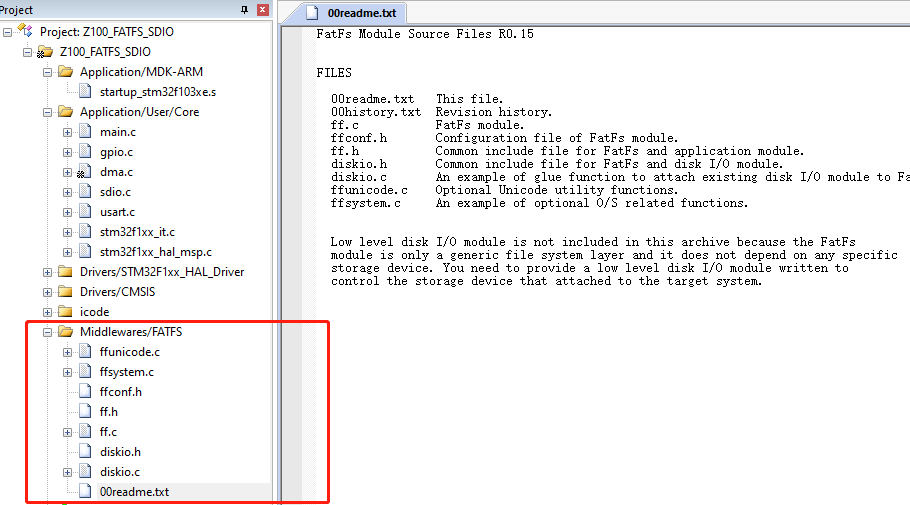
然后开始适配工作。
2.3.2 修改配置 ffconf.h
一些声明的含义可以参考一下网址:http://elm-chan.org/fsw/ff/doc/config.html。
以下内容是把原有的英文注释换成了中文的。并且修改了自己需要的配置。
需要注意的点(需要进行适配):
#define FF_CODE_PAGE 936 // 支持中文#define FF_USE_LFN 3 // 支持长文件名,且存在堆区#define FF_VOLUMES 1 // 一共有一个卷
/* 以下是全部默认拥有的配置 */

/* 版本ID */
#define FFCONF_DEF	80286	/* Revision ID */

/* 设置是否只读。建议为0,否则很多API用不了(0:可读写。1:只读)*/
#define FF_FS_READONLY	0

/*
	此选项定义了最小化级别,以删除一些基本API函数。

	0:基本功能已完全启用。建议为0
	1:f_stat(), f_getfree(), f_unlink(), f_mkdir(), f_truncate() and f_rename() 被移除
	2:在 1 的基础上 f_opendir(), f_readdir() and f_closedir() 被移除
	3:在 2 的基础上 f_lseek() 被移除
*/

#define FF_FS_MINIMIZE	0

/*
	设置是否使用查找功能 f_findfirst() and f_findnext().

	0:不启用
	1:启用
	2:同时启用匹配altname[]
*/
#define FF_USE_FIND		0

/*
	是否启用格式化功能 f_mkfs(),对于没有格式化为Fat32的U盘或者SD卡,设置为1,否则无法正常初始化。

	0:禁止使用 f_mkfs()
	1:允许使用 f_mkfs()
*/
#define FF_USE_MKFS		1

/* 设置是否使用快速查找功能(0:不使用。1:使用)*/
#define FF_USE_FASTSEEK	1

/* 设置是否使用拓展功能(0:不使用。1:使用) */
#define FF_USE_EXPAND	1

/* 切换属性操作函数 f_chmod()和 f_utime()(0:不使用。1:使用)仅在 FF_FS_READONLY 模式下可用*/
#define FF_USE_CHMOD	0

/* 切换卷标函数 f_getlabel() and f_setlabel() (0:不使用。1:使用)*/
#define FF_USE_LABEL	1

/* 此选项切换 f_forward()函数。(0:禁用或1:启用) */
#define FF_USE_FORWARD	0

/* 设置对字符串的操作 */
#define FF_USE_STRFUNC	1
#define FF_PRINT_LLI	1
#define FF_PRINT_FLOAT	1
#define FF_STRF_ENCODE	3
/* FF_USE_STRFUNC switches string functions, f_gets(), f_putc(), f_puts() and f_printf().
/
/   0: Disable. FF_PRINT_LLI, FF_PRINT_FLOAT and FF_STRF_ENCODE have no effect.
/   1: Enable without LF-CRLF conversion.
/   2: Enable with LF-CRLF conversion.
/
/  FF_PRINT_LLI = 1 makes f_printf() support long long argument and FF_PRINT_FLOAT = 1/2
/  makes f_printf() support floating point argument. These features want C99 or later.
/  When FF_LFN_UNICODE >= 1 with LFN enabled, string functions convert the character
/  encoding in it. FF_STRF_ENCODE selects assumption of character encoding ON THE FILE
/  to be read/written via those functions.
/
/   0: ANSI/OEM in current CP
/   1: Unicode in UTF-16LE
/   2: Unicode in UTF-16BE
/   3: Unicode in UTF-8
*/

/* 设置语言支持(932:中文支持。437:英文支持)*/
#define FF_CODE_PAGE	932
/* This option specifies the OEM code page to be used on the target system.
/  Incorrect code page setting can cause a file open failure.
/   437 - U.S.
/   720 - Arabic
/   737 - Greek
/   771 - KBL
/   775 - Baltic
/   850 - Latin 1
/   852 - Latin 2
/   855 - Cyrillic
/   857 - Turkish
/   860 - Portuguese
/   861 - Icelandic
/   862 - Hebrew
/   863 - Canadian French
/   864 - Arabic
/   865 - Nordic
/   866 - Russian
/   869 - Greek 2
/   932 - Japanese (DBCS)
/   936 - Simplified Chinese (DBCS)
/   949 - Korean (DBCS)
/   950 - Traditional Chinese (DBCS)
/     0 - Include all code pages above and configured by f_setcp()
*/

#define FF_USE_LFN		0
#define FF_MAX_LFN		255
/* The FF_USE_LFN switches the support for LFN (long file name).
/
/   0: Disable LFN. FF_MAX_LFN has no effect.(默认最长12个字符)
/   1: Enable LFN with static  working buffer on the BSS. Always NOT thread-safe.
/   2: Enable LFN with dynamic working buffer on the STACK.
/   3: Enable LFN with dynamic working buffer on the HEAP.
/
/  To enable the LFN, ffunicode.c needs to be added to the project. The LFN function
/  requiers certain internal working buffer occupies (FF_MAX_LFN + 1) * 2 bytes and
/  additional (FF_MAX_LFN + 44) / 15 * 32 bytes when exFAT is enabled.
/  The FF_MAX_LFN defines size of the working buffer in UTF-16 code unit and it can
/  be in range of 12 to 255. It is recommended to be set it 255 to fully support LFN
/  specification.
/  When use stack for the working buffer, take care on stack overflow. When use heap
/  memory for the working buffer, memory management functions, ff_memalloc() and
/  ff_memfree() exemplified in ffsystem.c, need to be added to the project. */

#define FF_LFN_UNICODE	0
/* This option switches the character encoding on the API when LFN is enabled.
/
/   0: ANSI/OEM in current CP (TCHAR = char)
/   1: Unicode in UTF-16 (TCHAR = WCHAR)
/   2: Unicode in UTF-8 (TCHAR = char)
/   3: Unicode in UTF-32 (TCHAR = DWORD)
/
/  Also behavior of string I/O functions will be affected by this option.
/  When LFN is not enabled, this option has no effect. */

#define FF_LFN_BUF		255
#define FF_SFN_BUF		12
/* This set of options defines size of file name members in the FILINFO structure
/  which is used to read out directory items. These values should be suffcient for
/  the file names to read. The maximum possible length of the read file name depends
/  on character encoding. When LFN is not enabled, these options have no effect. */

#define FF_FS_RPATH		0
/* This option confatfs文件系统移植 support for relative path.
/
/   0: Disable relative path and remove related functions.
/   1: Enable relative path. f_chdir() and f_chdrive() are available.
/   2: f_getcwd() function is available in addition to 1.
*/

/* Number of volumes (logical drives) to be used. (1-10) */
#define FF_VOLUMES		1

#define FF_STR_VOLUME_ID	0
#define FF_VOLUME_STRS		"RAM","NAND","CF","SD","SD2","USB","USB2","USB3"
/* FF_STR_VOLUME_ID switches support for volume ID in arbitrary strings.
/  When FF_STR_VOLUME_ID is set to 1 or 2, arbitrary strings can be used as drive
/  number in the path name. FF_VOLUME_STRS defines the volume ID strings for each
/  logical drives. Number of items must not be less than FF_VOLUMES. Valid
/  characters for the volume ID strings are A-Z, a-z and 0-9, however, they are
/  compared in case-insensitive. If FF_STR_VOLUME_ID >= 1 and FF_VOLUME_STRS is
/  not defined, a user defined volume string table is needed as:
/
/  const char* VolumeStr[FF_VOLUMES] = {"ram","flash","sd","usb",...
*/

#define FF_MULTI_PARTITION	0
/* This option switches support for multiple volumes on the physical drive.
/  By default (0), each logical drive number is bound to the same physical drive
/  number and only an FAT volume found on the physical drive will be mounted.
/  When this function is enabled (1), each logical drive number can be bound to
/  arbitrary physical drive and partition listed in the VolToPart[]. Also f_fdisk()
/  function will be available. */

#define FF_MIN_SS		512
#define FF_MAX_SS		512
/* This set of options confatfs文件系统移植 the range of sector size to be supported. (512,
/  1024, 2048 or 4096) Always set both 512 for most systems, generic memory card and
/  harddisk, but a larger value may be required for on-board flash memory and some
/  type of optical media. When FF_MAX_SS is larger than FF_MIN_SS, FatFs is configured
/  for variable sector size mode and disk_ioctl() function needs to implement
/  GET_SECTOR_SIZE command. */

#define FF_LBA64		0
/* This option switches support for 64-bit LBA. (0:Disable or 1:Enable)
/  To enable the 64-bit LBA, also exFAT needs to be enabled. (FF_FS_EXFAT == 1) */

#define FF_MIN_GPT		0x10000000
/* Minimum number of sectors to switch GPT as partitioning format in f_mkfs and
/  f_fdisk function. 0x100000000 max. This option has no effect when FF_LBA64 == 0. */

#define FF_USE_TRIM		0
/* This option switches support for ATA-TRIM. (0:Disable or 1:Enable)
/  To enable Trim function, also CTRL_TRIM command should be implemented to the
/  disk_ioctl() function. */

#define FF_FS_TINY		0
/* This option switches tiny buffer configuration. (0:Normal or 1:Tiny)
/  At the tiny configuration, size of file object (FIL) is shrinked FF_MAX_SS bytes.
/  Instead of private sector buffer eliminated from the file object, common sector
/  buffer in the filesystem object (FATFS) is used for the file data transfer. */

#define FF_FS_EXFAT		0
/* This option switches support for exFAT filesystem. (0:Disable or 1:Enable)
/  To enable exFAT, also LFN needs to be enabled. (FF_USE_LFN >= 1)
/  Note that enabling exFAT discards ANSI C (C89) compatibility. */

#define FF_FS_NORTC		0
#define FF_NORTC_MON	1
#define FF_NORTC_MDAY	1
#define FF_NORTC_YEAR	2022
/* The option FF_FS_NORTC switches timestamp feature. If the system does not have
/  an RTC or valid timestamp is not needed, set FF_FS_NORTC = 1 to disable the
/  timestamp feature. Every object modified by FatFs will have a fixed timestamp
/  defined by FF_NORTC_MON, FF_NORTC_MDAY and FF_NORTC_YEAR in local time.
/  To enable timestamp function (FF_FS_NORTC = 0), get_fattime() function need to be
/  added to the project to read current time form real-time clock. FF_NORTC_MON,
/  FF_NORTC_MDAY and FF_NORTC_YEAR have no effect.
/  These options have no effect in read-only configuration (FF_FS_READONLY = 1). */

#define FF_FS_NOFSINFO	0
/* If you need to know correct free space on the FAT32 volume, set bit 0 of this
/  option, and f_getfree() function at the first time after volume mount will force
/  a full FAT scan. Bit 1 controls the use of last allocated cluster number.
/
/  bit0=0: Use free cluster count in the FSINFO if available.
/  bit0=1: Do not trust free cluster count in the FSINFO.
/  bit1=0: Use last allocated cluster number in the FSINFO if available.
/  bit1=1: Do not trust last allocated cluster number in the FSINFO.
*/

#define FF_FS_LOCK		0
/* The option FF_FS_LOCK switches file lock function to control duplicated file open
/  and illegal operation to open objects. This option must be 0 when FF_FS_READONLY
/  is 1.
/
/  0:  Disable file lock function. To avoid volume corruption, application program
/      should avoid illegal open, remove and rename to the open objects.
/  >0: Enable file lock function. The value defines how many files/sub-directories
/      can be opened simultaneously under file lock control. Note that the file
/      lock control is independent of re-entrancy. */

#define FF_FS_REENTRANT	0
#define FF_FS_TIMEOUT	1000
/* The option FF_FS_REENTRANT switches the re-entrancy (thread safe) of the FatFs
/  module itself. Note that regardless of this option, file access to different
/  volume is always re-entrant and volume control functions, f_mount(), f_mkfs()
/  and f_fdisk() function, are always not re-entrant. Only file/directory access
/  to the same volume is under control of this featuer.
/
/   0: Disable re-entrancy. FF_FS_TIMEOUT have no effect.
/   1: Enable re-entrancy. Also user provided synchronization handlers,
/      ff_mutex_create(), ff_mutex_delete(), ff_mutex_take() and ff_mutex_give()
/      function, must be added to the project. Samples are available in ffsystem.c.
/
/  The FF_FS_TIMEOUT defines timeout period in unit of O/S time tick.
*/
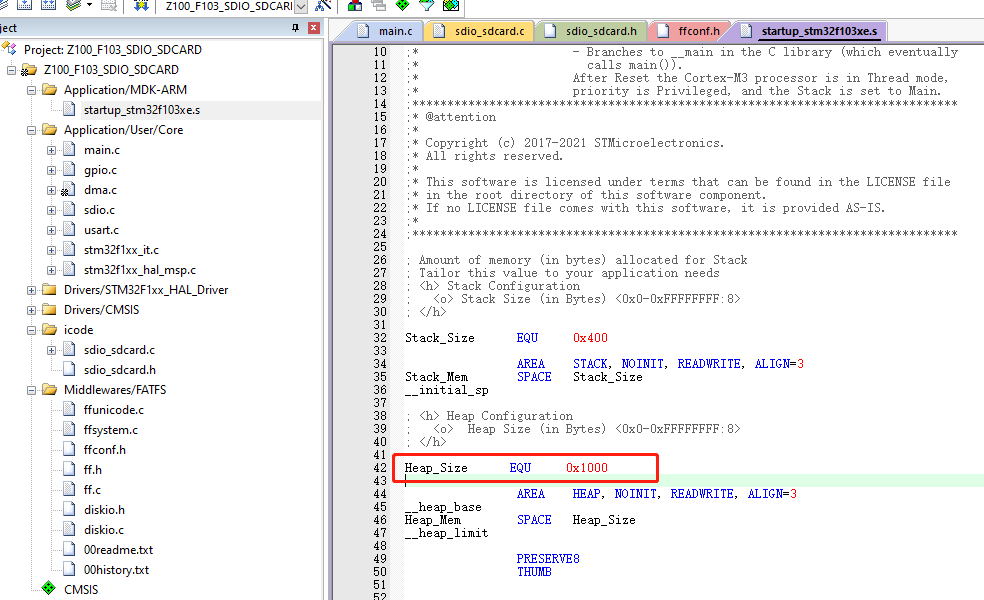
这里设置了支持长文件名,并且相关内容要申请堆中的内存,因此这里需要增大堆内存的空间。
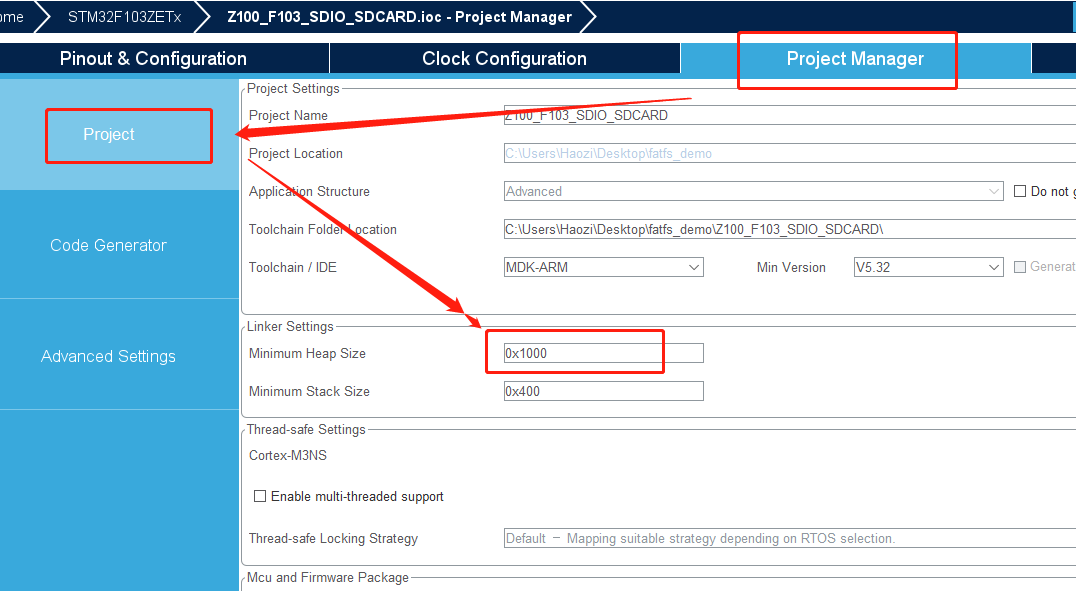
也可以直接从启动文件处修改
2.3.3 底层适配 diskio.c
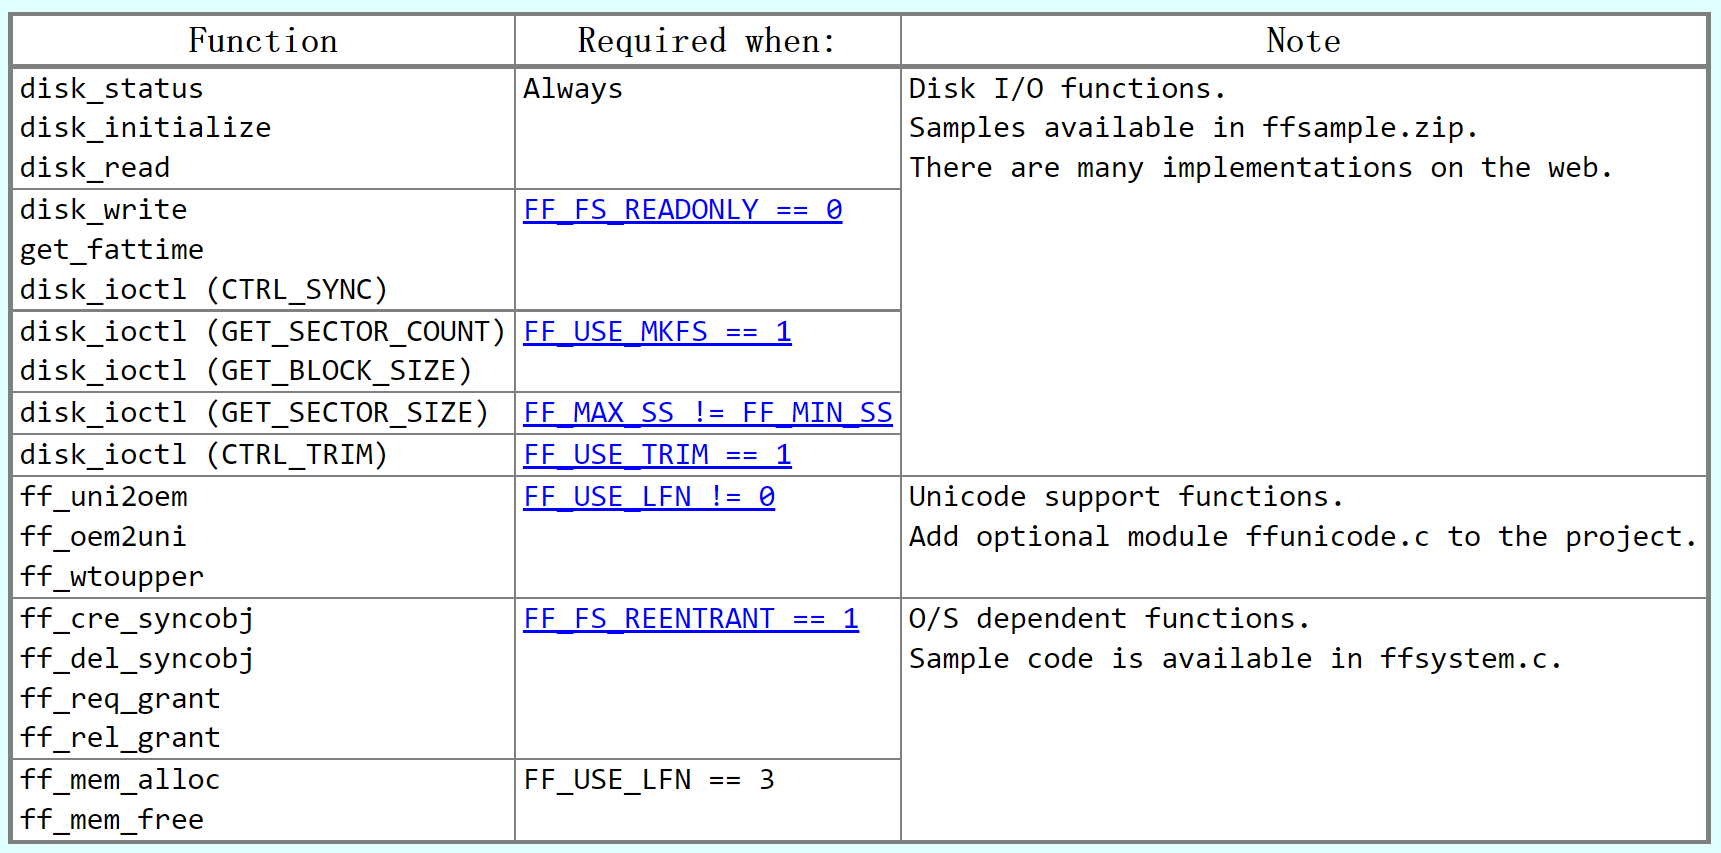
需要适配的函数如下
第一步:设备编号定义
这里只有一个设备(SD卡),把DEV_MMC编号改为0。(要求从0开始按顺序增加)
其他的可以按顺序编号,当然也可以直接删掉。但是为了以后增加,建议保留。
/* Definitions of physical drive number for each drive */
#define DEV_RAM		1	/* Example: Map Ramdisk to physical drive 0 */
#define DEV_MMC		0	/* Example: Map MMC/SD card to physical drive 1 */
#define DEV_USB		2	/* Example: Map USB MSD to physical drive 2 */
这里名字其实是可以改的,比如改为(正点原子就是这样的):
#define SD_CARD	 	0  			// SD卡,卷标为0
#define EX_FLASH 	1			// 外部spi flash,卷标为1
如果改了,下面的适配函数也都一样改就可以了。
第二步:添加头文件
因为需要用到我们前面写好的驱动以及printf调试输出,把头文件添加进来。
#include "spi_sdcard.h"
#include "stdio.h"
第三步:函数适配
这里直接默认返回OK,没什么问题,其他类型的设备注释掉即可。需要用的话再修改。
DSTATUS disk_status (
	BYTE pdrv		/* Physical drive nmuber to identify the drive */
)
{
	DSTATUS stat;

	switch (pdrv) {
	case DEV_RAM :	// 还没用到,先注释掉
		// result = RAM_disk_status();

		// translate the reslut code here

		return stat;

	case DEV_MMC :

		return 0;	// 默认没什么问题

	case DEV_USB :	// 还没用到,先注释掉
		// result = USB_disk_status();

		// translate the reslut code here

		return stat;
	}
	return STA_NOINIT;
}
初始化调用我们前面写好的驱动
DSTATUS disk_initialize (
	BYTE pdrv				/* Physical drive nmuber to identify the drive */
)
{
	DSTATUS stat;

	switch (pdrv) {
	case DEV_RAM :	// 还没用到,先注释掉
		// result = RAM_disk_initialize();

		// translate the reslut code here

		return stat;

	case DEV_MMC :

		if(SD_Init() == 0)    // SD_Init()是SD初始化函数,无错误返回0
            return 0;
        else
            return STA_NOINIT;

	case DEV_USB :	// 还没用到,先注释掉
		// result = USB_disk_initialize();

		// translate the reslut code here

		return stat;
	}
	return STA_NOINIT;
}
读扇区函数,一样的调用前面的驱动
DRESULT disk_read (
	BYTE pdrv,		/* Physical drive nmuber to identify the drive */
	BYTE *buff,		/* Data buffer to store read data */
	LBA_t sector,	/* Start sector in LBA */
	UINT count		/* Number of sectors to read */
)
{
	DRESULT res;

	switch (pdrv) {
	case DEV_RAM :
		// translate the arguments here

		// result = RAM_disk_read(buff, sector, count);

		// translate the reslut code here

		return res;

	case DEV_MMC :

		res = (DRESULT) SD_ReadDisk(buff, sector, count);

		while(res)	// 读出错
		{
			printf("sd read error:%d\r\n", res);
			SD_Init();	// 重新初始化SD卡
			res =  (DRESULT) SD_ReadDisk(buff,sector,count);
		}

		return res;

	case DEV_USB :
		// translate the arguments here

		// result = USB_disk_read(buff, sector, count);

		// translate the reslut code here

		return res;
	}

	return RES_PARERR;
}
写扇区函数,还是调用写好的驱动
DRESULT disk_write (
	BYTE pdrv,			/* Physical drive nmuber to identify the drive */
	const BYTE *buff,	/* Data to be written */
	LBA_t sector,		/* Start sector in LBA */
	UINT count			/* Number of sectors to write */
)
{
	DRESULT res;

	switch (pdrv) {
	case DEV_RAM :
		// translate the arguments here

		// result = RAM_disk_write(buff, sector, count);

		// translate the reslut code here

		return res;

	case DEV_MMC :

		res = (DRESULT) SD_WriteDisk((uint8_t *)buff, sector, count);

		while(res)	// 写出错
		{
			printf("sd write error:%d\r\n", res);
			SD_Init();	// 重新初始化SD卡
			res = (DRESULT) SD_WriteDisk((uint8_t *)buff, sector, count);
		}

		return res;

	case DEV_USB :
		// translate the arguments here

		// result = USB_disk_write(buff, sector, count);

		// translate the reslut code here

		return res;
	}

	return RES_PARERR;
}
命令函数
DRESULT disk_ioctl (
	BYTE pdrv,		/* Physical drive nmuber (0..) */
	BYTE cmd,		/* Control code */
	void *buff		/* Buffer to send/receive control data */
)
{
	DRESULT res;

	switch (pdrv) {
	case DEV_RAM :

		// Process of the command for the RAM drive

		return res;

	case DEV_MMC :

		switch(cmd)
	    {
#if FF_FS_READONLY == 0
		    case CTRL_SYNC:
				res = RES_OK;
		        break;
#endif
#if FF_USE_MKFS == 1
		    case GET_SECTOR_COUNT:
		        *(DWORD*)buff = SD_GetSectorCount();
		        res = RES_OK;
		        break;
		    case GET_BLOCK_SIZE:
				*(WORD*)buff = 8;
		        res = RES_OK;
		        break;
#endif
#if FF_MAX_SS != FF_MIN_SS
		    case GET_SECTOR_SIZE:
				*(DWORD*)buff = 512;
		        res = RES_OK;
		        break;
#endif
		    default:
		        res = RES_PARERR;
		        break;
	    }
		return res;

	case DEV_USB :

		// Process of the command the USB drive

		return res;
	}

	return RES_PARERR;
}
在此文件的最后添加一个获取时间的函数,默认返回0
DWORD get_fattime(void)
{
	return 0;
}
2.3.4 验证 main.c
把以下代码放在main函数中执行,如果成功执行,说明没问题。
这里执行 f_res = f_mount(&fs, “0:”, 1),标号0就是diskio.c开头定义的标号。
	FATFS fs;				/* FatFs 文件系统对象 */
	FRESULT f_res;			/* 文件操作结果 */
	BYTE work[FF_MAX_SS];

	FIL file;                       /* 文件对象 */
	UINT fnum;                      /* 文件成功读写数量 */
	BYTE ReadBuffer[1024] = {0};    /* 读缓冲区 */
	BYTE WriteBuffer[] = "This is STM32 working with FatFs \r\n";	/* 写缓冲区 */

	// 在外部 SD 卡挂载文件系统,文件系统挂载时会对 SD 卡初始化
	// note:必须先要保证SD卡正常拥有FAT文件系统,如果没有会失败。
    f_res = f_mount(&fs, "0:", 1);

	/* 如果没有文件系统就格式化创建创建文件系统 */
    if(f_res == FR_NO_FILESYSTEM)
    {
        printf("The SD card does not yet have a file system and is about to be formatted... \r\n");
        /* 格式化 */
		f_res = f_mkfs("0:", NULL, work, sizeof(work));	/* Create a FAT volume */

        if(f_res == FR_OK)
        {
            printf("The SD card successfully formatted the file system\r\n");
            /* 格式化后,先取消挂载 */
            f_res = f_mount(NULL, "0:", 1);
            /* 重新挂载 */
            f_res = f_mount(&fs, "0:", 1);
        }
        else
        {
            printf("The format failed\r\n");
            while(1);
        }
    }
    else if(f_res != FR_OK)
    {
        printf("mount error : %d \r\n", f_res);
        while(1);
    }
    else
    {
        printf("mount sucess!!! \r\n");
    }

	/*----------------------- 文件系统测试:写测试 -----------------------------*/
    /* 打开文件,如果文件不存在则创建它 */
    printf("\r\n ****** Create and Open new text file objects with write access ****** \r\n");

	f_res = f_open(&file, "0:FatFs STM32cube.txt", FA_CREATE_ALWAYS | FA_WRITE);
    if(f_res == FR_OK)
    {
        printf("open file sucess!!! \r\n");
        /* 将指定存储区内容写入到文件内 */
        printf("\r\n****** Write data to the text files ******\r\n");
        f_res = f_write(&file, WriteBuffer, sizeof(WriteBuffer), &fnum);
        if(f_res == FR_OK)
        {
            printf("write file sucess!!! (%d)\r\n", fnum);
            printf("write Data : %s\r\n", WriteBuffer);
        }
        else
        {
            printf("write file error : %d\r\n", f_res);
        }
        /* 不再读写,关闭文件 */
        f_close(&file);
    }
    else
    {
        printf("open file error : %d\r\n", f_res);
    }

    /*------------------- 文件系统测试:读测试 ------------------------------------*/
    printf("\r\n****** Read data from the text files ******\r\n");
    f_res = f_open(&file, "0:FatFs STM32cube.txt", FA_OPEN_EXISTING | FA_READ);
    if(f_res == FR_OK)
    {
        printf("open file sucess!!! \r\n");
        f_res = f_read(&file, ReadBuffer, sizeof(ReadBuffer), &fnum);
        if(f_res == FR_OK)
        {
            printf("read sucess!!! (%d)\r\n", fnum);
            printf("read Data : %s\r\n", ReadBuffer);
        }
        else
        {
            printf(" read error!!! %d\r\n", f_res);
        }
    }
    else
    {
        printf("open file error : %d\r\n", f_res);
    }
    /* 不再读写,关闭文件 */
    f_close(&file);
    /* 不再使用文件系统,取消挂载文件系统 */
    f_mount(NULL, "0:", 1);
    /* 操作完成,停机 */
其他 API 的使用参考 FATFS 官网:http://elm-chan.org/fsw/ff/00index_e.html
3. TF卡 SPI 模式移植
这里使用RTT&正点原子的潘多拉loT Board开发板,主控芯片为STM32L475VET6。开发板上TF卡与主控的通信采用SPI通信。
原理图如下:
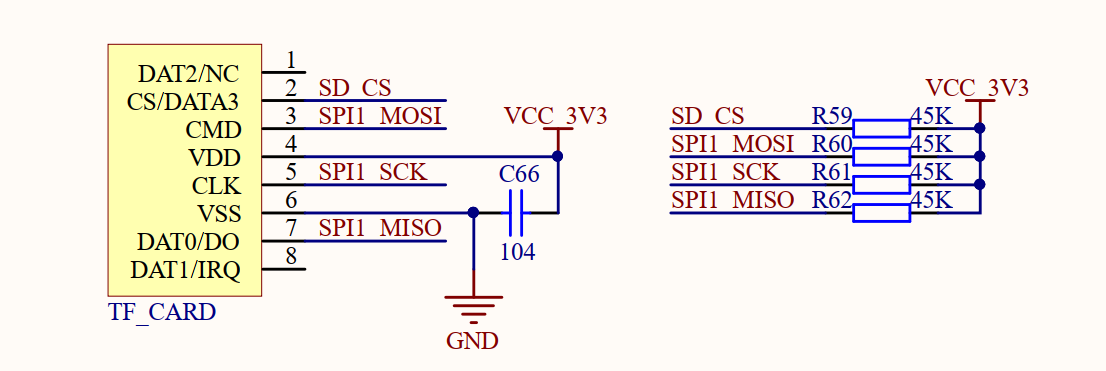
- SPI1_SCK:PA5
- SPI1_MISO:PA6
- SPI1_MOSI:PA7
- SD_CS:PC3
3.1 创建工程
使用CubeMX创建一个工程。需要配置的项目有:
- 时钟
- 程序调试接口
- 串口(用于观察调试信息)
- SPI 接口
- 片选引脚CS(推挽输出,默认高电平,速度最快,上拉)
其中 SPI 接口的配置如下:
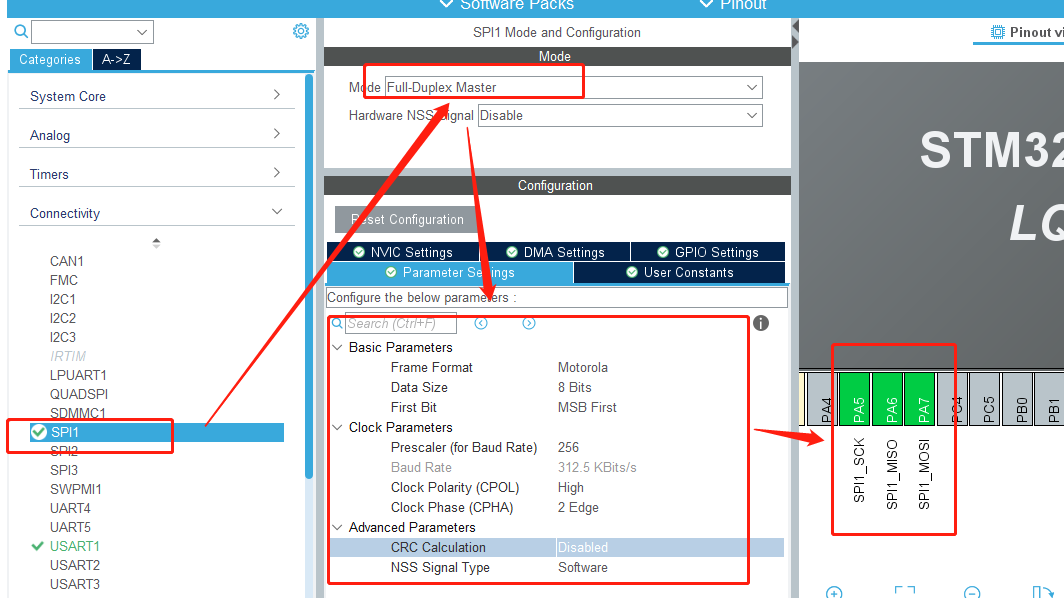
SPI 与 SD卡 通信,在卡识别阶段,时钟频率不能超过400K。在传输数据阶段可以更高,最多不超过25M。不同的卡上限不太一样。
这里初始化时先设置一个较低的速度,识别完成之后更改 SPI 波特率即可。
3.2 SD卡读写验证
3.2.1 spi_sdcard.h
#ifndef __SPI_SDCARD_H
#define __SPI_SDCARD_H


#include "stdint.h"

/*
	SD_CS:		PC3		// 片选
*/
#define	SD_CS_SET(n)	(n?HAL_GPIO_WritePin(GPIOC, GPIO_PIN_3, GPIO_PIN_SET):HAL_GPIO_WritePin(GPIOC, GPIO_PIN_3, GPIO_PIN_RESET))


// SD卡类型定义
#define SD_TYPE_ERR     0X00
#define SD_TYPE_MMC     0X01
#define SD_TYPE_V1      0X02
#define SD_TYPE_V2      0X04
#define SD_TYPE_V2HC    0X06
// SD卡指令表
#define CMD0    0       // 卡复位
#define CMD1    1
#define CMD8    8       // 命令8 ,SEND_IF_COND
#define CMD9    9       // 命令9 ,读CSD数据
#define CMD10   10      // 命令10,读CID数据
#define CMD12   12      // 命令12,停止数据传输
#define CMD16   16      // 命令16,设置SectorSize 应返回0x00
#define CMD17   17      // 命令17,读sector
#define CMD18   18      // 命令18,读Multi sector
#define CMD23   23      // 命令23,设置多sector写入前预先擦除N个block
#define CMD24   24      // 命令24,写sector
#define CMD25   25      // 命令25,写Multi sector
#define CMD41   41      // 命令41,应返回0x00
#define CMD55   55      // 命令55,应返回0x01
#define CMD58   58      // 命令58,读OCR信息
#define CMD59   59      // 命令59,使能/禁止CRC,应返回0x00
// 数据写入回应字意义
#define MSD_DATA_OK                0x05
#define MSD_DATA_CRC_ERROR         0x0B
#define MSD_DATA_WRITE_ERROR       0x0D
#define MSD_DATA_OTHER_ERROR       0xFF
// SD卡回应标记字
#define MSD_RESPONSE_NO_ERROR      0x00
#define MSD_IN_IDLE_STATE          0x01
#define MSD_ERASE_RESET            0x02
#define MSD_ILLEGAL_COMMAND        0x04
#define MSD_COM_CRC_ERROR          0x08
#define MSD_ERASE_SEQUENCE_ERROR   0x10
#define MSD_ADDRESS_ERROR          0x20
#define MSD_PARAMETER_ERROR        0x40
#define MSD_RESPONSE_FAILURE       0xFF


/* ========================== 以下通信部分修改区 ============================*/
void SD_SPI_SetSpeed(uint8_t SPI_BaudRatePrescaler);
uint8_t SD_SPI_ReadWriteByte(uint8_t TxData);
uint8_t SD_SPI_WriteByte(uint8_t TxData);
/* ========================== 以上通信部分修改区 ============================*/

/* ========================== 以下SD卡通信修改区 ============================*/
extern uint8_t  SD_Type;			//SD卡的类型

uint8_t SD_ReadWriteByte(uint8_t data);
void SD_SpeedLow(void);
void SD_SpeedHigh(void);
/* ========================== 以上SD卡通信修改区 ============================*/

/* ========================== 以下SD卡通信实现区(无需修改) ============================*/
uint8_t SD_WaitReady(void);										// 等待SD卡准备
void SD_DisSelect(void);										// 取消片选
uint8_t SD_Select(void);										// 片选选中
uint8_t SD_GetResponse(uint8_t Response);						// 获得响应
uint8_t SD_RecvData(uint8_t *buf, uint16_t len);				// 读sd卡512字节(一个扇区)
uint8_t SD_SendBlock(uint8_t *buf, uint8_t cmd);				// 向sd卡写512字节(一个扇区)
uint8_t SD_SendCmd(uint8_t cmd, uint32_t arg, uint8_t crc);		// 发送命令
uint8_t SD_GetCID(uint8_t *cid_data);							// 读SD卡CID
uint8_t SD_GetCSD(uint8_t *csd_data);							// 读SD卡CSD
uint32_t SD_GetSectorCount(void);								// 读扇区数
uint8_t SD_Init(void);											// 初始化
uint8_t SD_ReadDisk(uint8_t *buf, uint32_t sector, uint8_t cnt);	// 写块,连续读扇区
uint8_t SD_WriteDisk(uint8_t *buf, uint32_t sector, uint8_t cnt);	// 读块,连续写扇区
/* ========================== 以上SD卡通信实现区(无需修改) ============================*/


#endif	/* __SPI_SDCARD_H */
3.2.2 spi_sdcard.c
#include "spi_sdcard.h"
#include "stdio.h"	// 调试信息输出

#include "spi.h"    // cubemx生成的
#include "usart.h"  // cubemx生成的


/* ========================== 以下通信部分修改区 ============================*/

extern SPI_HandleTypeDef hspi1;
#define SD_SPI hspi1            // 减少移植时需要修改的地方


/**
 * @brief   SD_SPI 速度设置函数
 *
 * @param   SPI_BaudRate_Prescaler  SPI_BAUDRATEPRESCALER_2~SPI_BAUDRATEPRESCALER_256(2的倍数)
 *
 * @return  void
 *
 * @remark  SD卡初始化时,波特率不能超过400k,传输数据时可以很高(不同SD卡的最高范围不同)。
 *
 */
void SD_SPI_SetSpeed(uint8_t SPI_BaudRatePrescaler)
{
    assert_param(IS_SPI_BAUDRATE_PRESCALER(SPI_BaudRatePrescaler)); // 判断有效性

    __HAL_SPI_DISABLE(&SD_SPI);            // 先关闭SPI

    // hspi1.Init.BaudRatePrescaler = SPI_BAUDRATEPRESCALER_256;    // 设置波特率

    SD_SPI.Instance->CR1 &= 0XFFC7;                 // 位3-5清零,用来设置波特率
    SD_SPI.Instance->CR1 |= SPI_BaudRatePrescaler;  // 设置SPI速度

    __HAL_SPI_ENABLE(&SD_SPI);             // 重新使能SPI
}

/**
 * @brief   SD_SPI 读写一个字节
 *
 * @param   TxData      要写入的字节
 *
 * @return  uint8_t     读取到的字节
 */
uint8_t SD_SPI_ReadWriteByte(uint8_t TxData)
{
    uint8_t Rxdata;
    HAL_SPI_TransmitReceive(&SD_SPI, &TxData, &Rxdata, 1, 1000);
    return Rxdata;
}

/**
 * @brief   SD_SPI 写入一个字节
 *
 * @param   TxData      要写入的字节
 *
 * @return  uint8_t     0:写入成功,其他:写入失败
 */
uint8_t SD_SPI_WriteByte(uint8_t TxData)
{
    return HAL_SPI_Transmit(&SD_SPI, &TxData, 1, 1000);
}

/* ========================== 以上通信部分修改区 ============================*/


/* ========================== 以下SD卡通信修改区 ============================*/

uint8_t  SD_Type = 0;   // SD卡的类型

/**
 * @brief   SD卡底层读写一个字节
 *
 * @param   data        要写入的字节
 *
 * @return  uint8_t     读取到的字节
 *
 * @remark  调用SPI读写
 */
uint8_t SD_ReadWriteByte(uint8_t data)
{
    return SD_SPI_ReadWriteByte(data);
}

/**
 * @brief   SD卡初始化的时候,需要低速(400K以下)
 *
 * @param   void
 *
 * @return  void
 *
 * @remark  根据自己的芯片选择合适的分频系数 STM32L475VET6在这个分频系数下对应的是312.5K
 */
void SD_SpeedLow(void)
{
    // 初始化时设置到低速模式
    SD_SPI_SetSpeed(SPI_BAUDRATEPRESCALER_256);
}

/**
 * @brief   SD卡正常工作的时候,可以高速
 *
 * @param   void
 *
 * @return  void
 *
 * @remark  根据自己的芯片选择合适的分频系数 STM32L475VET6在这个分频系数下对应的是40M
 */
void SD_SpeedHigh(void)
{
    // 传输数据时设置到高速模式
    SD_SPI_SetSpeed(SPI_BAUDRATEPRESCALER_2);   // STM32L475VET6对应的是40M
}

/* ========================== 以上SD卡通信修改区 ============================*/


/* ========================== 以下SD卡通信实现区(无需修改) ============================*/

/**
 * @brief   等待卡准备好
 *
 * @param   void
 *
 * @return  uint8_t 0,准备好了;其他,错误代码
 */
uint8_t SD_WaitReady(void)
{
    uint32_t t = 0;
    do
    {
        if(SD_SPI_ReadWriteByte(0XFF) == 0XFF)
			return 0;		// OK
        t++;
    } while(t < 0XFFFFFF);	// 等待
    return 1;
}

/**
 * @brief   取消选择,释放SPI总线
 *
 * @param   void
 *
 * @return  void
 */
void SD_DisSelect(void)
{
    SD_CS_SET(1);
    SD_ReadWriteByte(0xff); // 提供额外的8个时钟
}

/**
 * @brief   选择SD卡,并且等待卡准备OK
 *
 * @param   void
 *
 * @return  0,成功;1,失败;
 */
uint8_t SD_Select(void)
{
    SD_CS_SET(0);

	if(SD_WaitReady() == 0)
        return 0;	// 等待成功

    SD_DisSelect();

    return 1;	// 等待失败
}

/**
 * @brief   等待SD卡回应
 *
 * @param   Response	要得到的回应值
 *
 * @return  uint8_t		0,成功得到了该回应值。其他,得到回应值失败。
 */
uint8_t SD_GetResponse(uint8_t Response)
{
    uint16_t Count = 0xFFFF; // 等待次数
    while((SD_SPI_ReadWriteByte(0XFF) != Response) && Count)
		Count--; 	// 等待得到准确的回应
    if(Count == 0)
		return MSD_RESPONSE_FAILURE;	// 得到回应失败
    else
		return MSD_RESPONSE_NO_ERROR;	// 正确回应
}

/**
 * @brief   从sd卡读取一个数据包的内容
 *
 * @param   buf     	数据缓存区
 * @param   len     	要读取的数据长度
 *
 * @return  uint8_t     0,成功;其他,失败
 */
uint8_t SD_RecvData(uint8_t *buf, uint16_t len)
{
    if(SD_GetResponse(0xFE))
		return 1;	// 等待SD卡发回数据起始令牌0xFE
    while(len--)	// 开始接收数据
    {
        *buf = SD_ReadWriteByte(0xFF);
        buf++;
    }
    //下面是2个伪CRC(dummy CRC)
    SD_SPI_ReadWriteByte(0xFF);
    SD_SPI_ReadWriteByte(0xFF);
    return 0; // 读取成功
}

/**
 * @brief   向sd卡写入一个数据包的内容 512字节
 *
 * @param   buf     	数据缓存区
 * @param   cmd     	指令
 *
 * @return  uint8_t     0,成功;其他,失败
 */
uint8_t SD_SendBlock(uint8_t *buf, uint8_t cmd)
{
    uint16_t t;

    if(SD_WaitReady())
		return 1;	// 等待准备失效

    SD_ReadWriteByte(cmd);

    if(cmd != 0XFD)	// 不是结束指令
    {
        for(t = 0; t < 512; t++)
			SD_ReadWriteByte(buf[t]);		// 提高速度,减少函数传参时间

        SD_ReadWriteByte(0xFF);	// 忽略crc
        SD_ReadWriteByte(0xFF);

		t = SD_SPI_ReadWriteByte(0xFF);	// 接收响应

		if((t & 0x1F) != 0x05)
			return 2;	// 响应错误
    }
    return 0;	// 写入成功
}

/**
 * @brief   向SD卡发送一个命令
 *
 * @param   cmd     	命令
 * @param   arg     	命令参数
 * @param   crc     	crc校验值
 *
 * @return  uint8_t     SD卡返回的响应
 */
uint8_t SD_SendCmd(uint8_t cmd, uint32_t arg, uint8_t crc)
{
    uint8_t r1;
    uint8_t Retry = 0;
    SD_DisSelect();		// 取消上次片选
    if(SD_Select())
		return 0XFF;	// 片选失效

	// 发送
    SD_ReadWriteByte(cmd | 0x40);	// 分别写入命令
    SD_ReadWriteByte(arg >> 24);
    SD_ReadWriteByte(arg >> 16);
    SD_ReadWriteByte(arg >> 8);
    SD_ReadWriteByte(arg);
    SD_ReadWriteByte(crc);

    if(cmd == CMD12)
		SD_ReadWriteByte(0xff); // Skip a stuff byte when stop reading
    // 等待响应,或超时退出
    Retry = 0X1F;
	do
    {
        r1 = SD_ReadWriteByte(0xFF);
    } while((r1 & 0X80) && Retry--);

    return r1;	// 返回状态值
}

/**
 * @brief   获取SD卡的CID信息,包括制造商信息
 *
 * @param   cid_data    存放CID的内存,至少16Byte
 *
 * @return  uint8_t		0:NO_ERR。1:错误
 */
uint8_t SD_GetCID(uint8_t *cid_data)
{
    uint8_t r1;
    // 发CMD10命令,读CID
    r1 = SD_SendCmd(CMD10, 0, 0x01);
    if(r1 == 0x00)
    {
        r1 = SD_RecvData(cid_data, 16); // 接收16个字节的数据
    }

    SD_DisSelect();	// 取消片选

    if(r1)
		return 1;
    else
		return 0;
}

/**
 * @brief   获取SD卡的CSD信息,包括容量和速度信息
 *
 * @param   cid_data    存放CSD的内存,至少16Byte
 *
 * @return  uint8_t		0:NO_ERR。1:错误
 */
uint8_t SD_GetCSD(uint8_t *csd_data)
{
    uint8_t r1;
    r1 = SD_SendCmd(CMD9, 0, 0x01);		// 发CMD9命令,读CSD
    if(r1 == 0)
    {
        r1 = SD_RecvData(csd_data, 16); // 接收16个字节的数据
    }
    SD_DisSelect();//取消片选
    if(r1)return 1;
    else return 0;
}

/**
 * @brief   获取SD卡的总扇区数(扇区数)每扇区的字节数必为512,因为如果不是512,则初始化不能通过.
 *
 * @param   void
 *
 * @return  uint32_t	0: 取容量出错。其他:SD卡的容量(扇区数/512字节)
 */
uint32_t SD_GetSectorCount(void)
{
    uint8_t csd[16];
    uint32_t Capacity;
    uint8_t n;
    uint16_t csize;

    // 取CSD信息,如果期间出错,返回0
    if(SD_GetCSD(csd) != 0)
		return 0;

    printf("SD_GetCSD(csd):[%d]\r\n", csd[0]);

    // 如果为SDHC卡,按照下面方式计算
    if((csd[0] & 0xC0) == 0x40)	// V2.00的卡
    {
        csize = csd[9] + ((uint16_t)csd[8] << 8) + 1;
        Capacity = (uint32_t)csize << 10;	// 得到扇区数
    }
    else // V1.XX的卡
    {
        n = (csd[5] & 15) + ((csd[10] & 128) >> 7) + ((csd[9] & 3) << 1) + 2;
        csize = (csd[8] >> 6) + ((uint16_t)csd[7] << 2) + ((uint16_t)(csd[6] & 3) << 10) + 1;
        Capacity = (uint32_t)csize << (n - 9); // 得到扇区数
    }
    return Capacity;
}

/**
 * @brief   初始化SD卡
 *
 * @param   void
 *
 * @return  uint8_t     0:初始化成功,其他:初始化错误
 */
uint8_t SD_Init(void)
{
    uint8_t r1;			// 存放SD卡的返回值
    uint16_t retry;		// 用来进行超时计数
    uint8_t buf[4];
    uint16_t i;

    SD_SpeedLow();		// 设置到低速模式

    for(i = 0; i < 10; i++)
		SD_ReadWriteByte(0XFF);	// 发送最少74个脉冲

    retry = 20;
    do
    {
        r1 = SD_SendCmd(CMD0, 0, 0x95); // 进入IDLE状态
    } while((r1 != 0X01) && retry--);

    SD_Type = 0;	// 默认无卡
    if(r1 == 0X01)
    {
        if(SD_SendCmd(CMD8, 0x1AA, 0x87) == 1)	// SD V2.0
        {
            for(i = 0; i < 4; i++)
				buf[i] = SD_ReadWriteByte(0XFF);	// Get trailing return value of R7 resp
            if(buf[2] == 0X01 && buf[3] == 0XAA)		// 卡是否支持2.7~3.6V
            {
                retry = 0XFFFE;
                do
                {
                    SD_SendCmd(CMD55, 0, 0X01);		// 发送CMD55
                    r1 = SD_SendCmd(CMD41, 0x40000000, 0X01);	// 发送CMD41
                } while(r1 && retry--);
                if(retry && SD_SendCmd(CMD58, 0, 0X01) == 0)	// 鉴别SD2.0卡版本开始
                {
                    for(i = 0; i < 4; i++)
						buf[i] = SD_ReadWriteByte(0XFF);	// 得到OCR值
                    if(buf[0] & 0x40)
						SD_Type = SD_TYPE_V2HC;					// 检查CCS
                    else
						SD_Type = SD_TYPE_V2;
                }
            }
        }
        else // SD V1.x/ MMC V3
        {
            SD_SendCmd(CMD55, 0, 0X01);			// 发送CMD55
            r1 = SD_SendCmd(CMD41, 0, 0X01);	// 发送CMD41
            if(r1 <= 1)
            {
                SD_Type = SD_TYPE_V1;
                retry = 0XFFFE;
                do // 等待退出IDLE模式
                {
                    SD_SendCmd(CMD55, 0, 0X01);			// 发送CMD55
                    r1 = SD_SendCmd(CMD41, 0, 0X01);	// 发送CMD41
                } while(r1 && retry--);
            }
            else // MMC卡不支持CMD55+CMD41识别
            {
                SD_Type = SD_TYPE_MMC; // MMC V3
                retry = 0XFFFE;
                do // 等待退出IDLE模式
                {
                    r1 = SD_SendCmd(CMD1, 0, 0X01); // 发送CMD1
                } while(r1 && retry--);
            }
            if(retry == 0 || SD_SendCmd(CMD16, 512, 0X01) != 0)SD_Type = SD_TYPE_ERR; // 错误的卡
        }
    }
    SD_DisSelect();		// 取消片选
    SD_SpeedHigh();		// 高速
    if(SD_Type)
		return 0;
    else if(r1)
		return r1;

    return 0xaa;	// 其他错误
}

/**
 * @brief   读SD卡,连续读扇区
 *
 * @param   buf     	数据缓存区
 * @param   sector  	扇区
 * @param   cnt     	扇区数
 *
 * @return  uint8_t     0,OK;其他,失败.
 */
uint8_t SD_ReadDisk(uint8_t *buf, uint32_t sector, uint8_t cnt)
{
    uint8_t r1;
    if(SD_Type != SD_TYPE_V2HC)
		sector <<= 9;	// 转换为字节地址
    if(cnt == 1)
    {
        r1 = SD_SendCmd(CMD17, sector, 0X01); // 读命令
        if(r1 == 0) // 指令发送成功
        {
            r1 = SD_RecvData(buf, 512); // 接收512个字节
        }
    }
    else
    {
        r1 = SD_SendCmd(CMD18, sector, 0X01);	// 连续读命令
        do
        {
            r1 = SD_RecvData(buf, 512);			// 接收512个字节
            buf += 512;
        } while(--cnt && r1 == 0);
        SD_SendCmd(CMD12, 0, 0X01);				// 发送停止命令
    }
    SD_DisSelect();	// 取消片选

    return r1;
}

/**
 * @brief   写SD卡,连续写扇区
 *
 * @param   buf     数据缓存区
 * @param   sector  起始扇区
 * @param   cnt     扇区数
 *
 * @return  uint8_t     0,OK;其他,失败.
 */
uint8_t SD_WriteDisk(uint8_t *buf, uint32_t sector, uint8_t cnt)
{
    uint8_t r1;
    if(SD_Type != SD_TYPE_V2HC)
		sector *= 512;	// 转换为字节地址
    if(cnt == 1)
    {
        r1 = SD_SendCmd(CMD24, sector, 0X01); // 读命令
        if(r1 == 0) // 指令发送成功
        {
            r1 = SD_SendBlock(buf, 0xFE);	// 写512个字节
        }
    }
    else
    {
        if(SD_Type != SD_TYPE_MMC)
        {
            SD_SendCmd(CMD55, 0, 0X01);
            SD_SendCmd(CMD23, cnt, 0X01);		// 发送指令
        }
        r1 = SD_SendCmd(CMD25, sector, 0X01);	// 连续读命令
        if(r1 == 0)
        {
            do
            {
                r1 = SD_SendBlock(buf, 0xFC);	// 接收512个字节
                buf += 512;
            } while(--cnt && r1 == 0);
            r1 = SD_SendBlock(0, 0xFD);			// 接收512个字节
        }
    }
    SD_DisSelect();	// 取消片选
    return r1;
}

/* ========================== 以上SD卡通信实现区(无需修改) ============================*/
3.2.3 main.c
添加printf支持,在usart.c中添加如下代码
// 需要调用stdio.h文件
#include <stdio.h>
// 取消ARM的半主机工作模式
#pragma import(__use_no_semihosting)// 标准库需要的支持函数
struct __FILE
{
	int handle;
};
FILE __stdout;
void _sys_exit(int x) // 定义_sys_exit()以避免使用半主机模式
{
	x = x;
}
void _ttywrch(int ch)	// 这个函数一般情况下应该是不需要的,但是在这里需要
{
	ch = ch;
}
int fputc(int ch, FILE *f)
{
	HAL_UART_Transmit(&huart1, (uint8_t *)&ch, 1, 0xffff);
	return ch;
}
把以下代码放在main函数中执行
uint8_t buf[512];
uint8_t sta = 0;

while(SD_Init())	// 检测不到SD卡
{
    printf("initing...!\r\n");
    HAL_Delay(100);
}

printf("SD Card Size = %d MB \r\n", SD_GetSectorCount() >> 11);	// 每个扇区512字节
printf("SD Card Capacity = %d\r\n", SD_GetSectorCount());		// 每个扇区512字节

// 从0扇区开始,读取一个扇区的数据
if(SD_ReadDisk(buf, 0, 1) == 0)
{
    printf("USART1 Sending Data...\r\n");
    printf("SECTOR 0 DATA:\r\n");

    for(uint32_t sd_size = 0; sd_size < 512; sd_size++)
        printf("%x ", buf[sd_size]); // 打印0扇区数据

    printf("\r\n USART1 Send Data Over! \r\n");
}

// 修改数组中的数据
for(uint32_t i = 0; i < 512; i++)
    buf[i] = i * 3;		// 初始化写入的数据,是3的倍数.

// 从第0个扇区开始读取一个扇区的数据
sta = SD_WriteDisk(buf, 0, 1);
if(sta == 0)
    printf("Write over!\r\n");
else
    printf("err:%d\r\n", sta);

// 从0扇区开始,读取一个扇区的数据(验证是否是写入的数据)
if(SD_ReadDisk(buf, 0, 1) == 0)
{
    printf("USART1 Sending Data...\r\n");
    printf("SECTOR 0 DATA:\r\n");

    for(uint32_t sd_size = 0; sd_size < 512; sd_size++)
        printf("%x ", buf[sd_size]); // 打印0扇区数据

    printf("\r\n USART1 Send Data Over! \r\n");
}
如果程序正常执行,说明SD卡读写没问题。可以进行下一步。
3.3 移植 FATFS 系统
3.3.1 添加源码
在工程目录创建文件夹并放入FATFS系统源码
- Middlewares\FATFS_R0.15
- ffunicode.c
- ffsystem.c
- ffconf.h
- ff.h
- ff.c
- diskio.h
- diskio.c
- 00readme.txt
- 00history.txt
并在 Keil 中添加文件和头文件路径。
3.3.2 修改配置 ffconf.h
一些声明的含义可以参考一下网址:http://elm-chan.org/fsw/ff/doc/config.html。
以下内容是把原有的英文注释换成了中文的。并且修改了自己需要的配置。
需要注意的点(需要进行适配):
#define FF_CODE_PAGE 936 // 支持中文#define FF_USE_LFN 3 // 支持长文件名,且存在堆区#define FF_VOLUMES 1 // 一共有一个卷
/* 版本ID */
#define FFCONF_DEF	80286	/* Revision ID */


/*---------------------------------------------------------------------------/
/ Function Configurations
/---------------------------------------------------------------------------*/

/* 设置是否只读。建议为0,否则很多API用不了(0:可读写。1:只读)*/
#define FF_FS_READONLY	0

/*
	此选项定义了最小化级别,以删除一些基本API函数。

	0:基本功能已完全启用。建议为0
	1:f_stat(), f_getfree(), f_unlink(), f_mkdir(), f_truncate() and f_rename() 被移除
	2:在 1 的基础上 f_opendir(), f_readdir() and f_closedir() 被移除
	3:在 2 的基础上 f_lseek() 被移除
*/
#define FF_FS_MINIMIZE	0

/*
	设置是否使用查找功能 f_findfirst() and f_findnext().

	0:不启用
	1:启用
	2:同时启用匹配altname[]
*/
#define FF_USE_FIND		0

/*
	是否启用格式化功能 f_mkfs(),对于没有格式化为Fat32的U盘或者SD卡,设置为1,否则无法正常初始化。

	0:禁止使用 f_mkfs()
	1:允许使用 f_mkfs()
*/
#define FF_USE_MKFS		1

/* 设置是否使用快速查找功能(0:不使用。1:使用)*/
#define FF_USE_FASTSEEK	1

/* 设置是否使用拓展功能(0:不使用。1:使用) */
#define FF_USE_EXPAND	1

/* 切换属性操作函数 f_chmod()和 f_utime()(0:不使用。1:使用)仅在 FF_FS_READONLY 模式下可用*/
#define FF_USE_CHMOD	0

/* 切换卷标函数 f_getlabel() and f_setlabel() (0:不使用。1:使用)*/
#define FF_USE_LABEL	1

/* 此选项切换 f_forward()函数。(0:禁用或1:启用) */
#define FF_USE_FORWARD	0

/* 设置对字符串的操作 */
#define FF_USE_STRFUNC	1
#define FF_PRINT_LLI	1
#define FF_PRINT_FLOAT	1
#define FF_STRF_ENCODE	3
/* FF_USE_STRFUNC switches string functions, f_gets(), f_putc(), f_puts() and f_printf().
/
/   0: Disable. FF_PRINT_LLI, FF_PRINT_FLOAT and FF_STRF_ENCODE have no effect.
/   1: Enable without LF-CRLF conversion.
/   2: Enable with LF-CRLF conversion.
/
/  FF_PRINT_LLI = 1 makes f_printf() support long long argument and FF_PRINT_FLOAT = 1/2
/  makes f_printf() support floating point argument. These features want C99 or later.
/  When FF_LFN_UNICODE >= 1 with LFN enabled, string functions convert the character
/  encoding in it. FF_STRF_ENCODE selects assumption of character encoding ON THE FILE
/  to be read/written via those functions.
/
/   0: ANSI/OEM in current CP
/   1: Unicode in UTF-16LE
/   2: Unicode in UTF-16BE
/   3: Unicode in UTF-8
*/


/*---------------------------------------------------------------------------/
/ Locale and Namespace Configurations
/---------------------------------------------------------------------------*/


/* 设置语言支持(936:中文支持。437:英文支持)*/
#define FF_CODE_PAGE	936
/* This option specifies the OEM code page to be used on the target system.
/  Incorrect code page setting can cause a file open failure.
/   437 - U.S.
/   720 - Arabic
/   737 - Greek
/   771 - KBL
/   775 - Baltic
/   850 - Latin 1
/   852 - Latin 2
/   855 - Cyrillic
/   857 - Turkish
/   860 - Portuguese
/   861 - Icelandic
/   862 - Hebrew
/   863 - Canadian French
/   864 - Arabic
/   865 - Nordic
/   866 - Russian
/   869 - Greek 2
/   932 - Japanese (DBCS)
/   936 - Simplified Chinese (DBCS)
/   949 - Korean (DBCS)
/   950 - Traditional Chinese (DBCS)
/     0 - Include all code pages above and configured by f_setcp()
*/

/*
	设置是否支持长文件名(如果设置了支持中文,建议一定要使用,中文一个字符两个字节)

	0:不启用(最长12个字符,FF_MAX_LFN参数不生效)
	1:启用(工作空间在BSS段,线程不安全。可以使用)
	2:启用(使用动态缓存在栈区。不推荐)
	3:启用(使用动态缓存在堆区。推荐使用)
*/
#define FF_USE_LFN		3
#define FF_MAX_LFN		255

/*
	当FF_USE_LFN启用时,此处设置字符编码。(IO函数也会被影响)

	0: ANSI/OEM in current CP (TCHAR = char)
	1: Unicode in UTF-16 (TCHAR = WCHAR)
	2: Unicode in UTF-8 (TCHAR = char)
	3: Unicode in UTF-32 (TCHAR = DWORD)
*/
#define FF_LFN_UNICODE	0

/*
	这组选项定义FILINFO结构中用于读取目录项的文件名成员的大小。
	这些值应该足以读取文件名。读取文件名的最大可能长度取决于字符编码。
	当LFN未启用时,这些选项无效。
*/
#define FF_LFN_BUF		255
#define FF_SFN_BUF		12

/*
	设置是否支持相对路径

	0: 不支持相对路径,并删除相关函数
	1: 支持相对路径,f_chdir()和f_chdrive()可用。
	2: 在1的基础上,f_getcwd() 可用。
*/
#define FF_FS_RPATH		0


/*---------------------------------------------------------------------------/
/ Drive/Volume Configurations
/---------------------------------------------------------------------------*/

/*
	一共有几个卷。(1-10)
	有几个存储设备就设置为几,比如只有SD卡就是1;如果有SD卡和W25Q128就是2。
*/
#define FF_VOLUMES		1

/*
	FF_STR_VOLUME_ID:卷标从几开始。
	当 FF_STR_VOLUME_ID 设置为1或2时,路径名称中的驱动器号可以使用任意字符串。

	FF_VOLUME_STRS 定义每个逻辑驱动器的卷ID字符串。项目数量不得小于FF_VOLUMES。
	卷ID字符串的有效字符为A-Z、A-Z和0-9,但是,会对它们进行不区分大小写的比较。
	如果 FF_STR_VOLUME_ID>=1 且未定义 FF_VOLUME_STRS,则需要用户定义的卷字符串表,如下所示:
	const char* VolumeStr[FF_VOLUMES] = {"ram","flash","sd","usb",...
*/
#define FF_STR_VOLUME_ID	0
#define FF_VOLUME_STRS		"RAM","NAND","CF","SD","SD2","USB","USB2","USB3"

/*
	多分区支持。(将一个物理设备分为多个磁盘)
	0:不支持。默认每个设备就是一个磁盘分区。
	1:支持。每个逻辑驱动器号都可以绑定到VolToPart[]中列出的任意物理驱动器和分区。
		并且支持 f_fdisk() 函数
*/
#define FF_MULTI_PARTITION	0


/*
	设置设备扇区的大小范围。(对于SD卡,固定就是512)

	如果 FF_MAX_SS > FF_MIN_SS。	FatFs被配置为可变扇区大小模式。
	disk_ioctl() 函数需要实现 GET_SECTOR_SIZE 命令
*/
#define FF_MIN_SS		512
#define FF_MAX_SS		512


/*
	此选项切换对64位LBA的支持。
	0:禁用
	1:启用
	要启用64位LBA,还需要启用exFAT(FF_FS_EXFAT==1)
*/
#define FF_LBA64		0

/*
	在f_mkfs和f_fdisk函数中将GPT切换为分区格式的最小扇区数。
	0x100000000最大值。当FF_LBA64==0时,此选项无效。
*/
#define FF_MIN_GPT		0x10000000

/*
	此选项切换对ATA-TRIM的支持。
	0:禁用
	1:启用
	要启用Trim函数,还应将CTRL_TRIM命令实现到disk_ioctl()函数。
*/
#define FF_USE_TRIM		0


/*---------------------------------------------------------------------------/
/ System Configurations
/---------------------------------------------------------------------------*/


/*
	此选项切换小缓冲区配置。
	0:正常
	1:微小。	在微小配置下,文件对象(FIL)的大小收缩为FF_MAX_SS字节。
		文件系统对象(FATFS)中的公共扇区缓冲区用于文件数据传输,而不是从文件对象中删除私有扇区缓冲区
*/
#define FF_FS_TINY		0

/*
	此选项切换对exFAT文件系统的支持。
	0:禁用
	1:启用
	要启用exFAT,还需要启用LFN。(FF_USE_LFN>=1)
*/
#define FF_FS_EXFAT		0

/*
	FF_FS_NORTC:系统是否有RTC时钟,以支持时间戳功能。(FF_FS_READONLY = 1时,该选项不受影响)
	0:有RTC,支持时间戳。需要添加 get_fattime() 函数。
		FF_NORTC_YEAR、FF_NORTC_MDAY、FF_NORTC_MON 不受影响
	1:没有RTC,不支持时间戳。
		使用默认的FF_NORTC_YEAR、FF_NORTC_MDAY、FF_NORTC_MON

*/
#define FF_FS_NORTC		0
#define FF_NORTC_MON	1
#define FF_NORTC_MDAY	1
#define FF_NORTC_YEAR	2022

/*
	如果您需要知道FAT32卷上的正确可用空间,请设置此选项的位0,
	并且在卷装载后的第一时间执行f_getfree()函数将强制进行完整的FAT扫描。
	位1控制最后分配的簇号的使用。

	bit0=0: Use free cluster count in the FSINFO if available.
	bit0=1: Do not trust free cluster count in the FSINFO.
	bit1=0: Use last allocated cluster number in the FSINFO if available.
	bit1=1: Do not trust last allocated cluster number in the FSINFO.
*/
#define FF_FS_NOFSINFO	0

/*
	选项 FF_FS_LOCK 切换文件锁定功能以控制重复文件打开和非法操作以打开对象。
	当 FF_FS_READONLY 为1时,此选项必须为0。

	0:禁用文件锁定功能。为了避免卷损坏,应用程序应避免非法打开、删除和重命名打开的对象。
	!0:启用文件锁定功能。该值定义在文件锁定控制下可以同时打开的文件/子目录的数量。
		请注意,文件锁定控制与重新进入无关。
*/
#define FF_FS_LOCK		0

/*
	选项FF_FS_REENTRANT切换FatFs模块本身的再入(线程安全)。
	请注意,无论此选项如何,对不同卷的文件访问始终是可重入的,
	卷控制函数f_mount()、f_mkfs()和f_fdisk()始终不是可重入函数。
	只有对同一卷的文件/目录访问受此功能控制。

	0:禁用重入。FF_FS_TIMEOUT无效。
	1:启用重新进入。
		此外,必须将用户提供的同步处理程序ff_mutex_create()、ff_mutexdelete()
		ff_mutex_take()和ff_mutex_give()函数添加到项目中。
		样品可在ffsystem.c中获得。

	FF_FS_TIMEOUT 以 O/S 时间刻度为单位定义超时时间。
*/
#define FF_FS_REENTRANT	0
#define FF_FS_TIMEOUT	1000
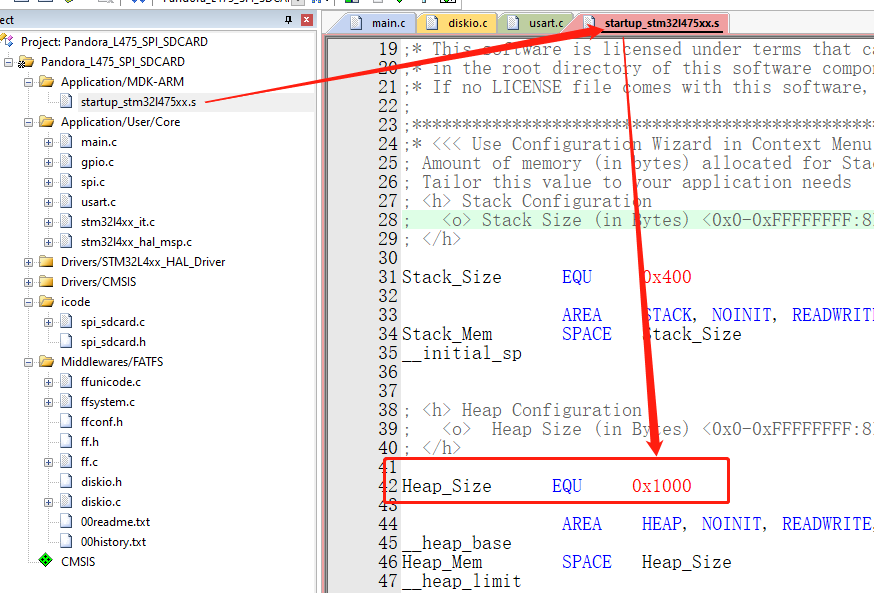
这里设置了支持长文件名,并且相关内容要申请堆中的内存,因此这里需要增大堆内存的空间。
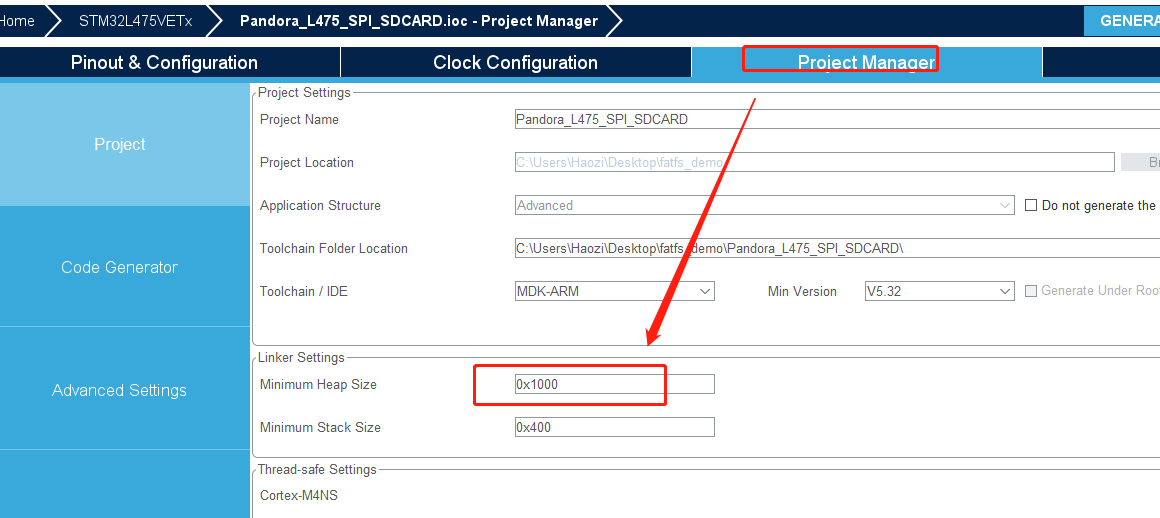
也可以直接从启动文件处修改
3.3.3 底层适配 diskio.c
需要适配的函数如下
第一步:设备编号定义
这里只有一个设备(SD卡),把DEV_MMC编号改为0。(要求从0开始按顺序增加)
其他的可以按顺序编号,当然也可以直接删掉。但是为了以后增加,建议保留。
/* Definitions of physical drive number for each drive */
#define DEV_RAM		1	/* Example: Map Ramdisk to physical drive 0 */
#define DEV_MMC		0	/* Example: Map MMC/SD card to physical drive 1 */
#define DEV_USB		2	/* Example: Map USB MSD to physical drive 2 */
这里名字其实是可以改的,比如改为(正点原子就是这样的):
#define SD_CARD	 	0  			// SD卡,卷标为0
#define EX_FLASH 	1			// 外部spi flash,卷标为1
如果改了,下面的适配函数也都一样改就可以了。
第二步:添加头文件
因为需要用到我们前面写好的驱动以及printf调试输出,把头文件添加进来。
#include "spi_sdcard.h"
#include "stdio.h"
第三步:函数适配
这里直接默认返回OK,没什么问题,其他类型的设备注释掉即可。需要用的话再修改。
DSTATUS disk_status (
	BYTE pdrv		/* Physical drive nmuber to identify the drive */
)
{
	DSTATUS stat;

	switch (pdrv) {
	case DEV_RAM :	// 还没用到,先注释掉
		// result = RAM_disk_status();

		// translate the reslut code here

		return stat;

	case DEV_MMC :

		return 0;	// 默认没什么问题

	case DEV_USB :	// 还没用到,先注释掉
		// result = USB_disk_status();

		// translate the reslut code here

		return stat;
	}
	return STA_NOINIT;
}
初始化调用我们前面写好的驱动
DSTATUS disk_initialize (
	BYTE pdrv				/* Physical drive nmuber to identify the drive */
)
{
	DSTATUS stat;

	switch (pdrv) {
	case DEV_RAM :	// 还没用到,先注释掉
		// result = RAM_disk_initialize();

		// translate the reslut code here

		return stat;

	case DEV_MMC :

		if(SD_Init() == 0)    // SD_Init()是SD初始化函数,无错误返回0
            return 0;
        else
            return STA_NOINIT;

	case DEV_USB :	// 还没用到,先注释掉
		// result = USB_disk_initialize();

		// translate the reslut code here

		return stat;
	}
	return STA_NOINIT;
}
读扇区函数,一样的调用前面的驱动
DRESULT disk_read (
	BYTE pdrv,		/* Physical drive nmuber to identify the drive */
	BYTE *buff,		/* Data buffer to store read data */
	LBA_t sector,	/* Start sector in LBA */
	UINT count		/* Number of sectors to read */
)
{
	DRESULT res;

	switch (pdrv) {
	case DEV_RAM :
		// translate the arguments here

		// result = RAM_disk_read(buff, sector, count);

		// translate the reslut code here

		return res;

	case DEV_MMC :

		res = (DRESULT) SD_ReadDisk(buff, sector, count);

		while(res)	// 读出错
		{
			printf("sd read error:%d\r\n", res);
			SD_Init();	// 重新初始化SD卡
			res =  (DRESULT) SD_ReadDisk(buff,sector,count);
		}

		return res;

	case DEV_USB :
		// translate the arguments here

		// result = USB_disk_read(buff, sector, count);

		// translate the reslut code here

		return res;
	}

	return RES_PARERR;
}
写扇区函数,还是调用写好的驱动
DRESULT disk_write (
	BYTE pdrv,			/* Physical drive nmuber to identify the drive */
	const BYTE *buff,	/* Data to be written */
	LBA_t sector,		/* Start sector in LBA */
	UINT count			/* Number of sectors to write */
)
{
	DRESULT res;

	switch (pdrv) {
	case DEV_RAM :
		// translate the arguments here

		// result = RAM_disk_write(buff, sector, count);

		// translate the reslut code here

		return res;

	case DEV_MMC :

		res = (DRESULT) SD_WriteDisk((uint8_t *)buff, sector, count);

		while(res)	// 写出错
		{
			printf("sd write error:%d\r\n", res);
			SD_Init();	// 重新初始化SD卡
			res = (DRESULT) SD_WriteDisk((uint8_t *)buff, sector, count);
		}

		return res;

	case DEV_USB :
		// translate the arguments here

		// result = USB_disk_write(buff, sector, count);

		// translate the reslut code here

		return res;
	}

	return RES_PARERR;
}
命令函数
DRESULT disk_ioctl (
	BYTE pdrv,		/* Physical drive nmuber (0..) */
	BYTE cmd,		/* Control code */
	void *buff		/* Buffer to send/receive control data */
)
{
	DRESULT res;

	switch (pdrv) {
	case DEV_RAM :

		// Process of the command for the RAM drive

		return res;

	case DEV_MMC :

		switch(cmd)
	    {
#if FF_FS_READONLY == 0
		    case CTRL_SYNC:
				res = RES_OK;
		        break;
#endif
#if FF_USE_MKFS == 1
		    case GET_SECTOR_COUNT:
		        *(DWORD*)buff = SD_GetSectorCount();
		        res = RES_OK;
		        break;
		    case GET_BLOCK_SIZE:
				*(WORD*)buff = 8;
		        res = RES_OK;
		        break;
#endif
#if FF_MAX_SS != FF_MIN_SS
		    case GET_SECTOR_SIZE:
				*(DWORD*)buff = 512;
		        res = RES_OK;
		        break;
#endif
		    default:
		        res = RES_PARERR;
		        break;
	    }
		return res;

	case DEV_USB :

		// Process of the command the USB drive

		return res;
	}

	return RES_PARERR;
}
在此文件的最后添加一个获取时间的函数,默认返回0
DWORD get_fattime(void)
{
	return 0;
}
3.3.4 验证 main.c
把以下代码放在main函数中执行,如果成功执行,说明没问题。
这里执行 f_res = f_mount(&fs, “0:”, 1),标号0就是diskio.c开头定义的标号。
	FATFS fs;				/* FatFs 文件系统对象 */
	FRESULT f_res;			/* 文件操作结果 */
	BYTE work[FF_MAX_SS];

	FIL file;                       /* 文件对象 */
	UINT fnum;                      /* 文件成功读写数量 */
	BYTE ReadBuffer[1024] = {0};    /* 读缓冲区 */
	BYTE WriteBuffer[] = "This is STM32 working with FatFs \r\n";	/* 写缓冲区 */

	// 在外部 SD 卡挂载文件系统,文件系统挂载时会对 SD 卡初始化
	// note:必须先要保证SD卡正常拥有FAT文件系统,如果没有会失败。
    f_res = f_mount(&fs, "0:", 1);

	/* 如果没有文件系统就格式化创建创建文件系统 */
    if(f_res == FR_NO_FILESYSTEM)
    {
        printf("The SD card does not yet have a file system and is about to be formatted... \r\n");
        /* 格式化 */
		f_res = f_mkfs("0:", NULL, work, sizeof(work));	/* Create a FAT volume */

        if(f_res == FR_OK)
        {
            printf("The SD card successfully formatted the file system\r\n");
            /* 格式化后,先取消挂载 */
            f_res = f_mount(NULL, "0:", 1);
            /* 重新挂载 */
            f_res = f_mount(&fs, "0:", 1);
        }
        else
        {
            printf("The format failed\r\n");
            while(1);
        }
    }
    else if(f_res != FR_OK)
    {
        printf("mount error : %d \r\n", f_res);
        while(1);
    }
    else
    {
        printf("mount sucess!!! \r\n");
    }

	/*----------------------- 文件系统测试:写测试 -----------------------------*/
    /* 打开文件,如果文件不存在则创建它 */
    printf("\r\n ****** Create and Open new text file objects with write access ****** \r\n");

	f_res = f_open(&file, "0:FatFs STM32cube.txt", FA_CREATE_ALWAYS | FA_WRITE);
    if(f_res == FR_OK)
    {
        printf("open file sucess!!! \r\n");
        /* 将指定存储区内容写入到文件内 */
        printf("\r\n****** Write data to the text files ******\r\n");
        f_res = f_write(&file, WriteBuffer, sizeof(WriteBuffer), &fnum);
        if(f_res == FR_OK)
        {
            printf("write file sucess!!! (%d)\r\n", fnum);
            printf("write Data : %s\r\n", WriteBuffer);
        }
        else
        {
            printf("write file error : %d\r\n", f_res);
        }
        /* 不再读写,关闭文件 */
        f_close(&file);
    }
    else
    {
        printf("open file error : %d\r\n", f_res);
    }

    /*------------------- 文件系统测试:读测试 ------------------------------------*/
    printf("\r\n****** Read data from the text files ******\r\n");
    f_res = f_open(&file, "0:FatFs STM32cube.txt", FA_OPEN_EXISTING | FA_READ);
    if(f_res == FR_OK)
    {
        printf("open file sucess!!! \r\n");
        f_res = f_read(&file, ReadBuffer, sizeof(ReadBuffer), &fnum);
        if(f_res == FR_OK)
        {
            printf("read sucess!!! (%d)\r\n", fnum);
            printf("read Data : %s\r\n", ReadBuffer);
        }
        else
        {
            printf(" read error!!! %d\r\n", f_res);
        }
    }
    else
    {
        printf("open file error : %d\r\n", f_res);
    }
    /* 不再读写,关闭文件 */
    f_close(&file);
    /* 不再使用文件系统,取消挂载文件系统 */
    f_mount(NULL, "0:", 1);
    /* 操作完成,停机 */
其他 API 的使用参考 FATFS 官网:http://elm-chan.org/fsw/ff/00index_e.html
4. W25Q128 (Q)SPI模式移植
这里不同开发板与外部FALSH(W25Q128)的通信方式有一丢丢的区别。
两种流程是一样的,只有驱动部分有一丢丢区别。两个开发板都整一份。
4.1 W25QXX系列芯片
W25QXX系列芯片,共有八个引脚,可以使用不同的通信方式。
| 引脚编号 | QSPI通信 | 备注 | SPI通信 | 备注 |
|---|---|---|---|---|
| 1 | CS## | 片选引脚。低电平表示选中。 | CS## | 片选引脚。低电平表示选中。 |
| 2 | IO1 | 数据线1,QSPI_BK1_IO1 | SO | SPI数据输出接口 |
| 3 | IO2 | 数据线2,QSPI_BK1_IO2 | WP## | 硬件写保护引脚,输入高电平可以正常写入数据,输入低电平禁止写入。 |
| 4 | GND | 公共地 | GND | 公共地 |
| 5 | IO0 | 数据线0,QSPI_BK1_IO0 | SI | SPI数据输入接口 |
| 6 | CLK | 时钟线,QSPI_BK1_CLK | CLK | SPI时钟接口 |
| 7 | IO3 | 数据线3,QSPI_BK1_IO3 | HOLD | 状态保存接口,输入低电平禁止操作芯片,输入高电平可正常操作芯片。 |
| 8 | VCC | 电源接口,2.7-3.6电源 | VCC | 电源接口,2.7-3.6电源 |
以W25Q64为例,其容量规划如下:
| 单位 | 大小 | 比例 | 数量 |
|---|---|---|---|
| 页 | 256字节 | 最小单位 | |
| 扇区 | 4K字节(4096字节) | 1扇区=16个页 | 2048个 |
| 块 | 64K字节 | 1块=16个扇区 | 128个 |
其总容量为 64 * 1024 * 128 = 8388608字节 = 8192K字节 = 8M 字节。
对于W25Q128,其共拥有256个块,总容量就为 16M 字节。
芯片每次最小擦写单位为一个扇区,即4K字节。
4.2 创建工程
使用CubeMX创建一个工程。需要配置的项目有:
- 时钟
- 程序调试接口
- 串口(用于观察调试信息)
- (Q)SPI。这里需要根据不同的通讯方式创建工程。
如果使用QSPI创建工程(潘多拉loT Board开发板),则配置如下:
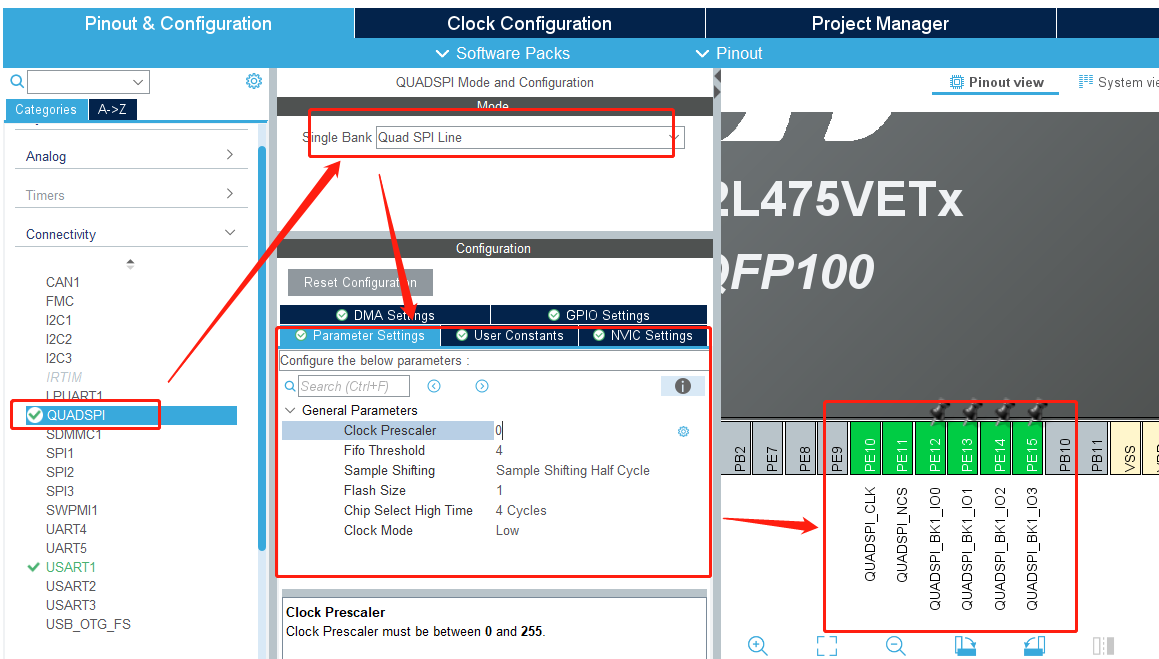
得到的初始化代码如下:
其中代码生成后需要手动修改的为:hqspi.Init.FlashSize,根据使用的Flash的大小修改。
void MX_QUADSPI_Init(void)
{
  hqspi.Instance = QUADSPI;
  hqspi.Init.ClockPrescaler = 0;	// QPSI分频比,W25Q128最大频率为104M,这里为80MHz
  hqspi.Init.FifoThreshold = 4;		// FIFO阈值为4个字节
  hqspi.Init.SampleShifting = QSPI_SAMPLE_SHIFTING_HALFCYCLE;	// 采样移位半个周期(DDR模式下,必须设置为0)
  hqspi.Init.FlashSize = POSITION_VAL(0x1000000)-1;		// SPI FLASH大小,W25Q128大小为16M字节
  hqspi.Init.ChipSelectHighTime = QSPI_CS_HIGH_TIME_4_CYCLE;	// 片选高电平时间为4个时钟(12.5*4=50ns),即手册里面的tSHSL参数
  hqspi.Init.ClockMode = QSPI_CLOCK_MODE_0;	// 模式0
  if (HAL_QSPI_Init(&hqspi) != HAL_OK)
  {
    Error_Handler();
  }
}
5. 多磁盘移植
这里我们直接在第三章的基础上改。
第一步:创建工程根据两种存储介质配置相应的接口。
第二步:添加每种存储介质的驱动、FATFS的源码
第三步:修改配置文件 ffconf.h
相较于上面的配置,需要修改的有
#define FF_VOLUMES 1 // 有几个存储介质,这里就改为几(1-10)
第四步:修改底层接口 diskio.c
设备定义。有几个就写几个,名字可以自己拟,但是标号要从0开始,这个标号就是挂载时的编号。
如果自拟了名字,那后面的函数中switch (pdrv) 的选项名字要对应的改一下
/* Definitions of physical drive number for each drive */
#define DEV_RAM		1	/* Example: Map Ramdisk to physical drive 0 */
#define DEV_MMC		0	/* Example: Map MMC/SD card to physical drive 1 */
#define DEV_USB		2	/* Example: Map USB MSD to physical drive 2 */
其他需要配置的接口如下,直接照抄上面,在需要的 case 中添加对应存储介质的实现即可。
DSTATUS disk_status (BYTE pdrv);
DSTATUS disk_initialize (BYTE pdrv);
DRESULT disk_read (BYTE pdrv, BYTE *buff, LBA_t sector,	UINT count);
DRESULT disk_write (BYTE pdrv, BYTE *buff, LBA_t sector, UINT count);
DRESULT disk_ioctl (BYTE pdrv, BYTE cmd, void *buff);
DWORD get_fattime(void);
第五步:挂载
有几个存储设备,就挂载几个。其余操作和原来的一样。
FATFS fs0, fs1;
f_res = f_mount(&fs0, "0:", 1);
if()	// 判断是否成功
{
}
f_res = f_mount(&fs1, "1:", 1);
if()	// 判断是否成功
{
}