1. LVGL 裸机移植
LVGL 可以在不同的显示屏上移植,移植区别不大,这里无需准备任何例程从头理解移植过程。
如果用的是其他的显示屏,只要有能在裸机下显示的例程,即有显示的驱动即可。
1.1 源码准备 首先下载 lvgl 的源码,注意这里选择 8.2版本。
官网在 Github,访问太慢了,就在 Gitee 上随便搜了一下,都一样。
Gitee 地址:https://gitee.com/my_lvgl/lvgl/tree/release%2Fv8.2/
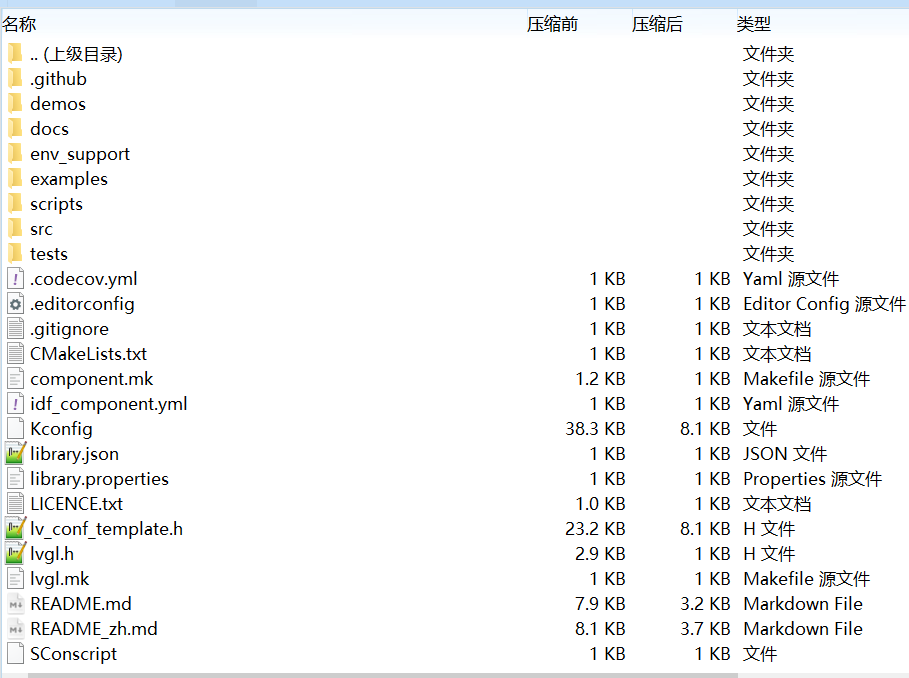
下载完成之后文件比较多
这里对其进行简化,解压之后,删掉无用的文件,留下以下文件。
然后进一步简化,把 examples 文件夹中无用的代码删掉。仅留下其中的 porting 文件夹。
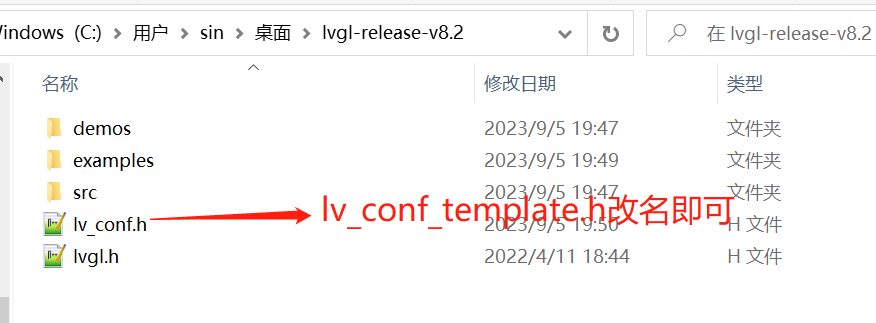
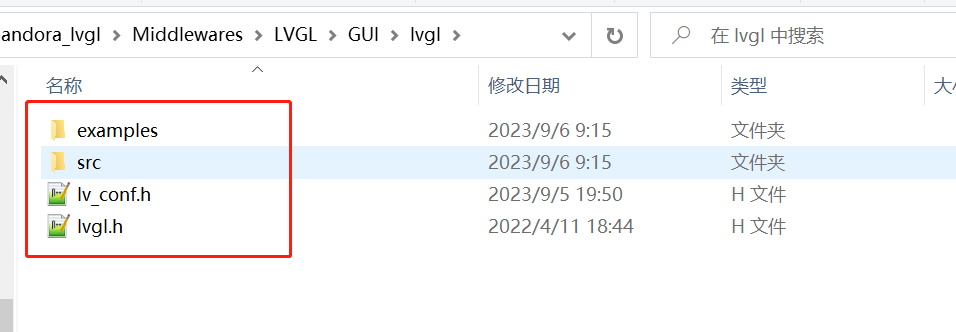
最后简化后的代码是这样的:
demos 文件夹(没动过里面内容)
examples 文件夹
src 文件夹(没动过里面内容)
lv_conf.h 文件(lv_conf_template.h 改名来的)
lvgl.h 文件
1.2 新建工程 使用 cubemx 新建一个空白的工程,需要的配置内容如下:
调试接口、时钟。
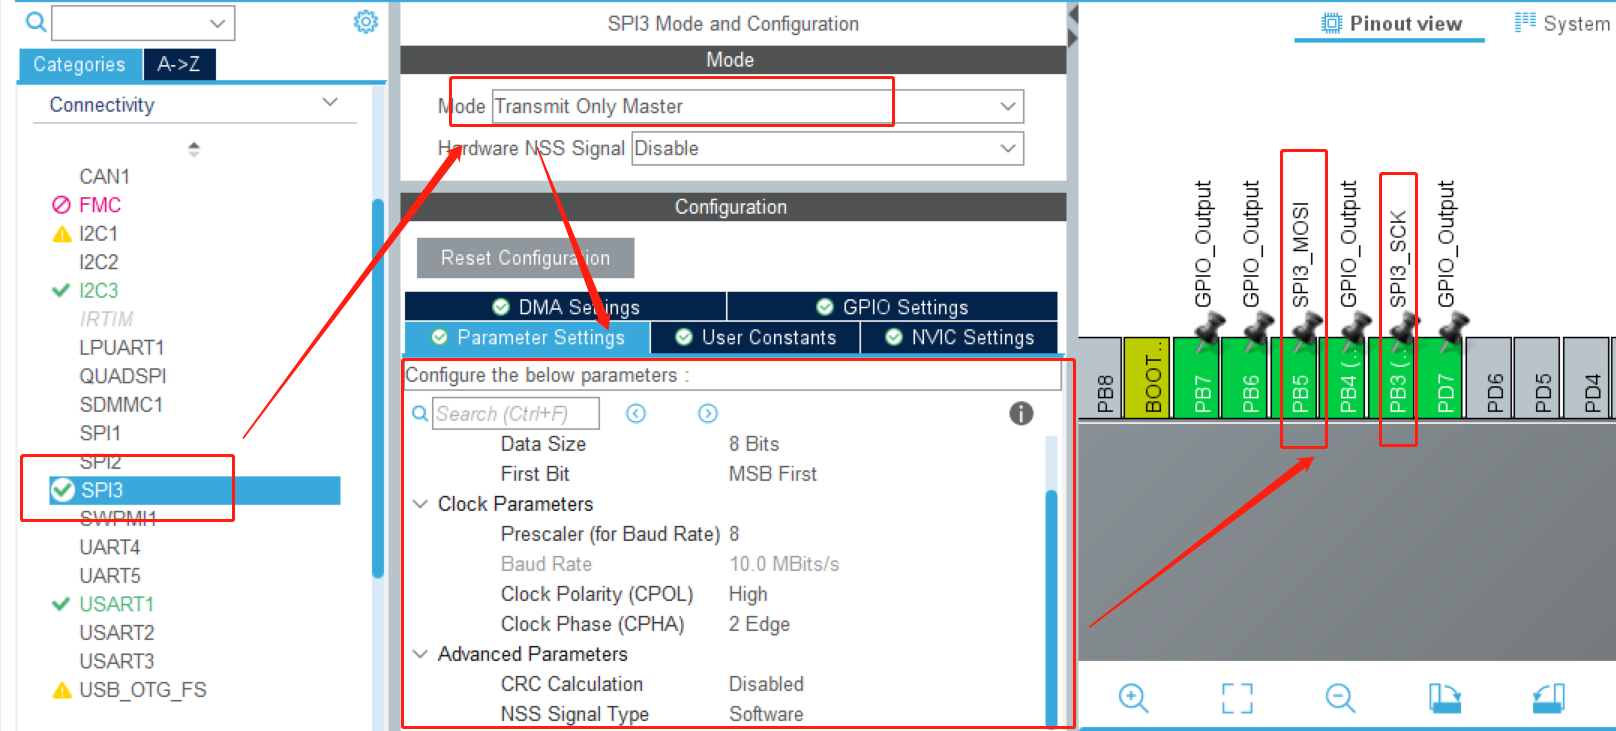
配置 spi 接口,用于驱动屏幕(如果是其他接口的屏,按照自己的配置即可)。
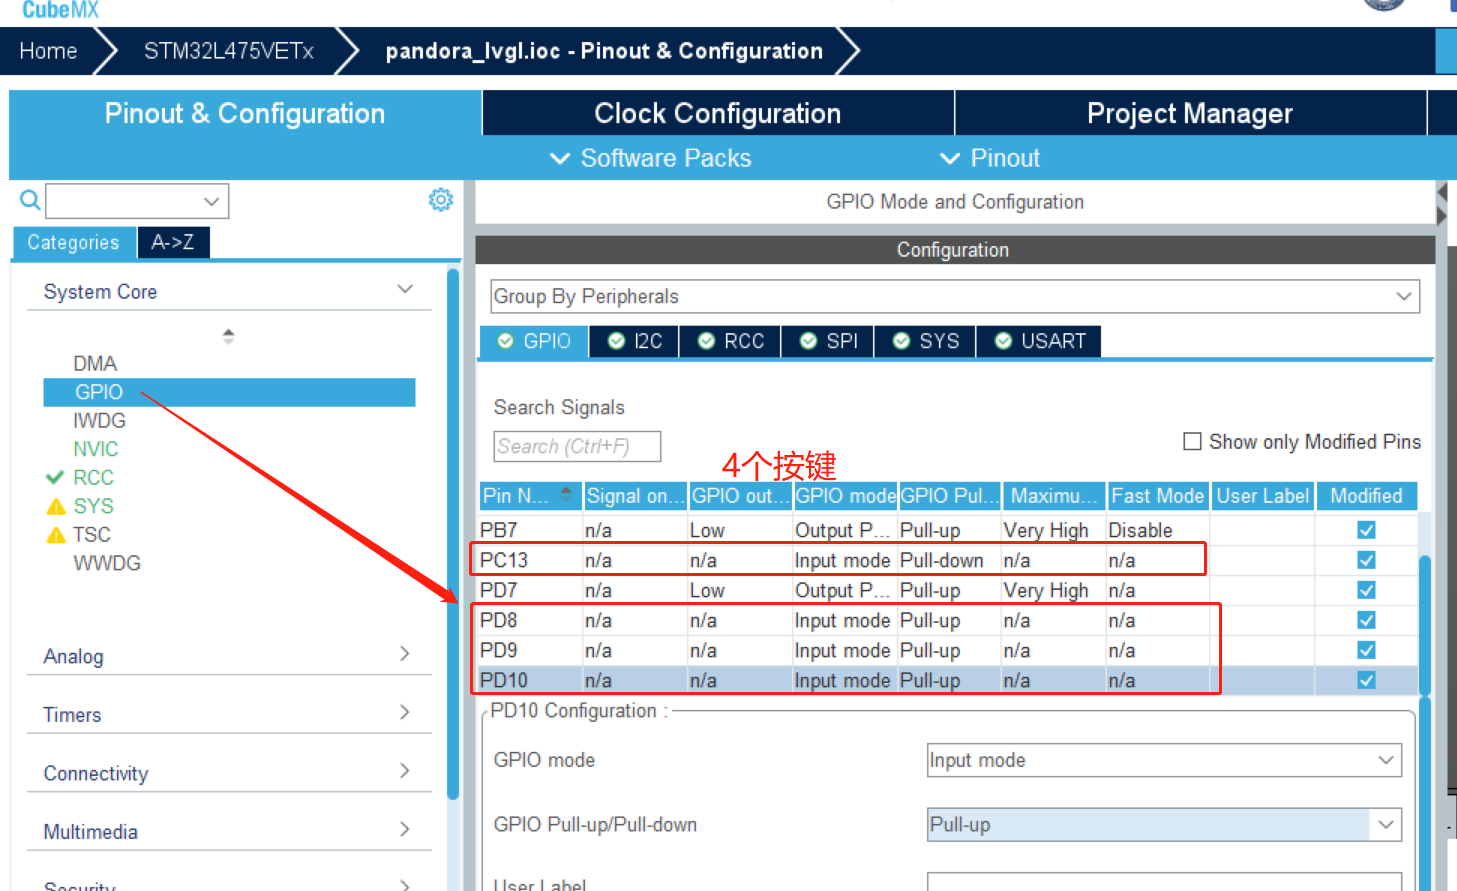
配置按键,用于作为输入。
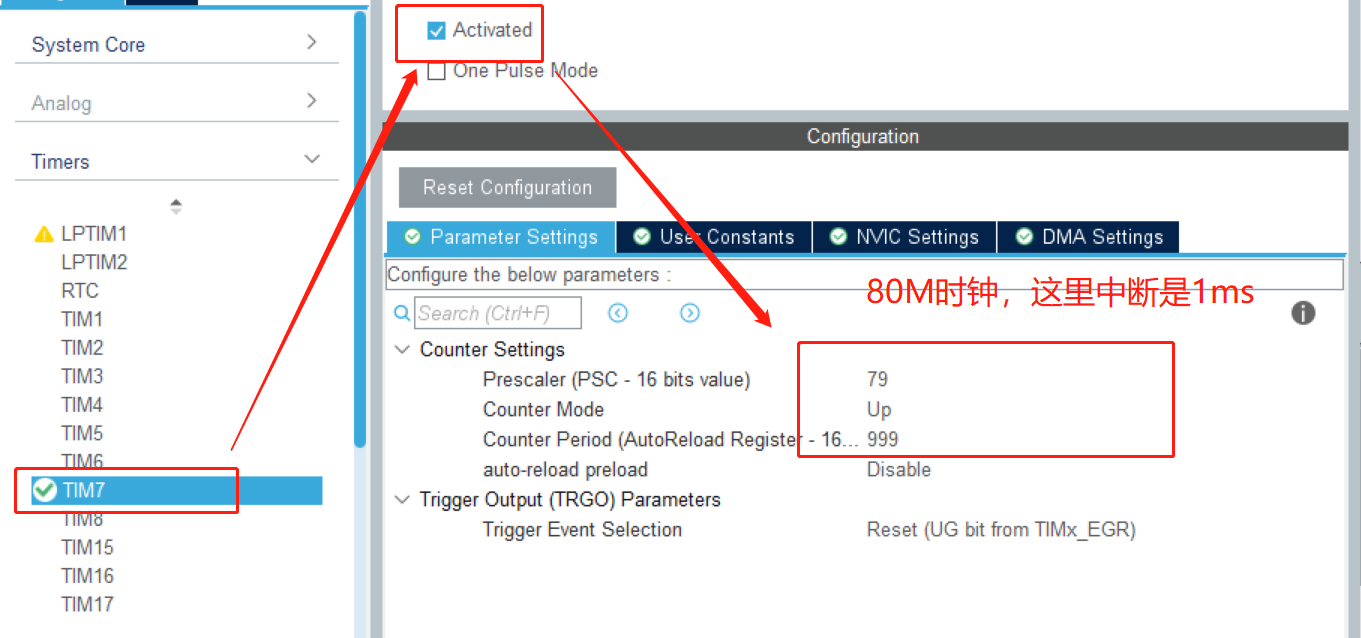
一个定时器,用于给 lvgl 提供时基。
spi 配置如下(根据自己的开发板修改引脚):
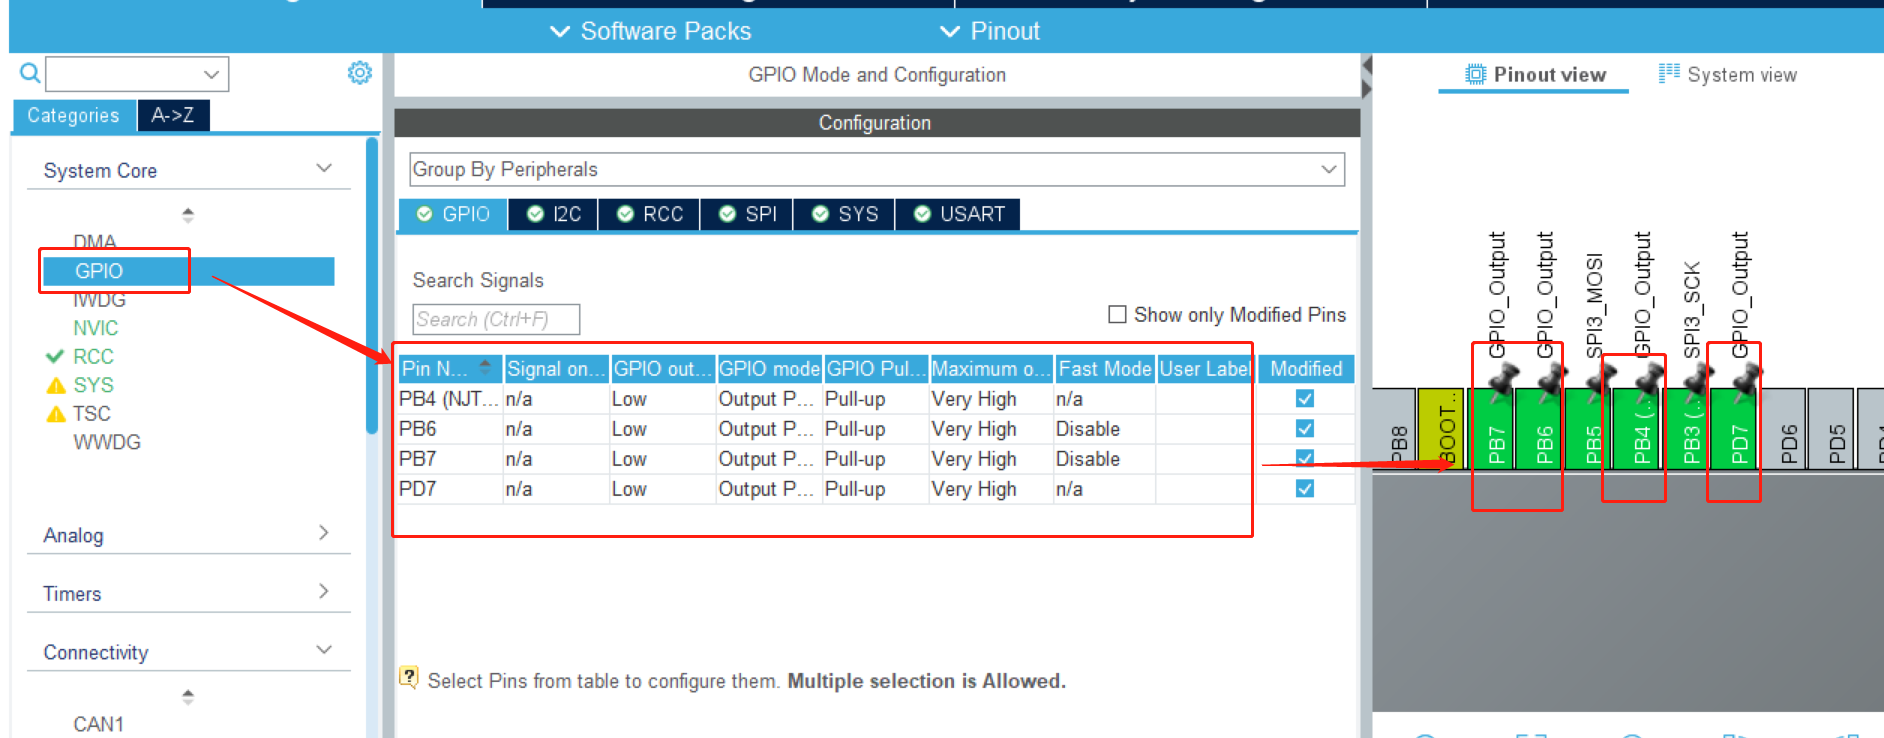
屏幕控制引脚配置如下(根据自己的开发板修改引脚):
按键配置如下,根据自己的原理图配置上拉还是下拉。
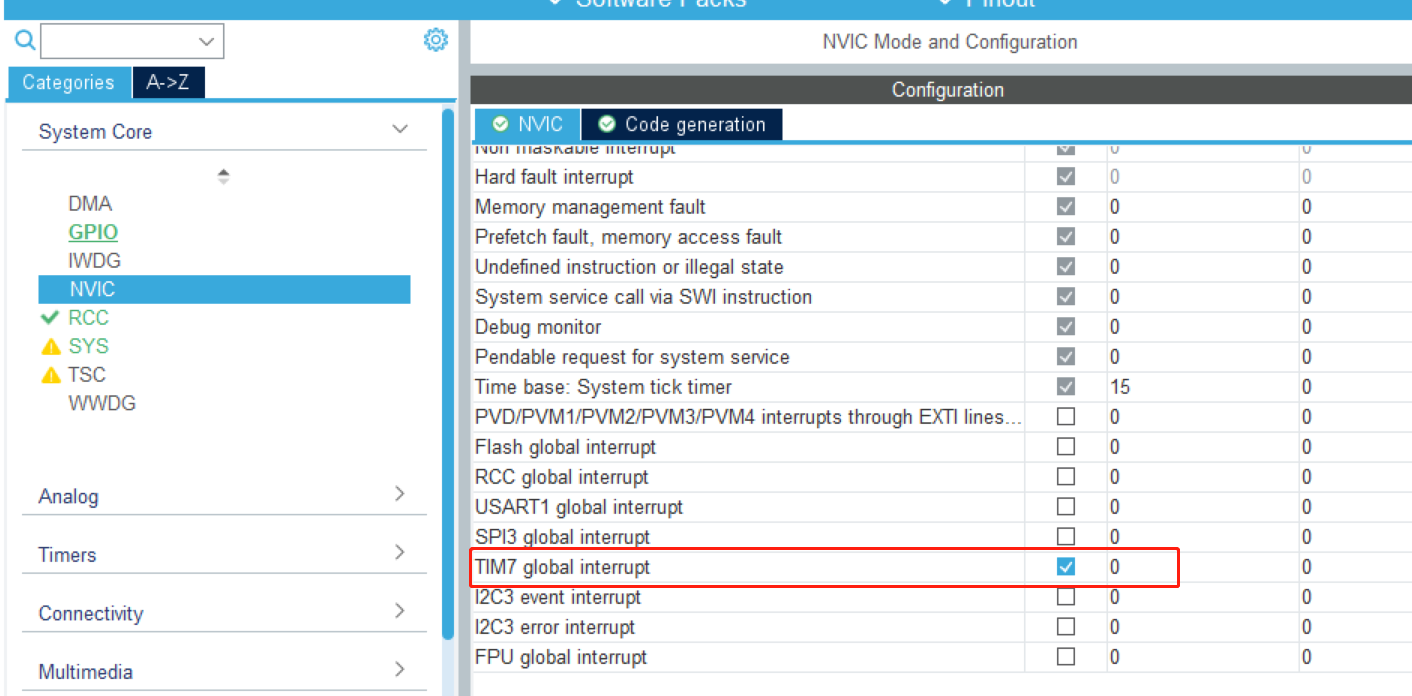
定时器配置如下,记得勾选上中断。(用其他的定时器也行,有中断即可)
中断勾选
配置完成后生成工程即可。
此时工程直接编译不应该有错误,如果有排查之后再进行下一步。
生成工程后,如果自己有裸机显示的程序,可以添加进去试试,即证明软件配置和硬件设备都是好用的。
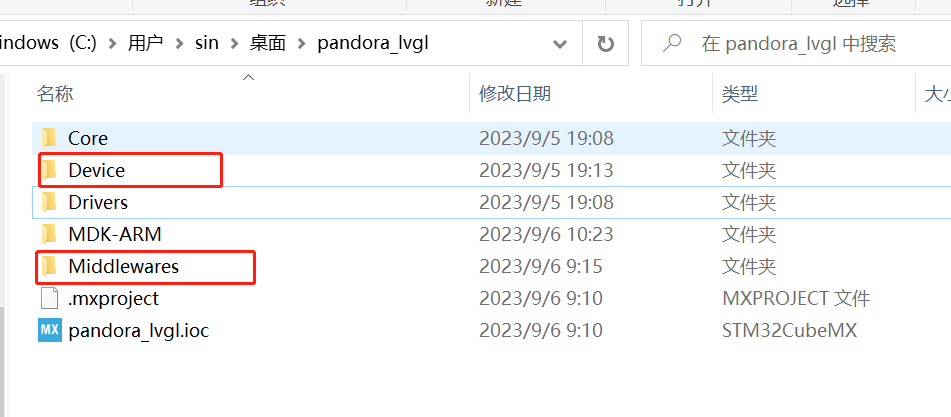
1.3 添加源码 在生成的工程目录下添加如下文件夹
工程目录
Device 文件夹(我添加的)
LCD_SPI_ST7789 文件夹(我添加的)
lcd_lvgl.c 文件(内容需要自己写,后面提供)
lcd_lvgl.h 文件(内容需要自己写,后面提供)
Middleware 文件夹(我添加的)
LVGL 文件夹(我添加的)
GUI 文件夹(我添加的)
GUI_APP 文件夹(我添加的)
如下图
然后把我们刚刚裁剪过的 LVGL 源码放进来。其中
工程名\Middlewares\LVGL\GUI\lvgl目录下放
examples 文件夹
src 文件夹
lv_conf.h 文件
lvgl.h 文件
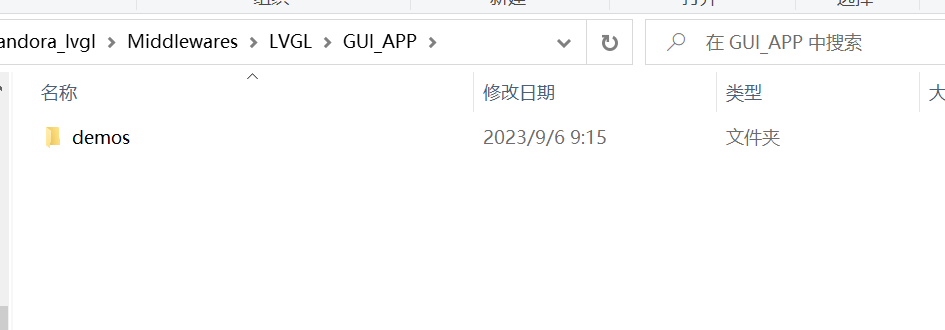
工程名\Middlewares\LVGL\GUI_APP目录下放
给 LCD_SPI_ST7789 提供的驱动文件如下:
lcd_lvgl.c 文件 (这是从正点原子这个屏幕的驱动文件里摘抄修改出来的,把 lvgl 用不到的部分删掉了)
1 2 3 4 5 6 7 8 9 10 11 12 13 14 15 16 17 18 19 20 21 22 23 24 25 26 27 28 29 30 31 32 33 34 35 36 37 38 39 40 41 42 43 44 45 46 47 48 49 50 51 52 53 54 55 56 57 58 59 60 61 62 63 64 65 66 67 68 69 70 71 72 73 74 75 76 77 78 79 80 81 82 83 84 85 86 87 88 89 90 91 92 93 94 95 96 97 98 99 100 101 102 103 104 105 106 107 108 109 110 111 112 113 114 115 116 117 118 119 120 121 122 123 124 125 126 127 128 129 130 131 132 133 134 135 136 137 138 139 140 141 142 143 144 145 146 147 148 149 150 151 152 153 154 155 156 157 158 159 160 161 162 163 164 165 166 167 168 169 170 171 172 173 174 175 176 177 178 179 180 181 182 183 184 185 186 187 188 189 190 191 192 u#include "lcd_lvgl.h" static void LCD_GPIO_Init (void ) { LCD_PWR(0 ); LCD_RST(0 ); LCD_CS(1 ); HAL_Delay(100 ); LCD_RST(1 ); } void LCD_DisplayOn (void ) { LCD_PWR(1 ); } void LCD_DisplayOff (void ) { LCD_PWR(0 ); } static void LCD_SPI_WriteByte (uint8_t *TxData, uint16_t size) { LCD_CS(0 ); HAL_SPI_Transmit(&LCD_SPI_Handler, TxData, size, 1000 ); LCD_CS(1 ); } static void LCD_SPI_Send (uint8_t *data, uint32_t size) { uint32_t i; uint32_t delta; delta = size/0xFFFF ; for (i = 0 ; i <= delta; i++) { if (i == delta) LCD_SPI_WriteByte(&data[i*0xFFFF ], size%0xFFFF ); else LCD_SPI_WriteByte(&data[i*0xFFFF ], 0xFFFF ); } } static void LCD_Write_Cmd (uint8_t cmd) { LCD_WR(0 ); LCD_SPI_Send(&cmd, 1 ); } static void LCD_Write_Data (uint8_t dat) { LCD_WR(1 ); LCD_SPI_Send(&dat, 1 ); } static void LCD_Address_Set (uint16_t x1, uint16_t y1, uint16_t x2, uint16_t y2) { LCD_Write_Cmd(0x2a ); LCD_Write_Data(x1 >> 8 ); LCD_Write_Data(x1); LCD_Write_Data(x2 >> 8 ); LCD_Write_Data(x2); LCD_Write_Cmd(0x2b ); LCD_Write_Data(y1 >> 8 ); LCD_Write_Data(y1); LCD_Write_Data(y2 >> 8 ); LCD_Write_Data(y2); LCD_Write_Cmd(0x2C ); } void LCD_Init (void ) { LCD_GPIO_Init(); HAL_Delay(120 ); LCD_Write_Cmd(0x11 ); HAL_Delay(120 ); LCD_Write_Cmd(0x36 ); LCD_Write_Data(0x00 ); LCD_Write_Cmd(0x3A ); LCD_Write_Data(0x65 ); LCD_Write_Cmd(0xB2 ); LCD_Write_Data(0x0C ); LCD_Write_Data(0x0C ); LCD_Write_Data(0x00 ); LCD_Write_Data(0x33 ); LCD_Write_Data(0x33 ); LCD_Write_Cmd(0xB7 ); LCD_Write_Data(0x72 ); LCD_Write_Cmd(0xBB ); LCD_Write_Data(0x3D ); LCD_Write_Cmd(0xC0 ); LCD_Write_Data(0x2C ); LCD_Write_Cmd(0xC2 ); LCD_Write_Data(0x01 ); LCD_Write_Cmd(0xC3 ); LCD_Write_Data(0x19 ); LCD_Write_Cmd(0xC4 ); LCD_Write_Data(0x20 ); LCD_Write_Cmd(0xC6 ); LCD_Write_Data(0x0F ); LCD_Write_Cmd(0xD0 ); LCD_Write_Data(0xA4 ); LCD_Write_Data(0xA1 ); LCD_Write_Cmd(0xE0 ); LCD_Write_Data(0xD0 ); LCD_Write_Data(0x04 ); LCD_Write_Data(0x0D ); LCD_Write_Data(0x11 ); LCD_Write_Data(0x13 ); LCD_Write_Data(0x2B ); LCD_Write_Data(0x3F ); LCD_Write_Data(0x54 ); LCD_Write_Data(0x4C ); LCD_Write_Data(0x18 ); LCD_Write_Data(0x0D ); LCD_Write_Data(0x0B ); LCD_Write_Data(0x1F ); LCD_Write_Data(0x23 ); LCD_Write_Cmd(0xE1 ); LCD_Write_Data(0xD0 ); LCD_Write_Data(0x04 ); LCD_Write_Data(0x0C ); LCD_Write_Data(0x11 ); LCD_Write_Data(0x13 ); LCD_Write_Data(0x2C ); LCD_Write_Data(0x3F ); LCD_Write_Data(0x44 ); LCD_Write_Data(0x51 ); LCD_Write_Data(0x2F ); LCD_Write_Data(0x1F ); LCD_Write_Data(0x1F ); LCD_Write_Data(0x20 ); LCD_Write_Data(0x23 ); LCD_Write_Cmd(0x21 ); LCD_Write_Cmd(0x29 ); LCD_PWR(1 ); } void lcd_fill_array (uint16_t x_start, uint16_t y_start, uint16_t x_end, uint16_t y_end, void *pcolor) { uint32_t size = 0 ; size = (x_end - x_start + 1 ) * (y_end - y_start + 1 ) * 2 ; LCD_Address_Set(x_start, y_start, x_end, y_end); LCD_WR(1 ); LCD_SPI_Send(pcolor, size); }
lcd_lvgl.h 文件
1 2 3 4 5 6 7 8 9 10 11 12 13 14 15 16 17 18 19 20 21 22 23 24 25 26 27 28 29 30 31 32 33 34 35 36 37 38 39 40 41 42 43 44 45 46 47 48 49 50 51 52 53 #ifndef __LCD_LVGL_H #define __LCD_LVGL_H #include "stdint.h" #include "spi.h" #include "gpio.h" #define LCD_Width 240 #define LCD_Height 240 #define LCD_SPI_Handler hspi3 #define LCD_PWR_PIN GPIO_PIN_7 #define LCD_PWR_GPIO_PORT GPIOB #define LCD_RST_PIN GPIO_PIN_6 #define LCD_RST_GPIO_PORT GPIOB #define LCD_WR_PIN GPIO_PIN_4 #define LCD_WR_GPIO_PORT GPIOB #define LCD_CS_PIN GPIO_PIN_7 #define LCD_CS_GPIO_PORT GPIOD #define LCD_PWR(n) (n?\ HAL_GPIO_WritePin(LCD_PWR_GPIO_PORT, LCD_PWR_PIN, GPIO_PIN_SET):\ HAL_GPIO_WritePin(LCD_PWR_GPIO_PORT, LCD_PWR_PIN, GPIO_PIN_RESET)) #define LCD_WR(n) (n?\ HAL_GPIO_WritePin(LCD_WR_GPIO_PORT, LCD_WR_PIN, GPIO_PIN_SET):\ HAL_GPIO_WritePin(LCD_WR_GPIO_PORT, LCD_WR_PIN, GPIO_PIN_RESET)) #define LCD_RST(n) (n?\ HAL_GPIO_WritePin(LCD_RST_GPIO_PORT, LCD_RST_PIN, GPIO_PIN_SET):\ HAL_GPIO_WritePin(LCD_RST_GPIO_PORT, LCD_RST_PIN, GPIO_PIN_RESET)) #define LCD_CS(n) (n?\ HAL_GPIO_WritePin(LCD_CS_GPIO_PORT, LCD_CS_PIN, GPIO_PIN_SET):\ HAL_GPIO_WritePin(LCD_CS_GPIO_PORT, LCD_CS_PIN, GPIO_PIN_RESET)) void LCD_Init (void ) ;void LCD_DisplayOn (void ) ;void LCD_DisplayOff (void ) ;void lcd_fill_array (uint16_t x_start, uint16_t y_start, uint16_t x_end, uint16_t y_end, void *pcolor) ;#endif
1.4 软件配置 在 KEIL 中把代码添加进去。
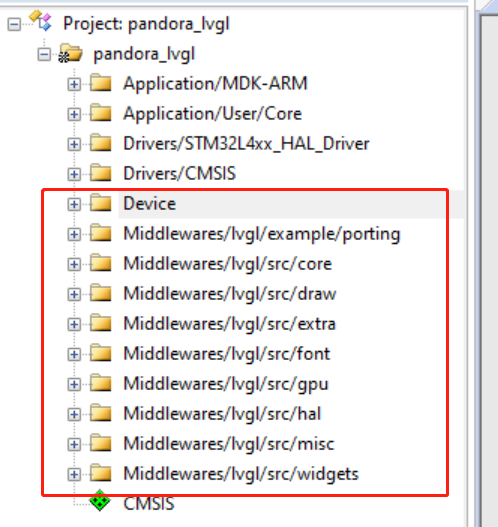
在 keil 中添加如下几个文件夹。
其中,
Device:添加 LCD 设备驱动代码,即 lcd_lvgl.c 文件。
Middlewares/lvgl/example/porting:添加 example/porting 文件夹下的lv_port_disp_template.c和lv_port_indev_template.c文件(这两个分别是显示接口、触摸等控制接口,还有一个文件系统的接口暂时没用先不添加)。
Middlewares/lvgl/src/core:添加 src/core 文件夹下的全部 c 文件。
Middlewares/lvgl/src/draw:添加 src/draw 文件夹下除了nxp_pxp、nxp_vglite、sdl和stm32_dma2d文件夹之外的全部 c 文件。
Middlewares/lvgl/src/extra:添加 src/extra 文件夹下的全部 c 文件。
Middlewares/lvgl/src/font:添加 src/font 文件夹下的全部 c 文件。
Middlewares/lvgl/src/gpu:添加 src/draw/sdl和src/draw/stm32_dma2d文件夹下的全部 c 文件。
Middlewares/lvgl/src/hal:添加 src/hal 文件夹下的全部 c 文件。
Middlewares/lvgl/src/misc:添加 src/misc 文件夹下的全部 c 文件。
Middlewares/lvgl/src/widgets:添加 src/widgets 文件夹下的全部 c 文件。
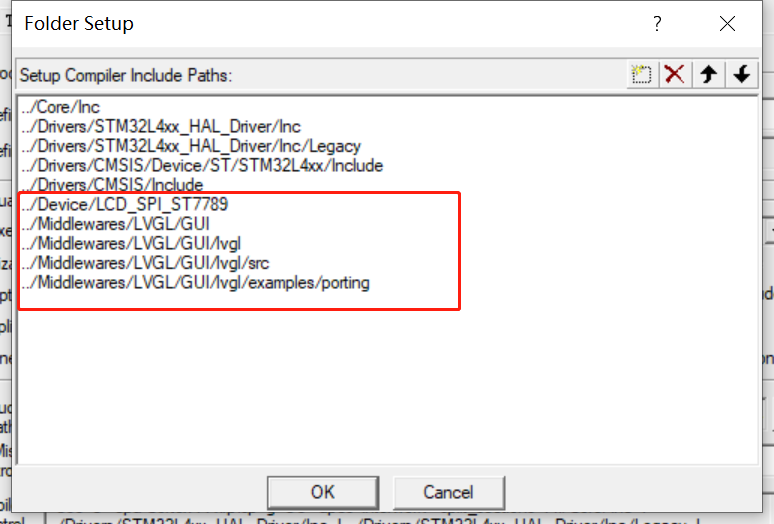
然后添加头文件路径。
所有的都添加完成之后,直接编译,会有几十个警告,但是不会有错误出现。如果有错误,先排查前面哪一步有问题然后再继续下一步。
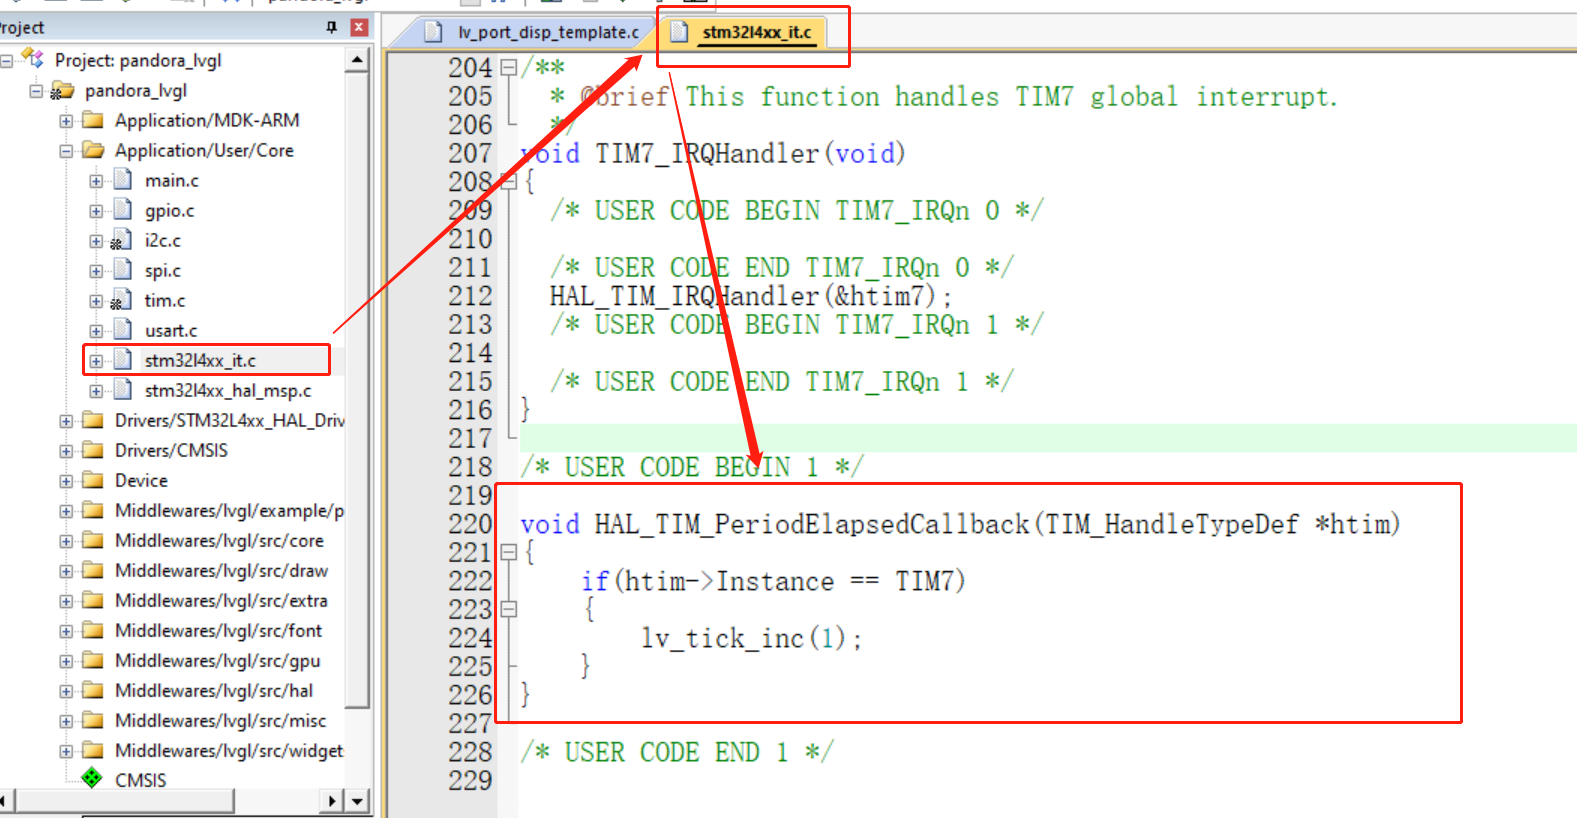
1.5 软件适配 1.5.1 添加时基 在中断函数的文件中可以看到定时器的中断处理函数,在这里添加中断回调函数,处理 lvgl 的时基即可。
记得要在main中开启定时器中断,HAL_TIM_Base_Start_IT(&htim7);
1 2 3 4 5 6 7 8 9 #include "lvgl.h" void HAL_TIM_PeriodElapsedCallback (TIM_HandleTypeDef *htim) { if (htim->Instance == TIM7) { lv_tick_inc(1 ); } }
1.5.2 显示部分
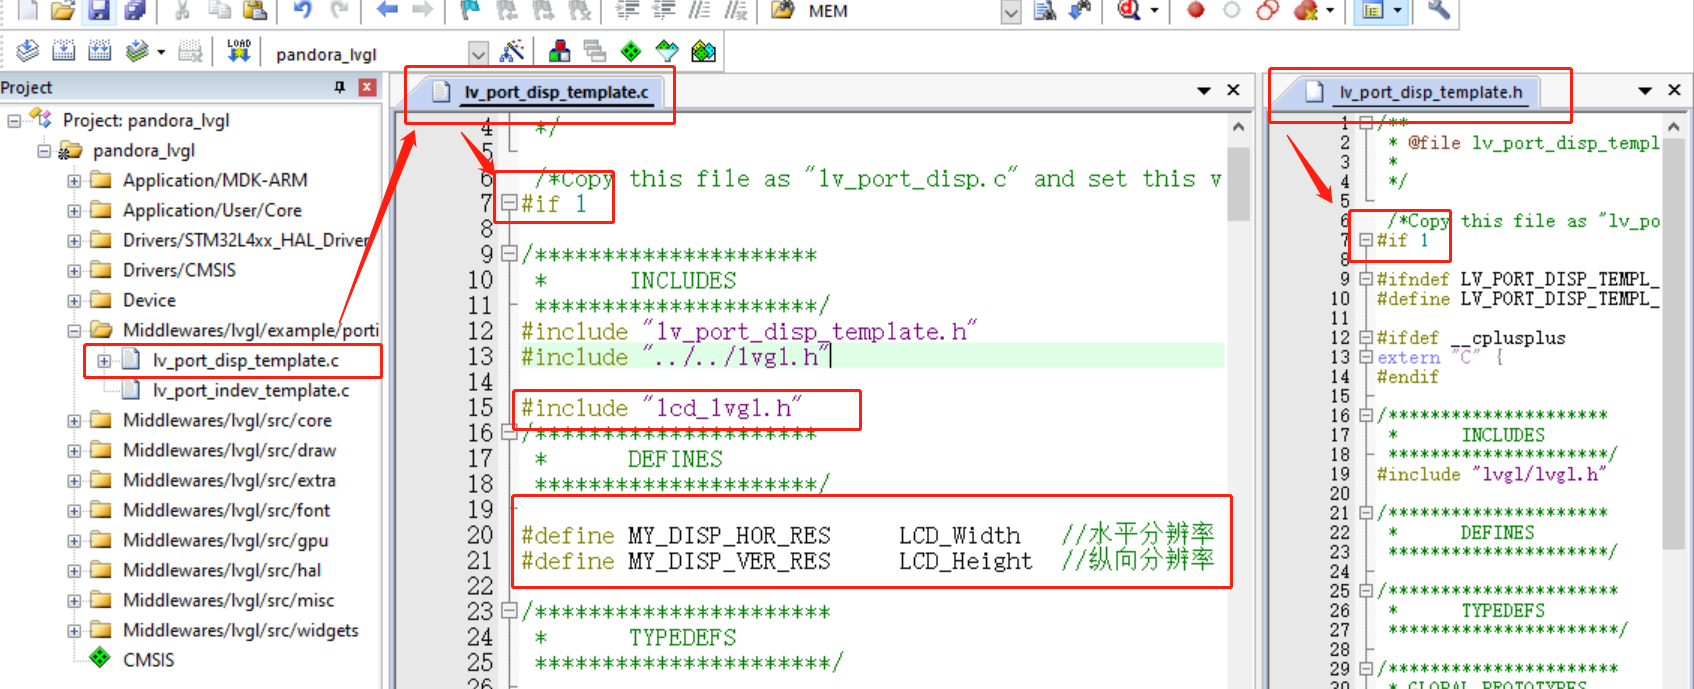
打开显示适配文件的宏定义,把 0 改为 1。
添加 lcd 显示驱动的头文件,因为下面需要调用里面的函数。
添加屏幕尺寸大小的宏定义。
下图中展示了上面三个步骤。
1 2 3 4 5 #include "lcd_lvgl.h" #define MY_DISP_HOR_RES LCD_Width #define MY_DISP_VER_RES LCD_Height
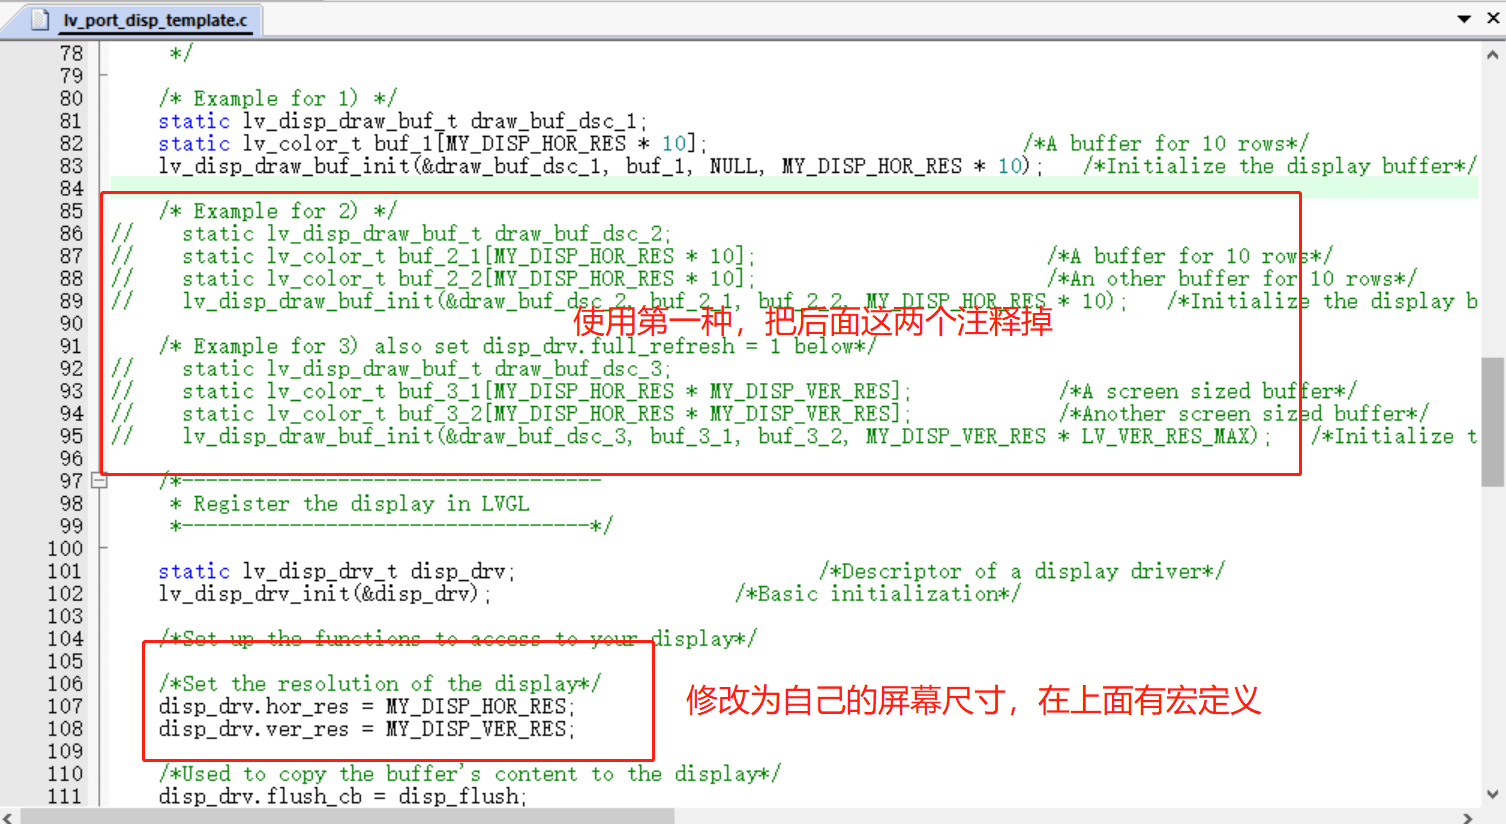
lv_port_disp_init函数修改,选择一种缓冲区方式,注释掉另外两种;修改自己的屏幕尺寸。这里使用这种,省内存。
如果想使用第二种,记得把下面缓冲区的名字换一下。
第三种同理,但是多了下面还要打开一个full_flash的定义,并添加一个LV_VER_RES_MAX的宏定义,就是数当然也是越大越好,能直接为LV_DISP_HOR_RES应该是最好了。
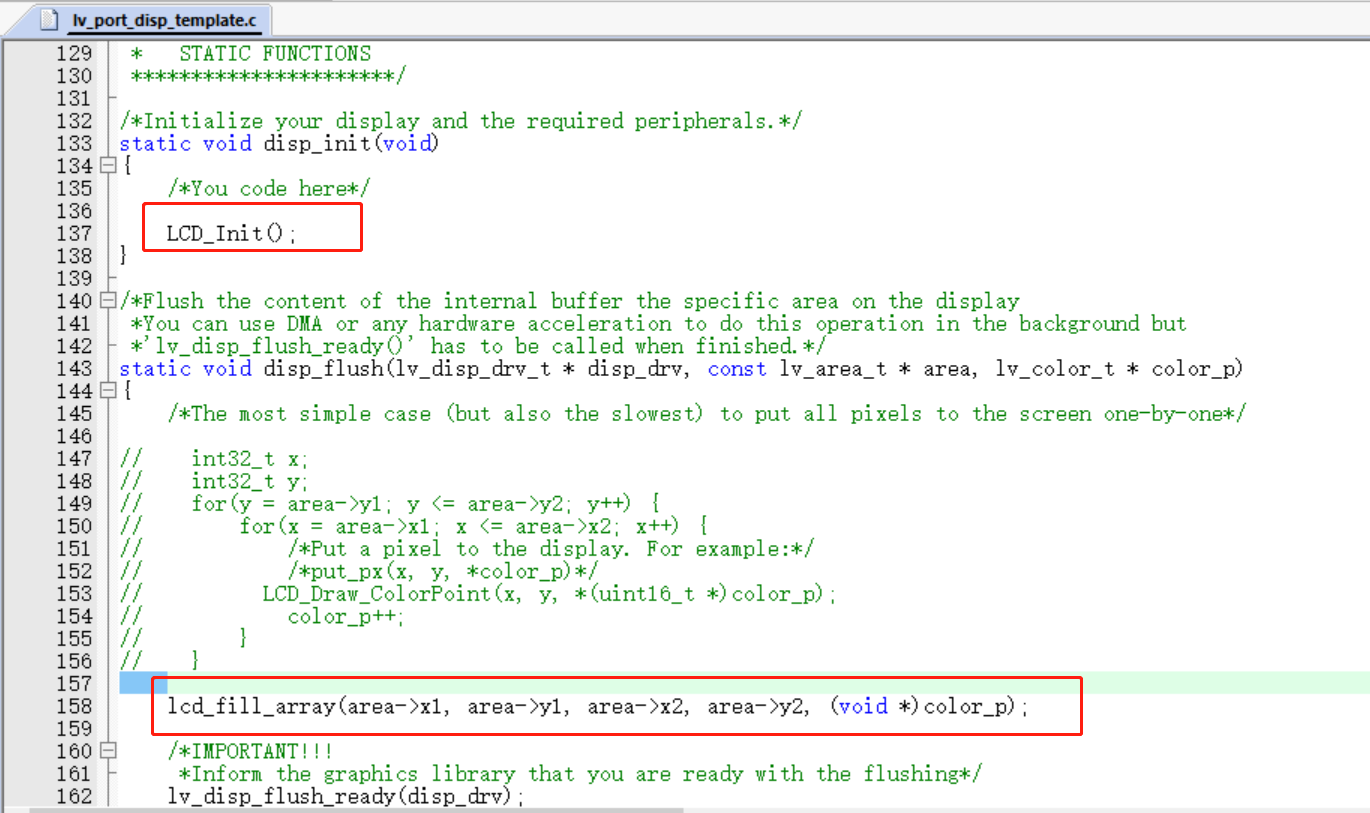
显示初始化函数:添加 LCD 初始化函数。显示刷新函数:添加自己的显示接口。
刷新函数中注释掉的部分:LCD_Draw_ColorPoint函数,内容如下。但是我的驱动文件里没有添加。因为速度特别特别慢。
如果想用的话,把下面两个函数放到lcd_lvgl.c中,并在头文件中声明下面的画点函数即可。
1
2
3
4
5
6
7
8
9
10
11
12
13
14
15
16
static void LCD_Write_HalfWord (const uint16_t da) { uint8_t data[2 ] = {0 }; data[0 ] = da >> 8 ; data[1 ] = da; LCD_WR(1 ); LCD_SPI_Send(data, 2 ); } void LCD_Draw_ColorPoint (uint16_t x, uint16_t y, uint16_t color) { LCD_Address_Set(x, y, x, y); LCD_Write_HalfWord(color); }
1.5.3 输入部分
跳过这部分不影响输出测试,只是没有交互。
输入支持多种,触摸、鼠标、键盘、编码器、按键。
因为我这里开发板上只有按键,因此这里可以使用键盘、按键,这两种方式稍微有点区别。这里以键盘为例。
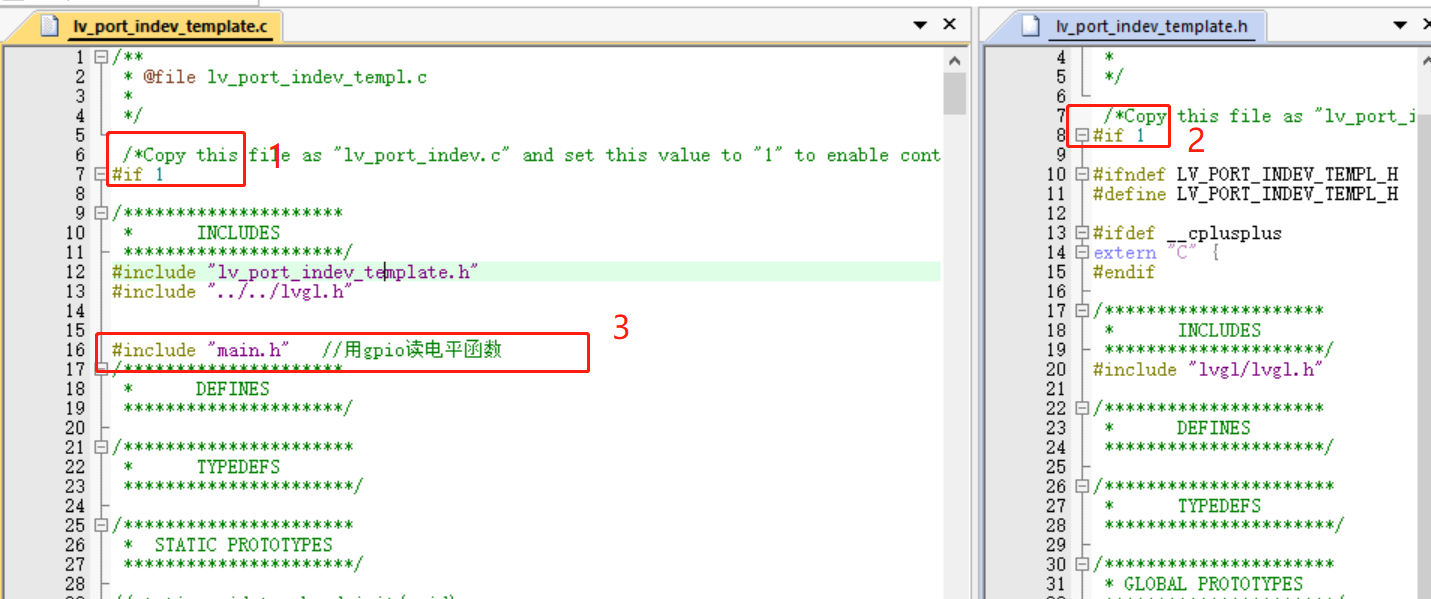
打开输入适配文件的宏定义,把 0 改为 1。
添加获取输入的头文件,因为下面需要调用里面的函数。
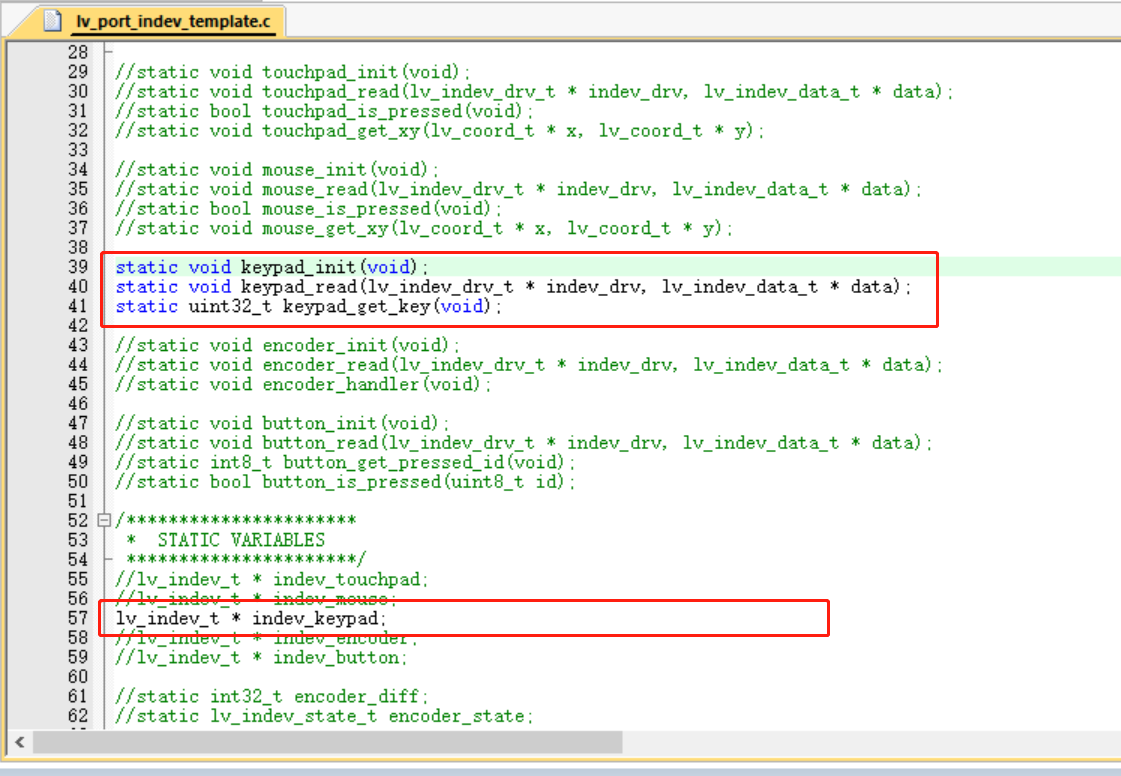
打开键盘输入需要的函数定义声明。
适配后面的输入函数。留下以下的内容,其他部分注释掉即可。如果使用其他输入,道理是一样的,打开相应部分的注释即可。
1
2
3
4
5
6
7
8
9
10
11
12
13
14
15
16
17
18
19
20
21
22
23
24
25
26
27
28
29
30
31
32
33
34
35
36
37
38
39
40
41
42
43
44
45
46
47
48
49
50
51
52
53
54
55
56
57
58
59
60
61
62
63
64
65
66
67
68
69
70
71
72
73
74
75
76
77
78
79
80
81
82
83
84
85
86
void lv_port_indev_init (void ) { static lv_indev_drv_t indev_drv; keypad_init(); lv_indev_drv_init(&indev_drv); indev_drv.type = LV_INDEV_TYPE_KEYPAD; indev_drv.read_cb = keypad_read; indev_keypad = lv_indev_drv_register(&indev_drv); } static void keypad_init (void ) { } static void keypad_read (lv_indev_drv_t * indev_drv, lv_indev_data_t * data) { static uint32_t last_key = 0 ; uint32_t act_key = keypad_get_key(); if (act_key != 0 ) { data->state = LV_INDEV_STATE_PR; switch (act_key) { case 2 : act_key = LV_KEY_ENTER; break ; case 3 : act_key = LV_KEY_PREV; break ; case 4 : act_key = LV_KEY_NEXT; break ; } last_key = act_key; } else { data->state = LV_INDEV_STATE_REL; } data->key = last_key; } static uint32_t keypad_get_key (void ) { if (HAL_GPIO_ReadPin(GPIOC, GPIO_PIN_13) == GPIO_PIN_SET) return 1 ; else if (HAL_GPIO_ReadPin(GPIOD, GPIO_PIN_9) == GPIO_PIN_RESET) return 2 ; else if (HAL_GPIO_ReadPin(GPIOD, GPIO_PIN_8) == GPIO_PIN_RESET) return 3 ; else if (HAL_GPIO_ReadPin(GPIOD, GPIO_PIN_10) == GPIO_PIN_RESET) return 4 ; else return 0 ; }
注意,这个配置在下面的demo中,大多都不能用,因为还要绑定组。测试这个按钮的话,直接看第3章,实体按钮控制。
1.6 测试代码 在 main.c 里添加
1 2 3 4 5 6 7 8 9 10 11 12 13 14 15 16 17 18 19 20 21 22 23 24 25 26 27 28 29 30 31 #include "lvgl.h" #include "lv_port_disp_template.h" int main (void ) { HAL_Init(); SystemClock_Config(); MX_GPIO_Init(); MX_SPI3_Init(); MX_USART1_UART_Init(); MX_I2C3_Init(); MX_TIM7_Init(); HAL_TIM_Base_Start_IT(&htim7); lv_init(); lv_port_disp_init(); lv_obj_t * switch_obj = lv_switch_create(lv_scr_act()); lv_obj_set_size(switch_obj, 120 , 60 ); lv_obj_align(switch_obj, LV_ALIGN_CENTER, 0 , 0 ); while (1 ) { HAL_Delay(5 ); lv_timer_handler(); } }
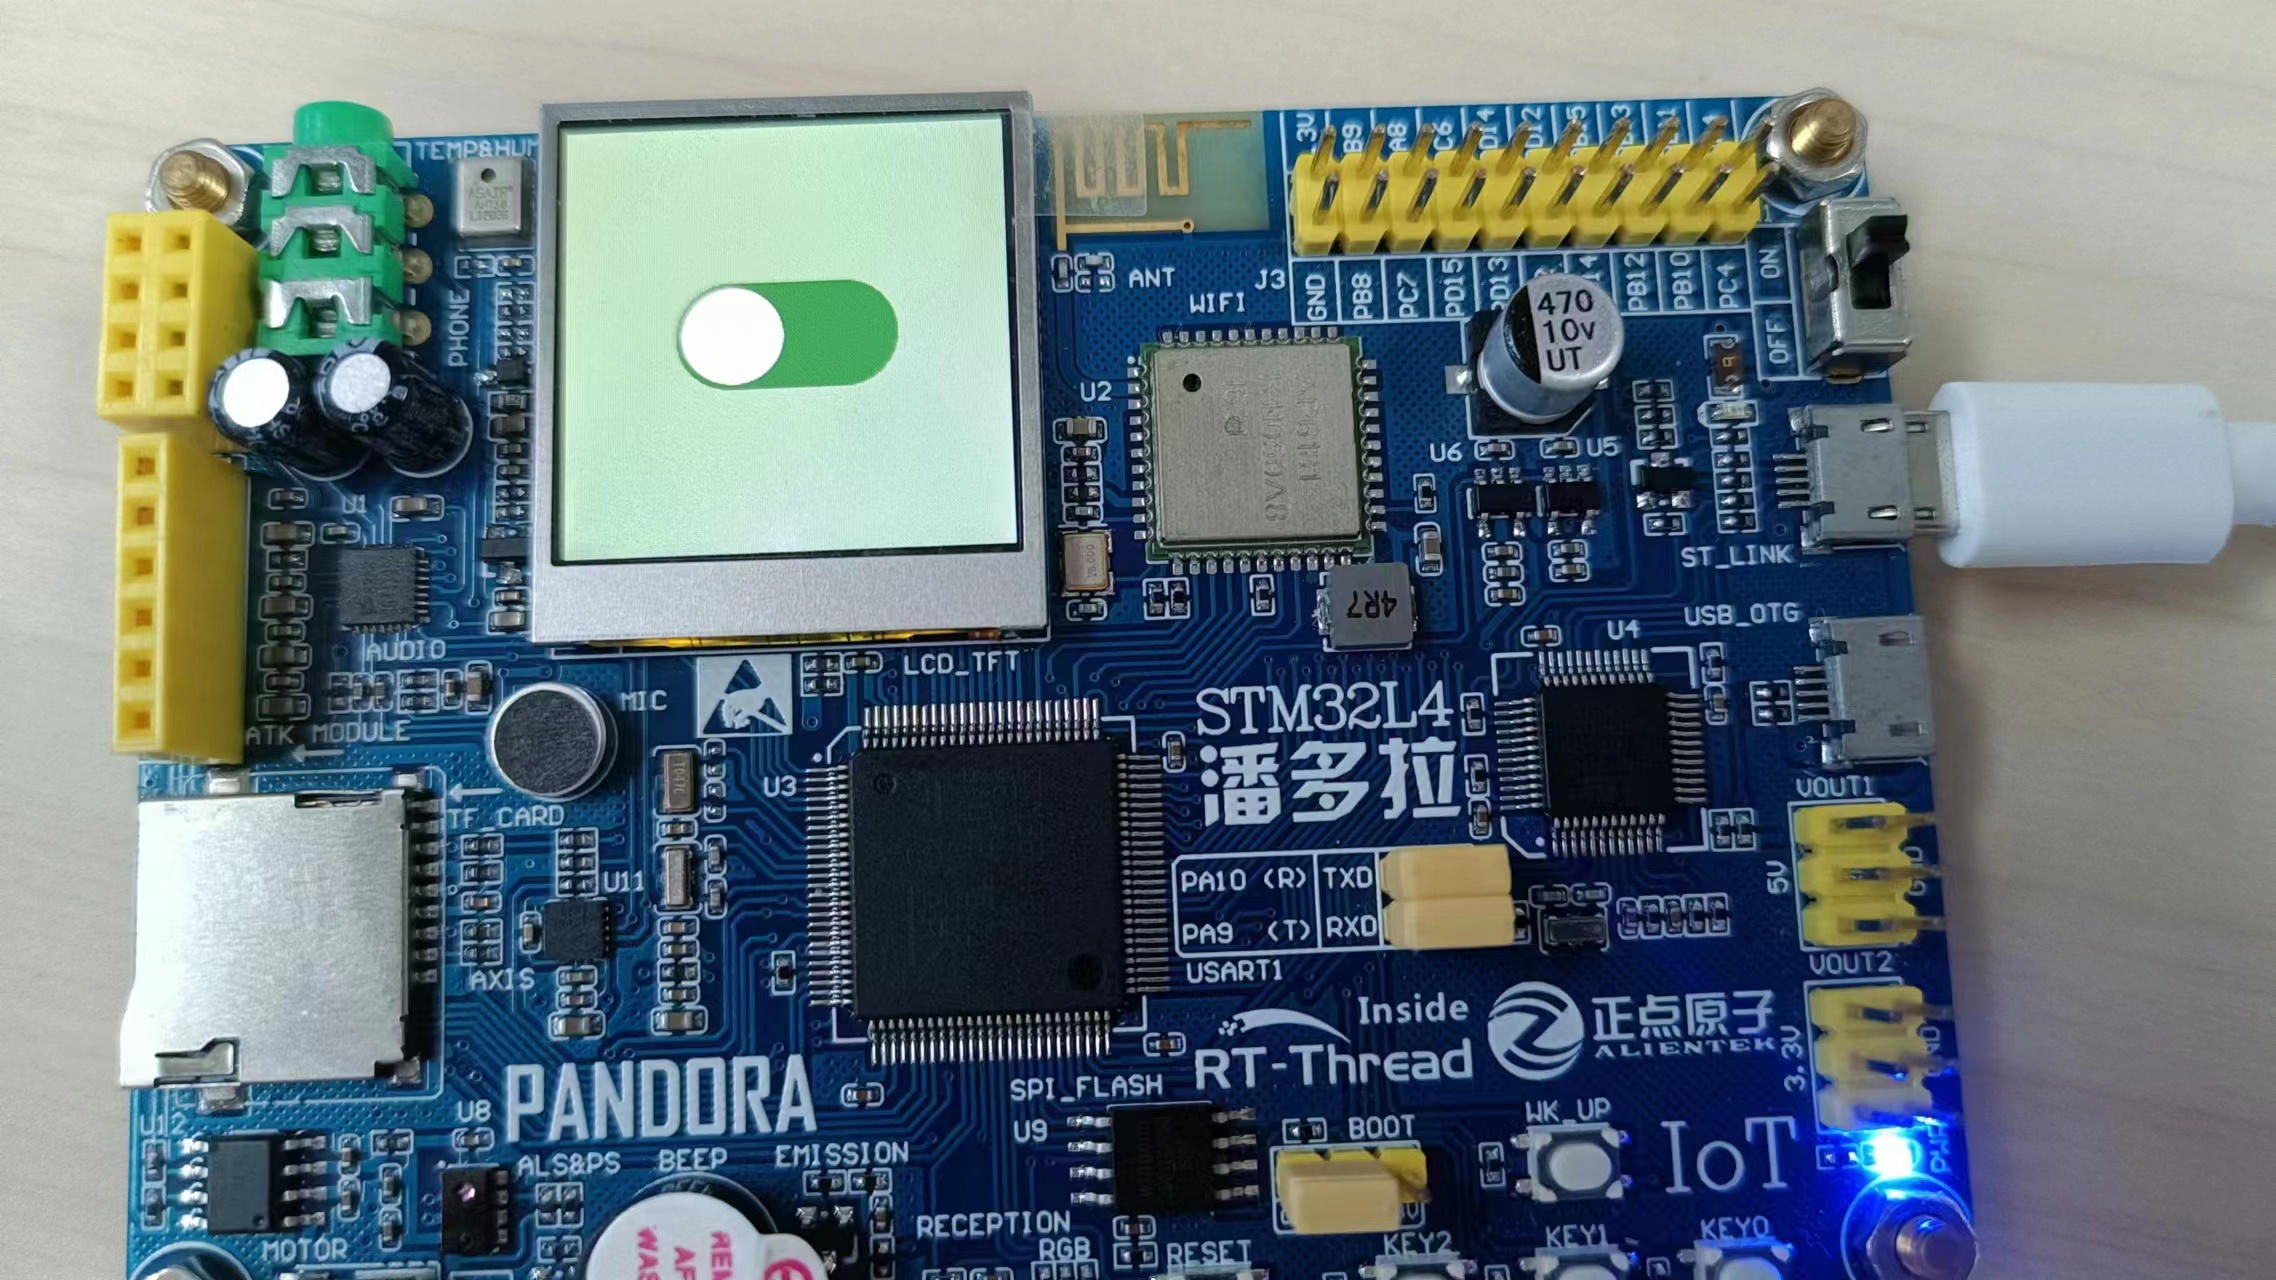
编译后应该是不能有错误,会有警告可以先不管。运行效果如下:
有此图像产生即表示移植正常。
1.7 案例测试 最刚开始的Demo文件夹中有很多已经写好的测试案例。可以试试。
压力测试步骤
将 demos 文件夹复制到 Middlewares/LVGL/GUI_APP 路径下;(前面已完成)
添加头文件路径
..\Middlewares\LVGL\GUI_APP\demos
..\Middlewares\LVGL\GUI_APP\demos\stress
打开 lv_conf.h 文件,找到宏定义 LV_USE_DEMO_STRESS 将其设置为1。
在 keil 中新建 Middlewares/LVGL/GUI_APP 工程组,添加 demos\stress 文件夹下的 lv_demo_stress.c 文件
main.c 文件里包含头文件:#include “lv_demo_stress.h”
初始化官方 demo:lv_demo_stress();
音乐播放器测试步骤 (我这里内存不够,会报上千个错误)
将 demos 文件夹复制到 Middlewares/LVGL/GUI_APP 路径下;(前面已完成)
添加头文件路径
..\Middlewares\LVGL\GUI_APP\demos
..\Middlewares\LVGL\GUI_APP\demos\music
打开 lv_conf.h 文件,找到宏定义 LV_USE_DEMO_MUSIC 将其设置为1。
在 keil 中新建 Middlewares/LVGL/GUI_APP 工程组,添加 demos\music 文件夹下的全部 c 文件。
main.c 文件里包含头文件:#include “lv_demo_music.h”
初始化官方 demo:lv_demo_music();